Blogpost 2: Designing for Empathy

Understanding the empathy gap

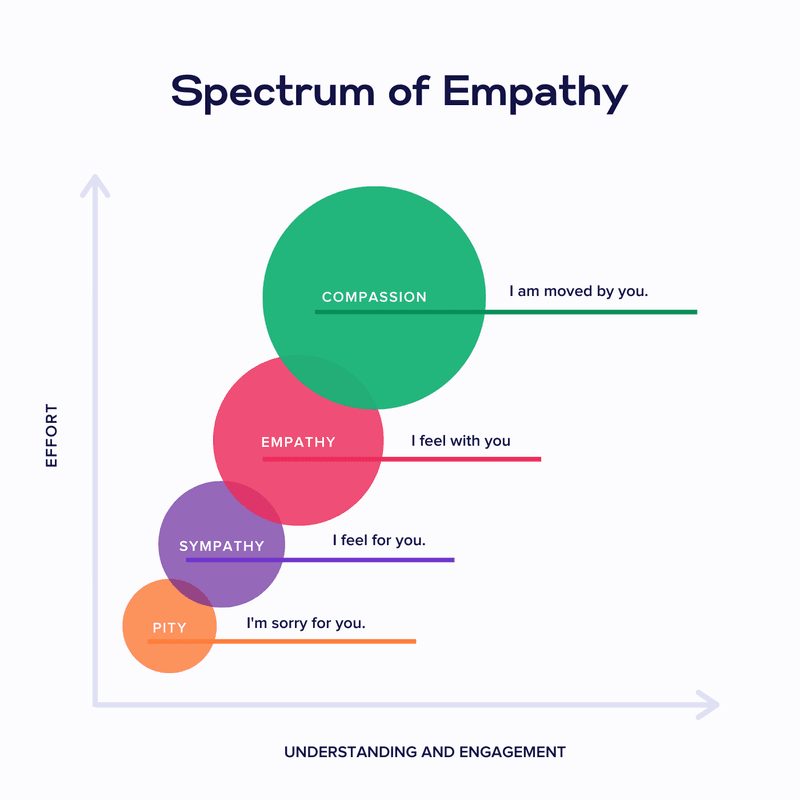
Designers often aim to create inclusive, human-centered products, but there’s a subtle challenge that’s harder to overcome than accessibility or UI polish: the empathy gap. This term refers to the cognitive and emotional distance between people who have direct experience with a problem and those who don’t.

In UX design, the empathy gap becomes especially problematic when building products for people with disabilities, like for example celiac disease. While a user without celiac might casually browse for places to eat, someone with celiac approaches every food decision with caution, emotional tension, and risk assessment. Unfortunately, many restaurant apps and travel platforms fail to reflect this difference in urgency and vulnerability.

Storytelling and personas as empathy tools

Personas are more than just user archetypes. They act as bridges to lived experiences. When backed by emotional storytelling, personas help designers and stakeholders temporarily “step into someone else’s shoes,” fostering a deeper understanding of motivations, fears, and mental models. According to Cooper et al. (2014), personas are “a powerful design tool for communication and empathy-building” when they reflect real emotional contexts and not just demographics or goals.

Storytelling in UX amplifies this effect. Stories engage the emotional centers of our brains, making information more memorable and decisions more thoughtful (Norman, 2004). When personas are introduced within narrative frameworks, such as onboarding sequences that follow their journey, designers can simulate real-life decision-making environments. This helps foster emotional alignment with users, especially those whose needs are often overlooked.

For travelers with celiac disease, this emotional alignment is important. It’s not just about finding gluten-free options – it’s about feeling safe and understood in a world where a simple breadcrumb can cause days of illness.

Sources:

Norman, D. A. (2004). Emotional Design: Why We Love (or Hate) Everyday Things

Cooper, A., Reimann, R., Cronin, D., & Noessel, C. (2014). About Face: The Essentials of Interaction Design

Persona & User journey

For this prototype, my goal is to create a low-fidelity paper app to help travellers with gluten intolerance find safe places to eat and enjoy local cuisine.

To help me achieve this, I created a persona and user journey.

Anne – Celiac solo traveler

Name: Anne Bauer
Age: 29
Occupation: Freelance photographer
Location: Berlin, currently traveling through Italy
Health Context: Diagnosed with celiac disease 5 years ago
Tech Use: Heavy smartphone user, relies on travel and food apps
Personality: Curious, independent, sometimes anxious about eating out


Goals:

  • Find places to eat safely while traveling abroad
  • Avoid cross-contamination and gluten exposure
  • Feel confident and supported in unfamiliar food cultures

Pain Points:

  • Unclear menus and gluten-free claims
  • Language barriers when asking staff about food safety
  • Anxiety when eating in new places
  • Lack of trust in unfamiliar restaurants

Emotional Triggers:

  • Relief and happiness when finding verified safe spots
  • Frustration when apps show “gluten-free” without proof
  • Appreciation when her needs are clearly understood

User journey: Anne arrives in Bologna and needs dinner

  1. Trigger: Anne arrives in Bologna and feels hungry.
  2. Goal: She wants to find a celiac-safe restaurant nearby.
  3. Problem: She’s unsure which places are safe and trustworthy.
  4. Action: Opens the app and starts onboarding → begins search → filters results → reads restaurant details → picks a trusted place.
  5. Success: Finds a restaurant with verified reviews and clear allergen info.

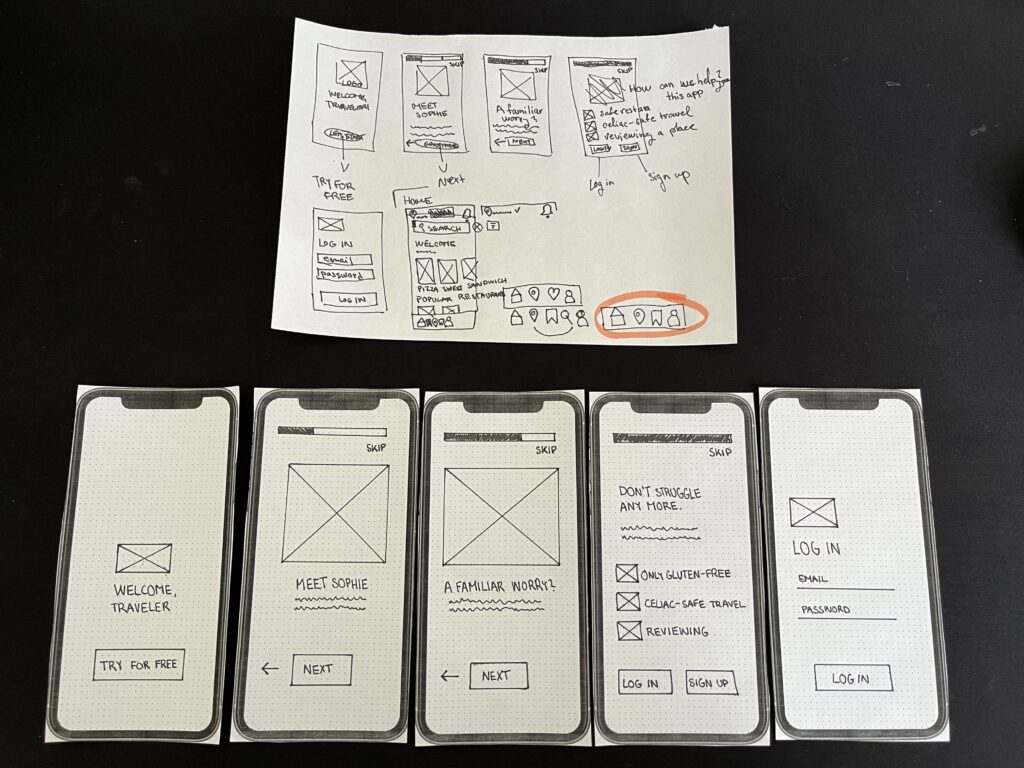
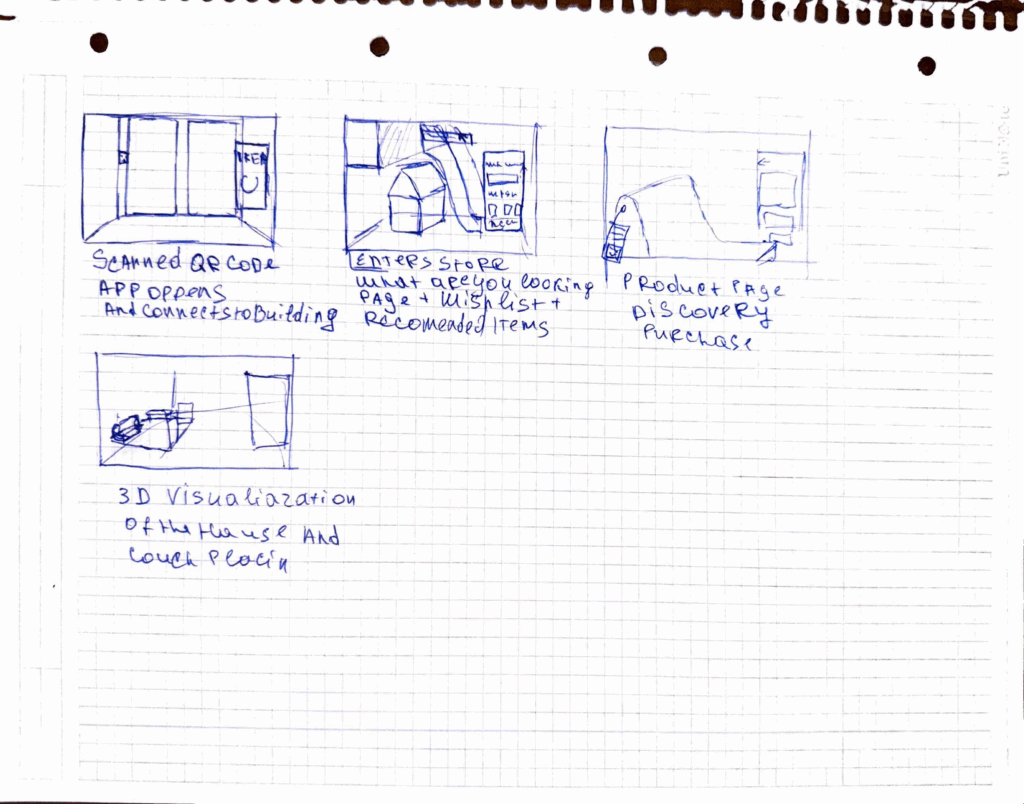
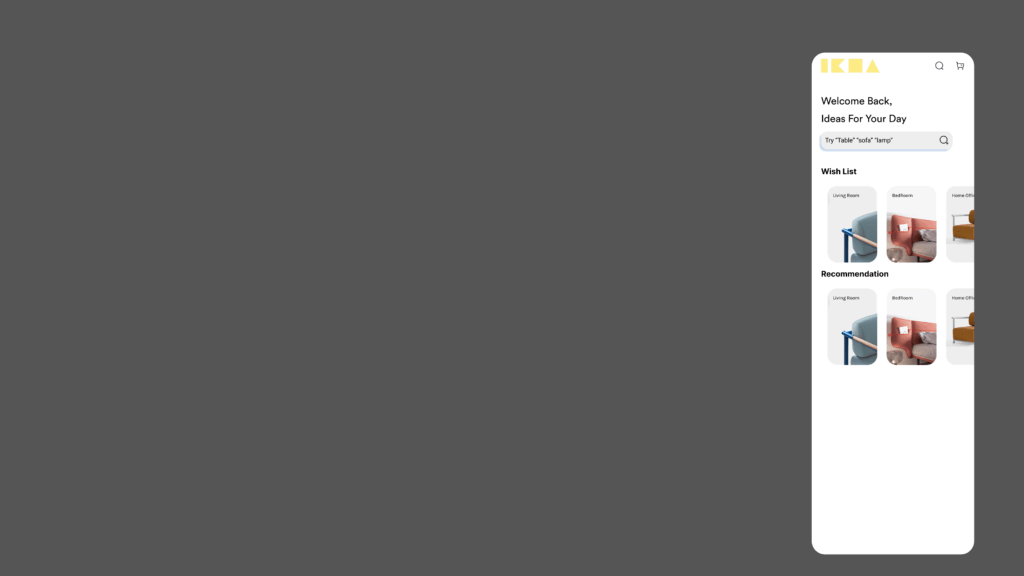
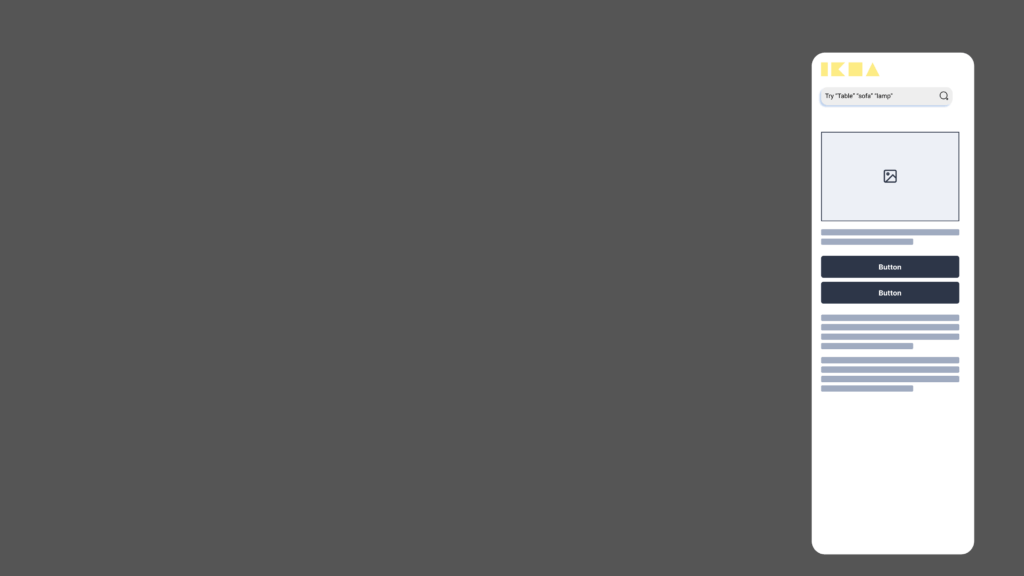
The first part of my work on the paper prototype involved creating an onboarding process for the application:

Blogpost 1: Prototyping-Speed-Dating-Session

Having my prototype shared as part of a speed date was a great way to get quick and varied feedback. Presenting the ideas in a short amount of time forced me to focus on the core functionality of each prototype, which helped me clarify my design decisions. It was interesting to see how different people interpreted my creations – some saw new possibilities that I hadn’t considered – like using a paper roll as a kaleidoscope.

One of the most valuable insights was realising how simple materials can lead to innovative solutions if approached creatively. The projection device helped me think about possible improvements, especially in terms of usability.

All in all, this session highlighted the importance of developing ideas, open discussion and looking at designs from multiple perspectives, key aspects of a strong prototyping process.

Here are my all three prototypes:

Crossbow from a paper clip

The first prototype I created is a tiny but functional crossbow, made primarily from a paper clip, a rubber band, and a small piece of paper or a toothpick as an arrow. I bent the paper clip into a crossbow shape and secured a rubber band to provide the necessary tension for launching the projectile.

This small crossbow demonstrates basic mechanical principles, particularly elasticity and tension. The rubber band stores energy, and when I release it, the projectile shoots forward. It was a fun experiment in leveraging small-scale mechanics to achieve movement and functionality.

Projection from a paper roll

For my second prototype, I explored light and shadow projection using a paper roll. I drew specific shapes into the roll and placed a light source behind it to create simple projections on a surface. The concept is similar to shadow puppetry or projectors, relying on light diffusion and obstruction to form visible patterns.

This experiment helped me better understand basic optical principles, like how light travels in straight lines and how different materials can block or diffuse it. By playing with shapes, angles, and distances, I was able to adjust the clarity and size of the projection. This could even be a starting point for interactive light installations or custom lamp designs.

Phone stand from a paper roll

For my third prototype, I wanted to make something practical, a DIY phone stand using a paper roll. By cutting slots into the roll, I created a stand that holds my phone at the perfect viewing angle.

I like this prototype because it’s both eco-friendly and functional. Instead of buying a phone stand, I repurposed a simple household item into something useful. This small project made me think about ergonomics and accessibility, as well as how design can make everyday tasks more convenient.

These three prototypes showed me how creativity and problem-solving can lead to functional designs using basic materials. Each one shows different aspects of design – from mechanics (crossbow) and optics (projection) to usability and ergonomics (phone stand). Prototyping with limited resources pushed me to reuse materials and find innovative solutions.

Blog 3: Current problems in EV Charging (Focus on User Experience and Accessibility)

On my current research and hands on experience with Chargers, I noticed that public charging infrastructure hasn’t caught up in terms of user experience and inclusivity. In this post i just want to dive little bit deeper and for that I did a small desk research. Here’s what’s going wrong:

Inconsistent User Interfaces & Unclear Feedback

  • Every station looks and acts differently. Menus vary wildly, icons are confusing and messaging like “Error 47” doesn’t explain much. Users often struggle to initiate charging or interpret unclear statuses
  • No real-time clarity. Displays frequently fail to show clear information like charging progress or estimated time remaining—making users feel uncertain and anxious

Accessibility Design Gaps

  • Physical barriers: No ramps or extra-wide spaces for wheelchair users. Many stations have high-mounted screens and stiff, heavy cables that require extra strength to operate .
  • Cable issues: CCS and other fast-charging cables are weighty and inflexible due to cooling needs. They’re often too short or too long making them hard to plug in for many users.
Own Image Documentation

Environmental & Spatial Constraints

  • Tight, unprotected spaces: Narrow bays, poor lighting, lack of shelter, all uncomfortable design choices, especially in bad weather or for vulnerable users
  • No tactile or audio support: Stations rarely include braille, haptic feedback, or voice prompts, ignoring users with visual or dexterity issues

Technical Unreliability & App Dependency

  • High failure rates: About 27% of public fast chargers are out of commission at any given time -> broken screens, failed connectors, or payment system glitches
  • App-only access: Many chargers demand app use for payment or activation, making usability dependent on the quality of the app and user connectivity
  • Multiple apps, multiple frustrations: Switching between brand-specific apps for each station is a constant headache for EV drivers

So why it is important to think of

  1. Creates anxiety & frustration
    Unpredictable errors and poor guidance lead to “range anxiety” and erode trust in the EV charging system.
  2. Excludes vulnerable users
    People with disabilities, seniors, or those less tech-savvy often find stations unusable, limiting EV adoption.
  3. Undermines wider EV adoption
    If charging remains cumbersome, many potential EV drivers will stick to fossil fuels, slowing sustainable transport progress.

What needs to Change

To make EV charging intuitive and inclusive there are some steps to consider:

  • Standardized UI elements: Clear steps like “Plug in, Tap to Start, Charging…” with robust feedback via visual, auditory, and haptic cues.
  • Inclusive hardware design: Adjustable screen heights, lighter cables (or cable reels), tactile buttons, braille labels, and wide, ramp-equipped bays.
  • Safety & comfort enhancements: Covered, well-lit stations with seats or resting areas especially important for longer charging waits.
  • Reliable offline access: Card readers plus app options, chargers that work even without mobile signal
  • Unified interfaces across networks: Consistent flows and minimal apps, drivers shouldn’t have to learn a new system at every station

Next Step: Rapid Prototyping

With these insights, my next step is to build or sketch something quick and to test it and iterate of course. With this i mean low-cost prototypes, sketches, cardboard interfaces, or simple physical models to validate ideas, also thinking about lego prototype:

  • trying out a height-adjustable screen mock-up with clear call-to-action buttons.
  • maybe simulating cable-handling ergonomics with also light feedback threw makey makey
  • Test feedback designs (LED, sound, or haptics).
  • Role-play station use in cramped or wheelchair-accessible scenarios.

These hands-on prototypes will reveal what truly makes charging intuitive and comfortable giving valuable, user-driven data before moving to high-fidelity design.

Clifford, J., Savargaonkar, M., Rumsey, P., Quinn, C., Varghese, B., & Smart, J. (2024). Understanding EV Charging Pain Points through Deep Learning Analysis. Idaho National Laboratory. SSRN. https://ssrn.com/abstract=5031126

https://www.evaglobal.com/news/accessible-charging-for-all-a-solutions-approach#:~:text=In%20a%20public%20charging%20environment,critical%20for%20public%20charging%20infrastructure

https://kempower.com/user-experience-ev-charger-design

Blog Post 4: Learning from CEWE Photo Kiosks – Bridging UX, Tech & Memory Design

What Happens Inside a Photo Kiosk?

These kiosks allow users to connect their phone or USB stick, select photos, and print them instantly. Technically, they run on Windows operating systems in kiosk mode, and the interface is custom software, likely built on Qt or similar cross-platform UI frameworks. Connections are supported via:

  • USB-A / USB-C
  • SD cards
  • Bluetooth, AirPrint, Huawei Share
  • QR code upload via CEWE mobile app

Once connected, the user’s gallery is displayed in a grid of thumbnails, ready to scroll and select.

UX Analysis: What Works, What’s Missing

From a user experience point of view, CEWE kiosks are highly optimized for speed and simplicity:

  • Large touchable thumbnails
  • Minimalistic, icon-driven steps
  • Clear path from selection to printing

However, in the context of memory and emotional engagement:

  • Photos are shown without metadata (no date, no location, no description)
  • There’s no storytelling layer, you select images, but don’t reflect on them
  • Entire galleries are exposed raising privacy concerns

This stripped-down interface is efficient for printing but misses opportunities for personal connection, reflection, or control which are central to my thesis.

The Cewe company also created an App where you can design your photobook layout and then print it.

https://apps.apple.com/de/app/cewe-fotowelt-fotobuch-mehr/id583713833

How This Inspires My Prototype Design

These kiosks give me a technical and experiential foundation for what my memory device prototype might be. I want to create something that feels as physical and intuitive as a kiosk, but is emotionally aware and curated, rather than just functional.

Instead of printing, my app and device would allow users to store, browse, and re-experience their photos in a more meaningful way. Here’s what that could look like:

A Custom Photo Archive App: UX Meets Memory

Imagine connecting your phone or SD card to a device, not to print photos, but to curate and store them intentionally. The app would function like a mix between Finder / File Explorer, Photo slideshow, and a memory journal.

Key Features for the App:

  • Photo Dashboard: A clean, visual overview where your photos are sorted by year, event, or theme (e.g. “Graduation”, “Summer 2023”, “Family”).
  • Filter & Organize: Tag and group memories manually or through AI suggestions (e.g. by faces, dates, or locations).
  • Slideshow Mode: Select folders or themes and activate a full-screen, ambient slideshow experience, ideal for reflection or sharing.
  • Simple Storage: All files live in a readable system (e.g. SD card or internal storage) so it’s not a locked-in app, but still has an elegant visual layer on top.
  • Selective Sync: Inspired by the kiosk, but instead of exposing your whole gallery, only selected folders or albums are shown on screen.

“Minimal surface, deep meaning” like a kiosk, it should be easy to use in public or private settings, but with a sense of control.

Connecting It Back to the Thesis

The CEWE kiosk taught me that:

  • People are comfortable interacting with touchscreens and device syncing in physical spaces
  • There’s value in ritualizing the photo-selection process
  • But there’s a lack of contextual memory architecture

For my thesis project, I aim to build a prototype that bridges technical familiarity (USB, QR code, SD cards) with UX depth (filters, tagging, curated playback). It’s not just about decluttering photos, it’s about transforming them into accessible, emotional archives.

Blog Post 4: From Blueprint to Visuals: Wireframing and Designing the UI

After defining the complex architecture and data flows in my previous posts, it was time to shift focus from the backend logic to the user’s reality. I needed to answer the most important question: What will this experience actually look and feellike for Alex, our shopper? This is where the design process begins. It’s a journey of translating abstract ideas into tangible, interactive screens. For this project, I followed a three-stage methodology, moving from low-commitment sketches to a fully realized high-fidelity vision.

Stage 1: The Spark of an Idea – Paper Wireframes Every complex digital product begins with the simplest of tools: a pen and paper. Before getting down to pixels and software, I sketched out the core user flow. This stage is all about speed and ideation—capturing the main steps of the journey without worrying about details.As you can see from my initial drawings, I focused on the key moments: entering the store, viewing a product, and the “wow” moment of 3D visualization in the user’s own home. This raw format allowed me to establish the foundational structure of the application.

Stage 2: Building the Blueprint – Low-Fidelity (Lo-Fi) Digital Wireframes With the basic flow mapped out, the next step was to give it a more formal structure. I created low-fidelity digital wireframes. The goal here is not beauty; it’s clarity. By using simple grayscale boxes, placeholder images, and basic text, I could focus entirely on information hierarchy and layout. These Lo-Fi designs helped me answer critical questions: Where should the search bar go ? How should a product’s details be organized? What does the checkout process look like? At this stage, I focused on a mobile form factor to solidify the core components in a familiar layout before adapting them for a more complex AR view.

Stage 3: Bringing the Vision to Life – High-Fidelity (Hi-Fi) AR Mockups This is the leap from a 2D blueprint into a 3D, immersive world. Designing for Augmented Reality, especially for the main target of smart glasses, required a complete shift in thinking. The user interface can’t just be a flat screen; it needs to live within the user’s space, providing information without obstructing their view.Here are some of the key design principles I implemented in the high-fidelity mockups:

Spatial & Contextual UI: The interface appears as a series of floating panels, or “holograms.” A navigation prompt appears at the top left, while the main interactive panel is on the right, keeping the central field of view clear. This UI is also contextual—it changes based on what the user is doing, whether they are navigating, inspecting an item, or making a purchase.

  • Glassmorphism: I used a translucent, blurred background effect for the UI panels. This modern aesthetic, known as glassmorphism, allows the user to maintain a sense of the environment behind the interface, making it feel integrated and less obtrusive.

  • Seamless AR Integration: The core feature—visualizing furniture—is seamlessly integrated. As seen below, when Alex wants to check how a sofa looks in his apartment, the app displays the 3D scan of his room directly within the interface. This feature provides immediate, powerful value and solves a key customer pain point.

    • An End-to-End Flow: From Browse the wishlist to making a secure payment with Apple Pay and seeing the order status, the entire purchase journey is designed to be fluid and intuitive, requiring minimal interaction from the user this. This actually concludes my idea of the technology us human moving from interacting with the objects by typing or other means now we have our devices to do so.

    This iterative journey from a simple sketch to a polished AR interface was crucial for refining the concept and ensuring the final design is not only beautiful but also intuitive and genuinely useful.

    With the architecture defined and the user interface designed, the final step is to merge them. In my next post, I’ll discuss the technical prototyping process—bringing these designs to life with code and seeing them work on a real device.

    05_Finding the Mood

    After some of the first tries and especially the last one with the beamer I got pretty frustrated. A lot of things didn’t really work the way I wanted them to. I also noticed something about myself again. If I don’t learn things quickly or see results early on I start losing interest really fast. And when stuff doesn’t work because of technical issues like the beamer last time it just kills the motivation even more. So for now I want to change the way I approach it. I don’t want the only goal to be a projection on flowers anymore. I still like the idea but I think I need to be a bit more open and just try out different things. So antoher thing I will be focusing on is the projection onto other surfaces too not just flowers. Try out stuff that’s fun or maybe unexpected. Just to make it feel more playful again and keep myself from getting frustrated and stopping completely. What I also started thinking about more is the feeling I want the projection to give. Not so much of a deep concept but more like the mood of it. Since I’ve been working with plants fake flowers and some analog photos I feel like soft and slow visuals work better than fast and flashy ones. I don’t want it to look like a VJ setup in a club. More like something calm maybe even a little surreal.

    When I projected onto my analog photos I really liked how it changed the whole vibe. It made the image feel kind of alive. That made me want to go more into that direction. Maybe only animating small parts or details instead of everything at once. I really like when something moves quietly in the background while everything else stays still. It feels more thoughtful and less overwhelming somehow. Right now, I imagine trying something like a very simple loop that almost follows the shape of the Monstera leaf or fades in and out depending on the structure of the object. For example, the holes in the Monstera could stay dark while everything around moves slowly. Same with the money plant or even a shape like the banana, here just using its shape to guide the projection instead of covering everything. I might also try something a bit more playful on a paper flower, just to see how it reacts. It doesn’t have to be deep or super emotional, I just want to explore how the surface influences the mood of the visuals.

    This time I didn’t do any new projection tests, but I finally started creating my own animations which helped a lot. It felt good to actually make something again instead of just thinking about what could work. I realized I was getting a bit stuck in the idea phase, so just sitting down and starting to animate gave me a bit of new motivation. The first animation I made is a soft, circular loop – kind of like an abstract movement that spreads over the whole image. It’s not super complex, but it already creates a calm and slow atmosphere, which is exactly what I’ve been thinking about lately. I imagined using it on one of my plant surfaces or even the paper flower. It’s meant to cover the full image, but not in a flashy or overwhelming way. More like a soft layer of motion that slowly shifts and brings some kind of life into the still object. I also made a second animation that’s a bit more playful. The colors and movement feel more dreamlike, maybe even a little surreal. I thought it could be fun to try that on the paper flower and just see how it reacts.

    Virtual Try-On Field Test: Amazon Glasses & Maybelline Makeup

    AR shopping testing from Graz, Austria


    Why I Tested These Two

    I wanted to see how far augmented-reality shopping has come, but most headline tools—Google’s new try-on, several US-only apps, etc.—still won’t load here in Austria. Even a VPN plus a “US” Google account failed. So I chose the two options that do work right now:

    1. Amazon Try-On (Eyewear)
    2. Maybelline Virtual Make-Up Studio

    Challenge #1: Geo-Locks Everywhere

    The biggest frustration wasn’t the tech itself; it was access. Many advanced AR experiences are geo-fenced to the United States. Until platforms open globally—or at least EU-wide—Austrian shoppers will stay few steps behind.


    Amazon Try-On: Hunting for AR-Ready Frames

    • Discovery pain: Only a fraction of Amazon’s glasses catalogue supports AR, and you don’t know which ones until you click. A small “AR available” badge on product tiles would save so much time.
    • Pro: I tried transparent frames, sunglasses, and standard optical models. Tracking stayed stable even as I turned my head, and sizing felt believable.
    • User experience: Simple tap, allow camera, instant preview. Exactly what a first-time user hopes for.
    • Excitement factor: I could genuinely picture ordering frames this way once the selection grows. It was also easy to scroll through the color and shape options.
    • What I would love to see: I would love to see the more authentic and rare items on the list for the testing with Virtual reality.

    Maybelline Virtual Makeup: Lipstick Wins, Complex Products Struggle

    • Face-shape hiccups: Foundations and contour products sometimes floated off-axis or didn’t appear at all, even in good lighting. ( as you can see in the provided video ) which I think is a huge problem and can get the first time user sceptic about virtual try ons.
    • Lip colour success: Lipstick shades mapped accurately and updated in real time as I moved.
    • Nice touch: You can switch to a preset model if you’d rather not show your own face. (On the model, every product looked flawless—highlighting that face-tracking, not shade range, is the bigger hurdle.)
    • Before/after slider: Handy for subtle products, though the differences were occasionally too subtle to notice.

    Personal “Aha” Moments

    1. Note-taking vs. flow: Detailed note-taking kills the vibe. One bullet per thought was more than enough.
    2. In-store “Deja vu”: Even when I’m standing in front of a real mirror in a shop, I still pull out my phone, switch to selfie mode, and check how glasses or blush look on-screen. Do you see my point? AR simply lets me do the same thing anywhere at home, at uni, on the tram without the struggle to get to a store. I am keep wondering when it all be updated enough and accurate enough does this one little glance in a real/physical mirror worth it? does it worth going to the store and take your time? why not just stay at home and try them on?

    Final Thoughts

    Trying on glasses through Amazon felt more professional and kinda ready to improve more and more and reach prime time, while Maybelline showed promise but needs better face recognition for anything beyond lipstick. Overall, the sessions were fun and clearly for me the future of product discovery.

    I’ve also recorded a short demo video of both try-ons I hope you enjoy watching it as much as I enjoyed testing!

    The big question: when these tools finally work as smoothly worldwide as they do in the US, will I still bother queuing at a cosmetics counter or will my camera remain my dressing room?


    Note: This post was corrected for grammar and clarity with the support of ChatGPT (OpenAI).

    Blog Post 3: Decluttering by Design – A UX/UI Benchmark of Modern Photo Management Apps

    My idea for master’s thesis explores how design can support the preservation of meaningful digital memories. In this blog post, I explore existing decluttering Apps and how could this knowledge help me with my next research.

    I benchmarked several modern photo decluttering apps, including:

    Swipe Delete: Photo Declutter

    https://apps.apple.com/us/app/swipe-delete-photo-declutter/id6477321134

    Swipewipe Photo Cleaner

    https://apps.apple.com/us/app/photo-cleaner-swipewipe/id1583884012

    Slidebox: Photo Cleaner App

    https://apps.apple.com/us/app/slidebox-photo-cleaner-app/id984305203

    Cleanup: Clean Storage Space

    https://www.cleanupapp.co

    Photo Declutter (AI-powered)

    https://apps.apple.com/us/app/photo-declutter/id1469956763?platform=iphone

    The Rise of the Swipe

    One thing that immediately stood out was how many of these apps use swiping gestures to manage photo deletion. This “Tinder-style” interface, where you swipe left to delete and right to keep, is fast, intuitive, and clearly designed with a younger, tech-savvy audience in mind. Apps like Slidebox and Swipewipe make the process feel almost fun, turning a boring task into something more engaging.

    While this interaction style is efficient, it also raises questions. What about older users who might find swipe-based design less familiar? And more importantly, do these fast decisions respect the emotional weight that some photos carry?

    Emotional and Digital Safety

    Most of the apps prioritize speed and simplicity, often at the expense of emotional context. Only Swipe Delete includes a moment to pause and reflect after mass deletions. On the other hand, Photo Declutter uses AI to identify duplicate photos, which feels less emotionally risky. You are not deciding whether a photo has meaning, just whether it’s a copy. Its interface is clean and easy to understand, making it feel approachable for more cautious users.

    Another concern that came up during testing is data privacy. Sharing your entire photo gallery with a third-party app can feel risky. Who owns your images? Where are they stored? This kind of safety issue is often overlooked, but it is a very real concern for users.

    Rethinking the Experience

    While working through this benchmark, I started asking a bigger design question. Should the photo decluttering happen directly inside your gallery, fully integrated with your device? Or should it function more like an external memory system, where you sort photos manually, similar to storing them on a hard drive?

    This reminded me of photo printing kiosks, like the ones at DM drogerie stores. When you connect your phone, the photo gallery is immediately accessible on the screen, and selecting pictures feels simple and clear. Maybe I should also explore and benchmark this kind of interface, where physical interaction connects directly with digital memory.

    Final Thoughts

    Decluttering digital photos is not only about creating more space. It is about deciding what is worth keeping. Most of today’s apps focus on speed and efficiency, but often overlook emotional value and safety. There is a big opportunity to design tools that are not only smart and fast but also sensitive, reflective, and secure.

    11. A 1-on-1 Experiment in Physical Storytelling

    In class, we did a rapid-fire round of 1-on-1 prototype testing. Each of us had about three minutes to present our prototype to a classmate, who would try to figure out how it works and what it represents, without much explanation.

    My prototype was a small-scale physical room, just 10x10cm, constructed from paper. It had two vertical walls and a floor, with a “0” drawn on each of these surfaces to mark the starting point. From there, the interaction unfolded in layers.

    The next components were two small paper strips, 1x3cm each. Folded in half and placed on top of the walls like little blades, these represented projectors. Then came two larger 10x10cm sheets, each marked with a “1” in the top left corner and colored pink. One of these was placed on the floor, the other on one of the walls. The pink floor piece had footprints drawn on it as signal of movement.

    Finally, two more sheets were added this time green, labeled with a “2” and layered over the pink ones. On the green floor piece, small ripples of water replaced the original marks. Meanwhile the wall had raindrops in the same axis of the water ripples.

    As classmates explored the prototype, the general response was encouraging. Many found it intuitive, the layering, the footprints, the shift from step to splash. However, the most consistent point of confusion was the tiny projector pieces. People weren’t sure what they were for, and in the fast-paced 3-minute window, that uncertainty took up valuable time.

    This exercise reminded me how even small unclear elements can disrupt an otherwise understandable experience. But it also showed how much can be communicated through tactile storytelling. Overall, it was nice to see my idea come to life in others’ hands.

    Post #2.10 – What We’ve Learned So Far

    After nine different testing sessions across multiple environments, preschools, family homes, group play, and one-on-one settings, it’s time to step back and reflect on everything we’ve learned from putting the ABC Learning Cards into the hands of real children.

    This wasn’t just a trial of the cards themselves. It was a broader exploration of how young learners interact with letters, sounds, images, and the process of early literacy in general. The goal wasn’t perfection, it was observation. And what we saw was a series of small, meaningful moments that pointed toward something much bigger: learning happens in many ways, not always in the way we plan it.

    So, What Did We Learn?

    1. Pictures Lead the Way

    Across nearly every test session, the most consistent response was this: children are drawn to images first. They engage through visuals, especially ones that feel familiar: animals, food, and objects from their everyday lives. The letter itself is almost always secondary at first.

    This confirmed that the visual design of the cards needs to stay clean, bold, and instantly recognizable. Cards that featured unfamiliar or abstract objects (like “net” or “violin”) were either misunderstood or ignored. Switching to more universally recognizable images is already in the works.

    2. Children Learn Through Play, Not Pressure

    The most powerful learning moments happened during spontaneous games and unstructured exploration. Whether children were making up their own rules, organizing cards into categories, or assigning cards to each other like characters, they were doing more than playing, they were constructing meaning.

    Structured activities helped guide focus, but play gave them ownership. When learning becomes a child-led process, it sticks.

    3. Letter Recognition Emerges Gradually

    Only a few children could consistently name letters on sight, but nearly all could remember a few after repeated exposure, especially when linked to personal associations (like the first letter of their name). That gradual familiarity is important. It showed us that the cards don’t need to teach the entire alphabet at once. They can and should, be used in small, repeating doses over time.

    Confidence often grew quietly: a child remembering one more letter than last time, or saying “I know this one!” when shown a familiar image. These were early signs of real learning taking hold.

    4. Sound Comes Before Spelling

    In testing sessions focused on letter sounds, I noticed children often picked up the beginning sound of a word (“sss for snake”) even if they couldn’t name the letter. This reinforces what we know from literacy research: phonemic awareness comes before formal phonics.

    The ABC cards acted as a useful bridge here. Sound-based games (“What starts with Mmm?”) often created more engagement than letter naming alone.

    5. Short Bursts Work Best

    Attention spans were short, as expected. Children typically stayed engaged for 8–15 minutes in solo play and up to 25 minutes in small groups with guided games. This tells us the cards work best when used in short, purposeful sessions rather than extended activities. And they’re highly re-playable. Several children returned to the cards multiple times within a session, picking different favorites each time.

    6. Parents and Educators Need Gentle Structure

    In home settings, parents responded positively to the cards but asked for more guidance. A few simple game suggestions, question prompts, or learning tips could go a long way. The next iteration of the project will include a small fold-out guide with ideas for:

    • 5-minute and 10-minute games
    • Sound-matching activities
    • Tracing extensions
    • Tips for encouraging confidence through repetition

    What Didn’t Work (And Why That’s Okay)

    Not everything landed perfectly. Some children were confused by less familiar words. Others grew disinterested when there was no variety in how the cards were presented. In a few sessions, children fixated only on the images and ignored the letters entirely, which, while expected, reminded us not to overestimate early symbolic understanding.

    But these moments were useful. They showed us what needs refining, not what needs abandoning. Testing isn’t about proving that a product is finished, it’s about seeing what real use looks like, and making it better from there.

    Final Thoughts

    The ABC Learning Cards were never meant to be the solution to teaching literacy, but they can be a starting point. A playful, friendly, confidence-boosting tool that introduces letters, sounds, and early word awareness in a way that feels natural to the way children already explore the world.

    If there’s one thing this testing phase has shown clearly, it’s this:

    Kids are ready. They’re curious, creative, and capable. And the right tools, offered at the right time, can help them feel proud of what they’re learning.