#1 Actionszenen filmisch gedacht: Eine Einführung in Einstellungsgrößen, Shotdauer und Bewegung

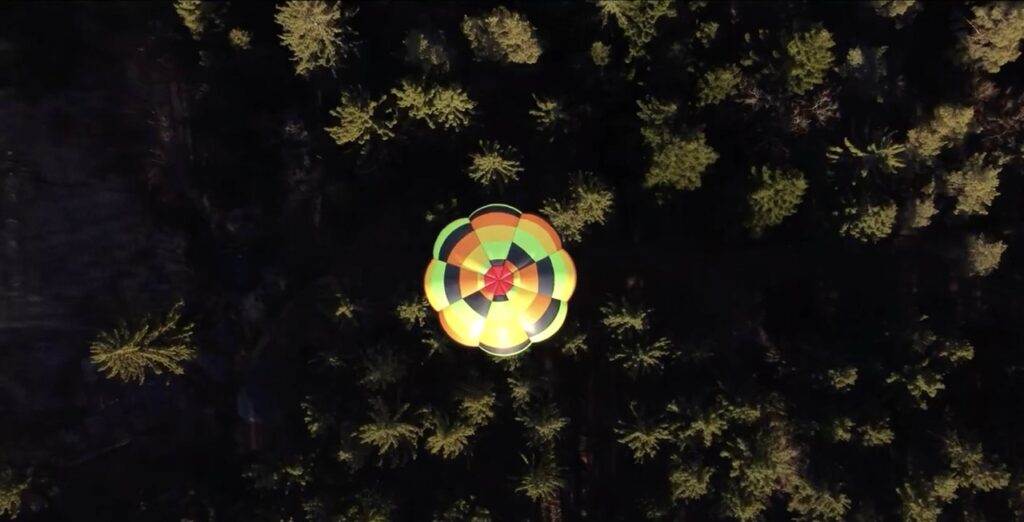
Egal ob rasante Verfolgungsjagden oder intensive Duelle mit gezogenen Klingen, Actionszenen gehören zu den technisch aufwendigsten und visuell eindrucksvollsten Momenten eines Films. Was auf der Leinwand als dynamische, oftmals chaotisch wirkende Abfolge von Bewegungen erscheint, ist in Wahrheit das Ergebnis genauester Planung, präziser Choreografie und anspruchsvoller Technik. Während häufig über die Stuntkoordination und Kampfkunst der Darsteller*innen gesprochen wird, bleibt die Kameraarbeit jedoch oft unbeachtet und genau diesem Aspekt widme ich mich in meiner Blogreihe.

Warum Actionszenen besondere filmische Anforderungen stellen

Anders als in dialogreichen Szenen, in denen Schnitte oft dem Sprachfluss oder der Emotion folgen, erfordern Actionszenen ein deutlich komplexeres Zusammenspiel aus Timing, räumlicher Orientierung und rhythmischer Schnittführung. Ziel ist es, ein Gefühl von Tempo und Intensität zu erzeugen, ohne dabei die Übersicht zu verlieren (es sei denn genau dies ist gewollt). Das Publikum soll in den Bann gezogen werden, aber stets den Glauben behalten zu wissen, was gerade passiert.

Um das zu erreichen, wird auf eine Vielzahl an gestalterischen Mitteln zurückgegriffen: die Auswahl von Einstellungsgrößen, die Dauer der einzelnen Shots, die Kameraperspektive, aber auch die Frage, ob eine Szene statisch oder mit bewegter Kamera eingefangen wird, sind dabei zentrale Elemente. Diese Parameter haben maßgeblichen Einfluss auf die Wirkung und Lesbarkeit einer Szene.

Shotlängen

In der Analyse zahlreicher Actionszenen zeigt sich: die durchschnittliche Shotlänge sinkt signifikant mit steigender Actionintensität. Während Dialogszenen oft mit Einstellungen zwischen 5–10 Sekunden auskommen, liegen Actionszenen meist im Bereich von 1–3 Sekunden pro Schnitt, teils sogar noch kürzer. Dies erzeugt Tempo und treibt den Puls nach oben, allerdings birgt diese Fragmentierung auch Gefahren mit sich, denn wenn Schnitte zu hektisch gesetzt werden oder die Kameraarbeit unsauber ist, leidet die Orientierung innerhalb der Szene darunter. Berühmte Negativbeispiele wie Taken 3 (2014) zeigen, wie eine überladene Schnittfrequenz die Glaubwürdigkeit einer Szene untergraben kann.

Dem gegenüber stehen Filme wie Children of Men (2006) oder The Revenant (2015), die mit längeren Plansequenzen arbeiten und Action mit einem fast dokumentarischen Realismus inszenieren. Diese Herangehensweise erfordert eine ausgeklügelte Kameraführung und ein präzises Timing aller Beteiligten, belohnt das Publikum aber mit einer immersiven Intensität.

Einstellungsgrößen

Auch die Wahl der Einstellungsgröße spielt eine entscheidende Rolle. Totale und Halbtotale kommen vor allem zu Beginn einer Szene zum Einsatz, um dem Publikum räumliche Orientierung zu geben. Sie etablieren, wo sich die Figuren befinden und wie das Setting aussieht. In der eigentlichen Kampfhandlung dominiert dann häufig die Amerikanische oder die Halbnahe, da sie ein gutes Verhältnis zwischen Körperbewegung und emotionalem Ausdruck erlaubt.

Extreme Close-Ups oder schnelle Kamerazooms finden in modernen Actionfilmen vor allem als stilistisches Mittel Verwendung, etwa um Schmerz oder Überraschung zu vermitteln. Klassische Martial-Arts-Filme hingegen bevorzugen eher die Totale, um Platz für Kampftechnik als choreografisches Spektakel zu schaffen, welche in ihrer Ganzheit erkennbar bleiben soll. Es geht hierbei nicht nur um Wirkung, sondern auch um Lesbarkeit. Hierzu wird in folgenden Blogs näher ins Detail gegangen.

Statische vs. bewegte Kamera

Eine weitere wichtige Unterscheidung betrifft die Bewegung der Kamera selbst. Statische Einstellungen bieten klare Orientierung und eignen sich gut für choreografisch anspruchsvolle Szenen, in denen der Fokus auf Technik und Timing liegt. Bewegte Kameras, sei es per Steadicam, Dolly oder Handkamera, erzeugen dagegen Unmittelbarkeit und Dynamik, können aber schnell zu einem visuellen Overload führen, wenn sie nicht gut kontrolliert sind.

Moderne Produktionen setzen zunehmend auf hybride Lösungen: Die Kamera folgt den Kämpfenden agil durch den Raum (Tracking), bleibt dabei aber bewusst an bestimmten Achsen oder Blickrichtungen orientiert. Dadurch entsteht das Gefühl von Bewegung, ohne die Szene unübersichtlich wirken zu lassen.

Vom Wissen zur Praxis – Mein Semesterprojekt

Diese Erkenntnisse bleiben im Rahmen dieses Semesters nicht nur theoretisch. Ziel meines Projekts ist es, eine choreografierte Actionszene selbst zu konzipieren, filmisch umzusetzen und alle Stationen des Prozesses zu dokumentieren. Von der ersten Idee, über das Location Scouting, das Festlegen der Kampfdynamik, die Wahl von Kamera, Objektiv und Licht bis hin zur praktischen Umsetzung am Drehtag. Die Entscheidungen sollen so gut wie möglich begründet und reflektiert werden.

Zudem wird ein besonderes Augenmerk auf die Storyboard-Phase gelegt: Wie übersetze ich Bewegungsabläufe in planbare Shots? Wie entwickle ich eine visuelle Dramaturgie, die nicht nur die Choreografie unterstützt, sondern auch die Spannung im Bildaufbau steigert? Die finale(n) Szene(n) wird anschließend geschnitten und analysiert – im Hinblick auf Shotdauer, Einstellungsgrößen und die menge an Bewegung.

Für mich, die bis dahin kameratechnisch hauptsächlich im Dokumentarfilm und statisch bei diversen Sport-Liveproduktionen Erfahrung sammeln konnte, wird dieses Semesterprojekt nicht nur eine technische Übung, sondern ein erster Versuch, das Unsichtbare sichtbar zu machen: die Kunst, durch das Auge der Kamera eine Kampfhandlung nicht nur aufzunehmen, sondern im Idealfall filmisch zu erzählen und verständlich zu machen.

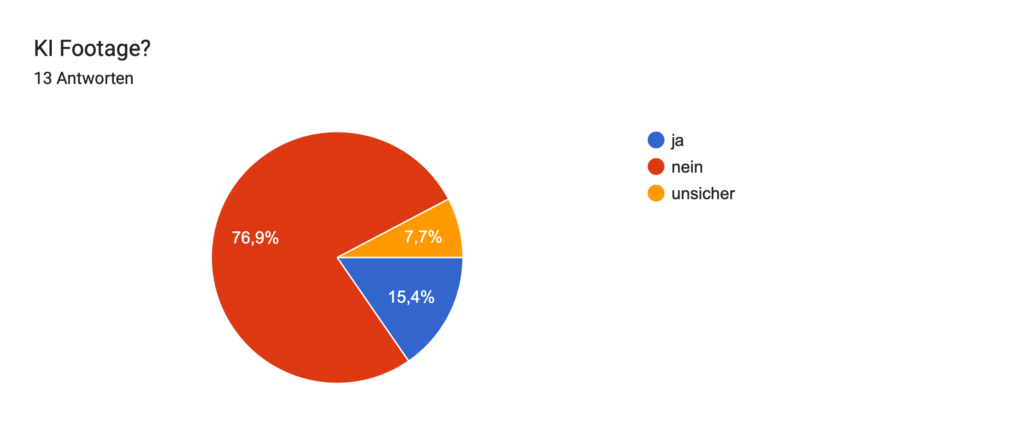
Zur Grammatik- und Rechtschreibüberprüfung wurde ChatGPT herangezogen.

Wie echt ist echt? Umfrage zur Wirkung vom Projekt mit KI-generierten Drohnenaufnahmen

Das Projekt dieses Design & Research Blogs bestand aus einem kurzen Video, das sowohl KI-generierte Clips als auch reales Drohnen-Footage kombiniert. Ziel war es, herauszufinden, ob Zuschauer*innen KI-Bilder als solche erkennen und wie sie auf diese Mischung reagieren.

Um diese Fragen zu untersuchen, wurde eine Umfrage mit 13 Teilnehmer*innen durchgeführt. Alle Befragten bekamen das Video vorab zugesendet und beantworteten im Anschluss 25 kurze, gezielte Fragen zu ihrer Wahrnehmung, Einschätzung und emotionalen Reaktion.

Die Ergebnisse dieser Erhebung liefern spannende Einblicke in die Wirkung von KI-Footage und die Grenzen der visuellen Glaubwürdigkeit und werden im Folgenden detailliert analysiert.

Wie ansprechend fanden Sie das Video insgesamt?

Die Bewertungen lagen überwiegend bei 4 von 5 Punkten, was auf eine insgesamt positive visuelle und gestalterische Wahrnehmung hindeutet. Nur wenige Bewertungen lagen darunter – zwei Personen gaben eine 2 oder 3. Das zeigt: Die Machart und Ästhetik des Videos kamen bei den meisten gut an, unabhängig vom Ursprung des Materials.

 Wie glaubwürdig wirkte das gezeigte Material auf Sie?

Hier zeigen sich leicht unterschiedliche Einschätzungen, von 2 bis 5 Punkten war alles dabei. Der Durchschnitt liegt zwischen 3 und 4. Das deutet darauf hin, dass viele Szenen glaubwürdig wirkten, bei einigen jedoch Zweifel aufkamen, etwa durch visuelle Unstimmigkeiten oder die Atmosphäre einzelner Shots.

Ist Ihnen aufgefallen, dass in dem Video KI-generierte Aufnahmen verwendet wurden?

Mehrere Personen gaben an, die KI-Aufnahmen erkannt zu haben, andere waren unsicher oder bemerkten erst beim zweiten Hinschauen Unterschiede. Das zeigt: Ohne expliziten Hinweis bleibt KI-Footage häufig unbemerkt, ein Beweis für seine visuelle Qualität. Interessant ist auch, dass einige Teilnehmende erst durch die Umfrage selbst auf die Idee kamen, genauer hinzusehen.

Aufschlüsselung der einzelnen Clips und das Ergebnis:

Bild 1: KI

Bild 2: ECHT

Bild 3: KI

Bild 4: ECHT

Bild 5: ECHT

Bild 6: KI

Bild 7: ECHT

Bild 8: KI

Bild 9: KI

Bild 10: KI

Bild 12: ECHT

Bild 13: ECHT

Bild 14: KI

Bild 15: KI

Bild 16: KI

Bild 17: KI

Wie sicher sind Sie sich bei Ihrer Einschätzung?

Die Selbsteinschätzung reichte von sehr unsicher (1–2) bis mittel (3–4). Nur eine Person gab an, sich sehr sicher zu fühlen (5). Dies verdeutlicht die Herausforderung: Auch wenn etwas „künstlich“ erscheint, ist es schwer, klare Beweise zu erkennen, ein typisches Merkmal von gutem KI-Content.

Was hat Sie vermuten lassen, dass es sich um KI-generiertes Material handelt?

Mehrfach genannt wurden:

  • Ungewöhnliche Farben oder Texturen
  • „Zu perfekte“ Szenen
  • Unnatürliche Bewegungen
  • Fehlende Details oder logische Fehler (z. B. Wege, die im Nichts enden)

Diese Beobachtungen spiegeln typische Schwächen aktueller KI-Generierung wider und zeigen, worauf geschulte Zuschauer achten.

Weitere Anmerkungen

Viele Kommentare spiegelten eine Erstauntheit über die Qualität des Videos wider, wie zum Beispiel: „Ich dachte erst, das ist einfach gut gefilmt.“
Einige merkten an, dass die Erkennbarkeit stark vom Bildschirmtyp und der Auflösung abhängig sei.
Andere gaben zu, dass der Kontext (Fragen, Hinweise) erst das kritische Sehen ausgelöst hat – ein Zeichen dafür, wie stark Wahrnehmung durch Erwartung beeinflusst wird.

“Es geht für mich gefühlt weniger darum dass ich szene zu szene genau sagen kann was KI ist und mehr darum dass ich ab der Weizenszene sehr sicher war dass mindestens eine KI generierte Szene drinnen war. Ab dann war ich bei jeder Szene skeptisch

Wie bewerten Sie den Einsatz von KI-Footage in diesem Video?

Die Mehrheit bewertete den Einsatz als positiv oder neutral. Nur eine Person äußerte sich klar negativ. Das spricht dafür, dass KI-Footage, sofern gut integriert, als stilistisches Mittel akzeptiert wird. Einige sehen darin sogar eine kreative Bereicherung.

Finden Sie die Kombination aus echtem und KI-generiertem Material störend?

Die meisten Antworten lagen bei 3 oder 4 (neutral bis nicht störend). Nur eine Person empfand die Mischung als deutlich störend (Wert 5). Insgesamt wird die Kombination als gelungen oder zumindest unproblematisch wahrgenommen.

The Role and Relevance of 3×3 Color Transformation Matrices in Color Science-Based Image Pipelines

In digital imaging workflows—particularly those involving color management, camera matching, and film emulation—the use of 3×3 color transformation matrices remains a foundational method for applying accurate linear color space conversions. A tool recently shared on Reddit by the user ctcwired introduces a practical and accessible way to calculate such matrices from a source (e.g., a digital camera) to a target (e.g., a film scan). The script is available via GitHub:
https://github.com/ctcwired/dctl-matrix-maker.

The process requires linear input imagery, ideally in OpenEXR (.exr) format, to ensure the correct mathematical application of the matrix. Since a 3×3 matrix performs a linear RGB transformation, using non-linear input (such as images encoded in gamma-corrected color spaces like sRGB) would yield inaccurate results. While the script is designed for EXR input, it has also been observed to function with linearized TIFF files.

The output is a complete DCTL (DaVinci Color Transform Language) file, which allows for immediate application within DaVinci Resolve, providing Resolve users with a workflow that mirrors the functionality of the mmColorTarget plugin used in Nuke pipelines. This comparison is significant because mmColorTarget has long been considered a high-quality tool for camera matching and color chart calibration, but remains inaccessible to many users due to platform-specific dependencies and installation complexity.

For background, Zeb Gardner introduced a related concept with his tool for color optimization using genetic algorithms, termed the “Genetic Color Space Transform Optimization Algorithm,” detailed in the article:
https://www.zebgardner.com/photo-and-video-editing/genetic-color-space-transform-optimization-algorithm.
While Gardner’s method explores more advanced and dynamic forms of transform fitting, the simplicity and immediacy of the 3×3 matrix approach retain practical value.

From a color science standpoint, a 3×3 matrix is essential for defining primary transformations, chromatic adaptation (e.g., between D65 and D60 white points), or approximate gamut mapping between color spaces. Though it cannot model non-linear tone curves or perceptual shifts, it remains ideal for:

  • Input Device Transforms (IDTs) in ACES or custom workflows.
  • Camera matching in multi-camera setups.
  • Fast, mathematically consistent creative tweaks in look development.
  • Pre-processing before film print emulation LUTs, where a tailored matrix can better approximate a film scan than generic Rec.709 or P3 transforms.

This tool’s ability to integrate directly into Resolve as a lightweight DCTL also makes it a more efficient alternative to heavier, more nuanced transforms such as Radial Basis Function (RBF) interpolation or tetrahedral LUTs. While such methods provide higher fidelity, a 3×3 matrix offers speed, editability, and clarity—particularly in the early stages of look creation or for subtle final image adjustments.

For users building layered, hybrid color pipelines, tools like this one offer critical flexibility and control.

In the last Blogpost I will try and create a custom 3×3 Matrix with Python.

Demystify Color. “Film Profile Journey 21: mmColorTarget for Resolve.” Demystify Color, October 29, 2023. https://www.demystify-color.com/post/film-profile-journey-21-mmcolortarget-for-resolve.

Gardner, Zeb. “Genetic Color Space Transform Optimization Algorithm.” Zeb Gardner, August 30, 2023. https://www.zebgardner.com/photo-and-video-editing/genetic-color-space-transform-optimization-algorithm.

2.5 Quick User Tests: Observations and Future Directions

Over the past few days, I conducted three quick user tests to gain early feedback on my analog prototype – the breathing circle. Although the tests were informal and low-pressure, they offered helpful insights into how others interpret and interact with the object. I invited Žiga (26), Nika (24), and Črtomir (62) to try it out. Each session lasted around 5 minutes.

Test Setup

I placed the plywood breathing circle on a table and gave minimal instructions: “This is a tool for guided breathing. Feel free to explore it and describe what you think it’s doing or how you would use it.” I asked them to use the think aloud method, meaning they should voice their thoughts as they interact with the object: what they believe it is, what it might do, and how they feel using it.

The goal was to observe how people interacted with the object naturally, especially how they understood the engraved inhale–hold–exhale sections, the circular form, and the rotating movement of the top plate.

After each test, we spent some time discussing their experience and gathering suggestions for improvements and potential uses.

User 1: Žiga (26, software developer)

Žiga intuitively understood what the breathing circle was for. Without much hesitation, he picked it up, started turning the top plate, and said something like, “Ah, this is for breathing, right?” He immediately began mimicking the rhythm of inhale–hold–exhale as he turned the plate. He noted that the movement felt a bit stiff and suggested a smoother surface or finish to make the rotation feel more meditative and pleasant.

He also raised several ideas during our conversation afterward: “I’d use this during online meetings. I often catch myself scrolling or clicking random things without paying attention. Having this in my hand would keep my fingers busy and help me focus.”

He added that he would be more likely to use it if it were smaller and made of a more satisfying material, something smoother and less rough than bare plywood. He liked the idea of it being minimalistic and aesthetically pleasing: “If it looked like a clean, white decorative piece, I’d definitely keep it on my desk. It could be like a fidget toy for adults.”

Key takeaway: Žiga saw real use potential in focused work contexts and as a physical alternative to digital distractions. He emphasized the importance of both feel and aesthetics, suggesting that people might be more likely to use something that feels good in the hand and looks good in the environment.

User 2: Nika (24, pedagogy master’s student & HR assistant)

Nika was initially unsure how to interact with the breathing circle. She wondered aloud whether she should turn it only one way or back and forth. After some time exploring, she closed her eyes to focus more on the texture. She liked the tactile feel and suggested the engraved areas could be more pronounced so the different phases of the breathing cycle are easier to recognize by touch alone. Although she didn’t see herself using it frequently, she said she might carry a smaller version in her purse if it were about the size of a fidget spinner.

Drawing from her background working with children, she immediately thought about potential classroom uses, especially for kids with attention difficulties. “I see more and more kids who can’t calm down. Something like this could help them focus during class, they could use it with one hand while listening or drawing. If they focused on this, maybe they wouldn’t be so ‘naughty.’” She emphasized that a child-friendly design is important: sturdy, colorful, and available in different versions with language-appropriate text. She sees real potential for the breathing circle as a calming tool for kids.

“I really enjoy doing breathing exercises without screens. I never liked guided YouTube meditations. This feels more real.”

Key takeaway: Nika prefers meditating without any digital interfaces and enjoys practicing breathing exercises undistracted. She sees strong potential for the breathing circle to support children with attention and self-regulation challenges, especially in educational settings. Enhancing the tactile experience and making the design kid-friendly could open valuable new applications.

User 3: Črtomir (62, electrical engineer)

At first, Črtomir had some difficulty understanding the English words engraved on the breathing circle, but with his basic knowledge, he soon figured out the inhale–hold–exhale instructions. He said, “I wasn’t sure at first what these words meant, but I got it after a moment.”

He shared that he has never tried meditation before but could see this tool being useful for people who are stressed or those who always feel the need to hold something in their hands. He also agreed that the breathing circle could work well for children in school settings. When asked how he might use it, he said, “Maybe before bed or while watching TV, something to help you relax.”

Since he didn’t understand the concept right away, I explained a bit more about its purpose before we discussed further. Črtomir thought it was a smart and simple solution but suggested some digital enhancements, such as connecting to a phone to show heart rate. He recommended versions with instructions in different languages and a brief explanation on the device to help new users. He joked about the size, saying it should be made for bigger fingers too.

Key takeaway: Črtomir appreciated the simplicity of the breathing circle and its potential to help people manage stress or restlessness, even if they’re new to meditation. Clear instructions and multilingual options would improve accessibility, and some might value digital features for added feedback. Making the design inclusive for different hand sizes could also broaden its appeal.

What I Learned

  • Users value a smooth, satisfying rotational movement and a pleasant material feel.
  • Size matters: many suggested smaller, more portable versions.
  • Clear tactile differentiation for inhale–hold–exhale phases is important.
  • Different user groups have distinct needs: minimalistic and elegant for adults; sturdy, colorful, and kid-friendly for children.
  • Clear instructions or icons help users understand how to use the tool quickly.
  • Some users are interested in optional digital features but want to keep the core experience analog and distraction-free.

Next Iteration Ideas

  • Experiment with different materials and surface finishes to improve rotation smoothness and tactile satisfaction.
  • Develop smaller versions suitable for carrying in a purse or pocket.
  • Enhance tactile cues with deeper engraving or raised elements for easier recognition by touch.
  • Design variants tailored for children: durable, colorful, and with language-appropriate text.
  • Integrate subtle instructional text or simple icons on the device to aid understanding.
  • Explore potential optional digital integrations, like app connectivity, while maintaining a primarily analog experience.

What’s Next?

This initial round of testing provided valuable insights that will guide the next steps in refining the breathing circle. In my upcoming blog post, I’ll share a video showcasing this stage of the prototype in action and reflect on whether it’s meaningful to develop the concept further. Stay tuned to see how this simple analog tool might evolve into a practical aid for mindful breathing and focus.

Using flat Film PRINT Emulations for more control

This small excursion introduces the process of creating film print emulations, which are inherently complex and require specialized equipment and workflows. Proper creation of print film emulations typically demands a grading suite equipped with both a film projector and a digital projector operating in tandem. Additionally, accurate profiling requires advanced tools such as spectrophotometers and other precise measurement devices. The financial investment for such a setup often exceeds one hundred thousand dollars, and the associated workflows are technically advanced.

One commercially available process is Fotokem’s shiftAI, a proprietary analog intermediate service developed by a leading motion picture film laboratory. This process facilitates the creation of print film emulations by transforming footage into a print film look. Despite the absence of public technical details, the service provides datasets that can be utilized for profiling and color grading purposes. The process involves producing scan-backs that are notably flatter compared to traditional 2383 print film stocks, likely achieved through specific scanning techniques, potentially involving the Scanity4K scanner.

This flatter scan-back requires subsequent grading and preparation to achieve the desired visual characteristics. The shiftAI process is designed as an intermediate step in a digital workflow: digital footage is initially graded, processed through shiftAI, and then further graded post-process. This methodology offers flexibility, allowing for various approaches in applying the dataset, including software such as Nuke, Fusion, Tetra DCTL, or Light Illusions.

To facilitate integration into scene-referred workflows, a Color Space Transform (CST) can be applied to the scan-backs, converting them into log-based color spaces such as LogC3, ACEScct, or DaVinci Intermediate. Experimentation with different transformations is encouraged to optimize results.

Color Patch Recording and Densitometer Measurements

A dataset comprising over 1700 color patches has been recorded onto 250D film stock and printed onto 2383 print stock. These patches provide a comprehensive basis for film emulation research. Initial attempts to digitize these patches utilized a digital scanner to expedite the process, resulting in cleaner scans compared to those obtained post-densitometer readings. Plans to perform detailed densitometer measurements remain ongoing, supported by the acquisition of film winders to streamline the process.

Datasets derived from these measurements will be made available in CSV or TXT formats, offering accessible data for further emulation development. Upcoming tutorials will address methods for measuring and working with these patches, including automated workflows and scripting approaches aimed at enhancing efficiency and accuracy in film emulation creation.

Integration of Negative and Print Film Emulations

The combination of negative and print film emulations can be implemented using either traditional or modern workflows. The traditional approach involves applying a negative emulation to digital footage in Cineon log space, performing grading, and subsequently applying a print film emulation (FPE) as a final step. Alternatively, a modern workflow leverages scene-referred processes, allowing both negative and print emulations to be applied flexibly within a grading environment. This enables the adjustment of emulation intensity and the selective combination of elements from each profile, providing greater creative control and adaptability.

Demystify Color. “Film Profile Journey: 19 – Creating Your Own Film Print Emulations.” Demystify Color, June 2024. https://www.demystify-color.com/post/film-profile-journey-19-creating-your-own-film-print-emulations.

Create Scene Referred Negativ Emulations (Part 2)

This discussion focuses on the importance of the 3×3 transformation matrix used to convert Plog-encoded film scans into a linear color space. Accurate color space conversion is essential for consistent and reliable post-processing of scanned film negatives. The transformation is achieved through a DCTL (DaVinci Color Transform Language) script, which is publicly accessible at https://github.com/Demystify-Color/DCTLs/blob/main/Technical%20Transforms/DMC_PLogLin.dctl. This tool enables users to place their film scans within the correct color space, thereby facilitating the creation of scene-referred looks, as previously outlined in the initial installment of this series.

The DCTL operates by converting the logarithmically encoded scanned images into a linear color space representation. This linearization is a crucial step before applying a Color Space Transform (CST) to translate the footage into the desired target color space. It is imperative that the target footage shares an identical color space configuration to ensure visual consistency and accurate profiling.

Brightness adjustment within the DCTL is managed by manipulating the “LOG Reference” slider. The procedure involves initially applying a blur filter to the scanned image to minimize noise and local variations. Subsequently, middle gray values are measured using an RGB picker tool, and an average value is calculated. This average is then input into the DCTL parameters, effectively aligning the brightness levels between the source scan and the target footage. This alignment ensures a more precise match in terms of luminance, thereby enhancing the fidelity of subsequent color transformations and profiling process.

Using an Output Device Transform (ODT) at the end allows verification that all applied transforms function correctly and do not introduce unwanted artifacts.

Demystify Color. “Film Profile Journey 11: A Better Way to Prep Your Negative Scans.” Demystify Color, June 2024. https://www.demystify-color.com/post/film-profile-journey-11-a-better-way-to-prep-your-negative-scans.

Create Scene Referred Negativ Emulations (Part 1)

Film negative emulation is a digital process that replicates the look and behavior of traditional film negative stocks, such as Kodak 250D or 500T. These film negatives capture a wide dynamic range with accurate color information, but in a low-contrast, log-like format—similar to how digital cameras record footage using log profiles.

To achieve the final look, the negative would traditionally be printed onto a positive film stock like Kodak 2383. This print stock adds contrast, saturation, and subtle color shifts that define the characteristics.

In digital workflows, film negative emulation mimics this entire process by first emulating the response of the film negative and then applying a film print emulation to recreate the final graded appearance, bringing the image to life with the depth and texture of analog film.

Scene-referred means you’re working for a specific colorspace like Rec.709 Gamma 2.4. Display Referred means that you are working with what you are seeing on screen. For example by doing the ODT with a contrast curve instead of a technical transform.


1. Film Stock Selection and Image Preparation

The workflow begins with selecting the target film stock. An appropriate exposure bracket is chosen, and the image is slightly blurred in the first node to simulate optical softness and reduce digital noise. This step stabilizes color matching and improves the emulation’s realism.

2. Color Space Mapping with a 3×3 Matrix

A 3×3 matrix is then applied to map the film scan’s chromatic values into the working color space. This transformation ensures consistent color behavior and a neutral foundation for further grading. (The matrix construction is detailed in the following chapter.)

3. Output Display Transform (ODT)

An ODT is added at the end of the node tree to convert the image from the working space to the intended output space, ensuring accurate display rendering.

4. Patch Matching and Baseline Normalization

Color patches from the film stock are matched to digital camera equivalents. Initially, only contrast is adjusted using a global offset to establish a neutral baseline for color work.

5. Refining Hue, Saturation, and Density

Using tools such as Color Warper or Tetra v2 DCTL, the target patches are further refined to match hue, saturation, and density. Split toning is added based on grayscale patches for tonal separation and filmic character after that with whatever technique you see fit.

By working in a normalized, wide-gamut color space with moderate contrast, this method enables faster, more consistent emulation results. It reduces the need for extensive contrast adjustments later in the process and offers a more reliable starting point for creative grading.

Preparing the Filmstock

Matching the target footage fo the prepared filmstock

Aurélien Pierre, “The Scene‑Referred Workflow,” Ansel, December 1, 2022–April 26, 2025, accessed June 20, 2025, https://ansel.photos/en/workflows/scene-referred/.

Demystify Color, “Film Profile Journey #18: A New Way for Creating Scene-Referred Negative Emulations,” Demystify Color, June 2023, https://www.demystify-color.com/post/film-profile-journey-18-a-new-way-for-creating-scene-referred-negative-emulations.

Theory Meets Practice

In my past blog posts, I discussed many theoretical aspects of the treatment writing process. With that knowledge, I started taking a more hands-on approach. I watched every YouTube video I could find on the topic and eventually came across the channel of Nur Niaz, a commercial director from Bangkok, Thailand, who has worked with major brands. His videos significantly helped me improve my treatment skills.

Focusing more on the following points made a huge difference:

  • Visual References: Incorporate images that reflect the project’s tone and style.
  • Concise Storytelling: Present the narrative clearly, focusing on key plot points.
  • Character Descriptions: Provide detailed profiles of main characters to convey their motivations.
  • Stylistic Approach: Explain the visual and auditory style, including color schemes and sound design.
  • Personal Vision: Articulate your unique perspective and passion for the project.

But the biggest learning for me personally wasn’t really how to structure or design the treatment. It was about how to handle feedback.

Often, when I’m deep in my creative process, I see my vision clearly and know exactly where the video should go—but that clarity doesn’t always translate to others. When people don’t understand your concept, you might start to question your idea. But most of the time, it’s just not communicated clearly enough and needs some reworking.

That’s where feedback comes in. I learned that getting feedback from people who aren’t involved in the project is one of the best things you can do. They have no background on it—so if they understand the vision and the idea, the client will too. And that’s the most important thing.

I applied his tips to my latest treatment, which I wrote for my Carhartt WIP spec project. After receiving feedback from several people, I felt I had genuinely improved compared to my previous treatments. I also used ChatGPT to help me rephrase my sentences, and it effectively maintained the core of my ideas while refining the grammar and flow. This further enhanced my treatment.

Next, I’ll take the theoretical knowledge I gained from my research and begin scripting my idea—followed by storyboarding. During my research, I tried to find AI tools that could assist with screenwriting, but to my surprise, I couldn’t find anything that felt useful without interfering with my original idea. So I’ve decided to write down every scene manually, just as we learned in our past Dynamic Media classes, and see if everything works out both visually and narratively as I imagined.

Once the script is finished, I’ll look into AI tools like Stable Diffusion or Midjourney to see how much they can help me and whether they’re useful and time saving compared to sketching the storyboard myself, since I can’t sketch.

Interesting Links:
https://www.youtube.com/channel/UC1QQwXzHskeJzslDn8dylqA

16 Morse Code with Arduino Summary + Video

Over the semester, I built a simple Arduino-based Morse code prototype. It started with just three buttons to create Morse code messages, which were then turned into sound. I quickly realized that keeping it on one device didn’t make much sense, so I connected the Arduino to Wi-Fi and used OSC to send messages to my laptop. From there, I added a decoding function that translated Morse into readable text. In the final step, I built a basic web interface where you could type a message, send it to the Arduino, and see it displayed on an LED matrix. My idea is to use this setup to teach kids about encryption in a playful way. Along the way, I learned a lot about Arduino syntax, using libraries, and how to build Wi-Fi and web-based interfaces—opening up tons of new creative possibilities for me.