Prototyping VII: Image Extender – Image sonification tool for immersive perception of sounds from images and new creation possibilities

Mixing of the automatically searched audio files into one combined stereo file:

In this latest update, I’ve implemented several new features to create the first layer of an automated sound mixing system for the object recognition tool. The tool now automatically adjusts pan values and applies attenuation to ensure a balanced stereo mix, while seamlessly handling multiple tracks. This helps avoid overload and guarantees smooth audio mixing.
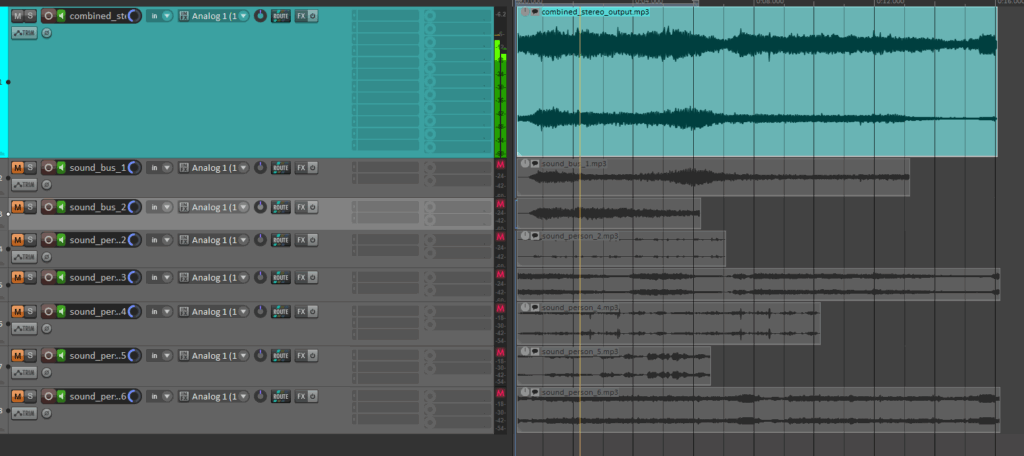
check of the automatically searched and downloaded files + the automatically generated combined audiofile

A key new feature is the addition of a sound_pannings array, which holds unique panning values for each sound based on the position of the object’s bounding box within an image. This ensures that each sound associated with a recognized object gets an individualized panning, calculated from its horizontal position within the image, for a more dynamic and immersive experience.
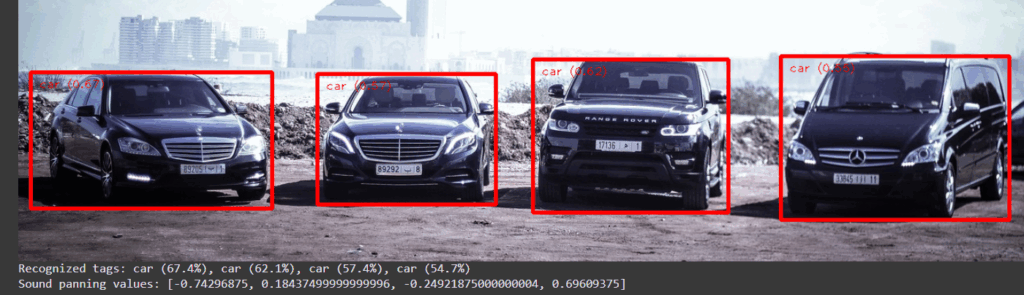
display of the sound panning values [-1 left, 1 right]

I’ve also introduced a system to automatically download sound files directly into Google Colab’s file system. This eliminates the need for managing local folders. Users can now easily preview audio within the notebook, which adds interactivity and helps visualize the results instantly.

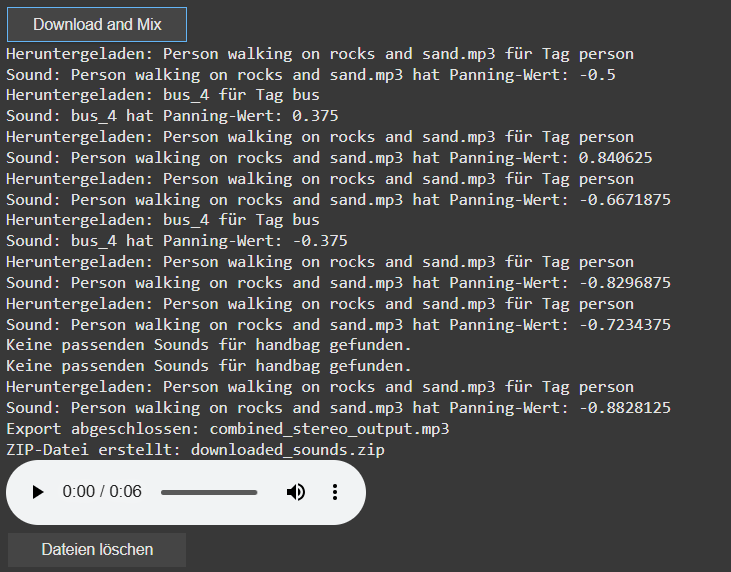
The sound downloading process has also been revamped. The filters for the search can now be saved via a buttonclick to apply for the search and download for the audiofile. Currently for each tags there are 10 sounds per tag preloaded, with each sound randomly selected to avoid duplication but ensure the use of multiple times of the same tag. A sound is only downloaded if it hasn’t been used before. If all sound options for a tag are exhausted, no sound will be downloaded for that tag.

Additionally, I’ve added the ability to create a ZIP file that includes all the downloaded sounds as well as the final mixed audio output. This makes it easy to download and share the files. To keep things organized, I’ve also introduced a delete button that removes all downloaded files once they are no longer needed. The interface now includes buttons for controlling the download, file cleanup, and audio playback, simplifying the process for users.
Looking ahead, I plan to continue refining the system by working on better mixing techniques, focusing on aspects like spectrum, frequency, and the overall importance of the sounds. Future updates will also look at integrating volume control and more far in the future an LLM Model that can check the correctness of the found file title.
02.05.: Zweiführung

Nach der Einführung in Post 02.02, in der zwei große Starttutorials ihren Weg in mein Hirn fanden, folgen nun in diesem und im nächsten Post die restlichen Kurztutorials in Modul 1, die sich genauer mit gewissen Themen beschäftigen. Zu jedem dieser Tutorials möchte ich kurz die wichtigsten Dinge festhalten und Tricks, die ich noch nicht kannte mit euch teilen. Die jeweiligen Tutorials findet ihr in Modul 1 des Kurses.

Shape Layer Tricks

  • Rotobezier: Rotobezier ist quasi autosmooth für Shape Layer. Man kann es mit Rechtsklick auf die Shape unter Mask and Shape Path finden und es lässt die Handles aller Knotenpunkte verschwinden und smoothed sie stattdessen automatisch aus. Der Path bleibt aber trotzdem animierbar.
  • Gruppieren: CMD+G kann einem das ganze Projekt wirklich extrem gut aufräumen, da man damit innerhalb einer Shape Layer verschiedene Paths gruppieren kann.
  • Convert Vertex Tool: Sollte man die Handles eines Knotenpunkts mal nicht sehen kann man sie damit zurückholen. Man findet es durch Altklicks auf das Pen-Tool.
  • Convert to Bezier: Auch “normale” Shapes wie Quader kann man durch Rechtsklick in der Composition in Bezier Paths umwandeln um mehr Gestaltungsmöglichkeiten zu haben.

Vector Trick

  • Continuously Rasterize: Damit kann man das leidige Problem von Vektor Grafiken in After Effects lösen. So lange man Vektoren nämlich direkt scaled berechnet AE die Pixel immer neu und alles bleibt scharf, Pre-Comped man das Ganze aber und scaled dann die Pre-Comp passiert das nicht mehr. Damit das passiert muss man bei den Switches der Pre-Comp den kleinen Stern aktivieren und schon berechnet AE auch wieder alles vektorbarsiert… crazy.

Graph Editor Hacks

  • Multi-Tasking: Für manche vielleicht offensichtlich, aber ein brutaler Aha-Moment war für mich, dass ich gleichzeitig mit dem Pen-Tool im Ansichtsfenster Paths verschieben kann und einfach in der unteren Ansicht im Graph Editor parallel das Easing kontrollieren kann.
  • Value-Graph: Als jemand der mit Keyframes zum ersten mal in DaVinci zu tun hatte (und dort den Spline Editor kennt) habe ich in After Effects im Grunde eigentlich nur mit dem Speed Graph gearbeitet, der dasselbe in Grün ist. In zwei Szenarien kann der Value Graph aber bedeutend mehr: Bei Bounces ist er einfach viel logischer und bei so klassischen Overshoot-Reaktionen (die in Davinci einfach super easy mit der Out-Back-Cubic Easing Funktion von alleine passieren) macht er auch extrem Sinn.
  • Hold-Keyframes: Wenn man nicht möchte, dass die Zeit zwischen zwei Keyframes animiert wird kann man das stoppen. Geht mit Rechtsklick auf den Keyframe.
  • Motion-Paths? WTF?!: Also das ist das mit Abstand gestörteste was ich in meinem Leben jemals gesehen habe. Kurz von Anfang an: Ich habe immer gedacht wenn ich ein Objekt auf einer gewissen Bahn bewegen will, muss ich zuerst die Bahn zeichnen, zb mit dem Pen-Tool, dann diese Bahn tracken, ein Null-Objekt anheften und dann mein Objekt ans Null-Objekt parenten. Wenn ich dann etwas an der Bahn ändern will, alles gleich nochmal. Fuck it! Es is einfach unfassbar, aber ich glaubs nicht. Wenn man einfach grundsätzlich zwei Position-Keyframes erstellt, egal wo, erhält man in der Anzeige diese blaue Linie, die repräsentiert zwischen welchen Punkten sich das Objekt bewegt. Und jetzt kommts. DIE KANN MAN BEARBEITEN. Verzieht man das Objekt, erstellt es automatisch einen neuen Keyframe und ändert die blaue Linie… und nimmt man das Pen-Tool kann man diese auch noch abrunden. Mein Leben bisher war sinnlos. Tschau.
  • Rove-Across-Time: Und es wird immer gestörter. Ich kann After Effects einfach mit Rechtsklick sagen, dass es mir den Wert mancher Keyframes einfach automatisch berechnen soll, wenn ich andere bewege. So kann ich nur meine “Hauptpunkte” easen und alles dazwischen macht AE. Ich bin sprachlos.

Prototyping VI: Image Extender – Image sonification tool for immersive perception of sounds from images and new creation possibilities

New features in the object recognition and test run for images:

Since the initial freesound.org and GeminAI setup, I have added several improvements.
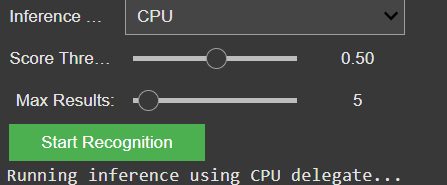
You can now choose between different object recognition models and adjust settings like the number of detected objects and the minimum confidence threshold.

GUI for the settings of the model

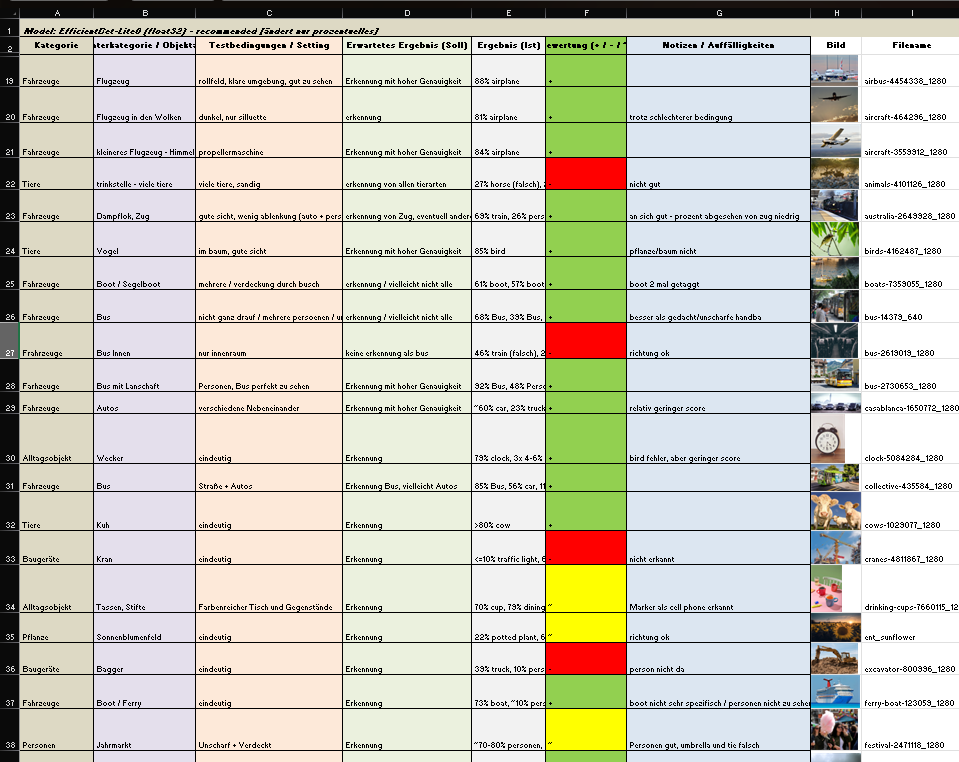
I also created a detailed testing matrix, using a wide range of images to evaluate detection accuracy. Due to that there might be the change of the model later on, because it seems the gemini api only has a very basic pool of tags and is also not a good training in every category.

Test of images for the object recognition

It is still reliable for these basic tags like “bird”, “car”, “tree”, etc. And for these tags it also doesn’t really matter if theres a lot of shadow, you only see half of the object or even if its blurry. But because of the lack of specific tags I will look into models or APIs that offer more fine-grained recognition.

Coming up: I’ll be working on whether to auto-play or download the selected audio files including layering sounds, adjusting volumes, experimenting with EQ and filtering — all to make the playback more natural and immersive. Also, I will think about categorization and moving the tags into a layer system. Beside that I am going to check for other object recognition models, but  I might stick to the gemini api for prototyping a bit more and change the model later.

02.04: Exkurs. Audioreaktivität in After Effects

Wie bereits im letzten BlogPost gezeigt habe ich in den letzten Wochen an Versuchen mit Gradients gearbeitet. Auch wenn es eigentlich nicht Teil des angestrebten Kurses ist, habe ich daraufhin viel Zeit damit verbracht diese Gradients in After Effects auf Sound und Musik hin reagieren zu lassen. Deshalb wollte ich es mir nicht nehmen lassen meine Erkenntnisse auch hier schriftlich festzuhalten. Skills sind Skills.

Im Grunde geht es in diesem Blogpost um dasselbe Projekt wie im letzten, nur nun eben audioreaktiv. Die angewandte Methode funktioniert aber natürlich gleichsam auf allen möglichen Shape Layern, nicht nur auf meinen Gradients.

Schritt 1: Audio Loopen

Um eine saubere Basis für die weiteren Schritte zu haben, empfiehlt es sich einen Loop des Audios zu machen. Das funktioniert meiner Meinung nach direkt beim Import bzw. bei den Importeinstellungen am besten. Diese findet man mit Rechtsklick auf das Audio, jedoch nicht unten in den Compositions sondern nur oben im Projektmenü. Unter “Interpret Footage” und “Main” kann man ganz unten dann die Häufigkeit einstellen mit der das Material geloopt werden soll. Damit muss man das Audio nicht mehrfach einfügen, verschieben oder irgendwie anders pfuschen.

Schritt 2: Keyframes aus dem Beat erzeugen

Zieht man sich diesen Audioloop dann in die Timeline, könnte man natürlich manuell auf Beats oder andere Änderungen Keyframes setzen und die Werte verändern, dies geht aber auch automatisch. Über Rechtsklick “Keyframe-Assistant” und “Convert Audio to Keyframes” macht After Effects nämlich genau das von selbst. Ehrlicherweise habe ich auch nach diversen Versuchen mit verschiedenen Tracks noch immer keine Ahnung auf welcher Basis After Effects das berechnet und wie diese Keyframes zustande kommen…. unterm Strich funktionierts aber und AE erstellt einem auf einer eigenen Layer drei Channels mit drei Slidern und Keyframes für jeden einzelnen Frame mit (meiner Meinung nach) zufälligen Werten, die aber bestimmt irgendwie mit Lautstärke oder ähnlichem der Musik zusammenhängen. Diese drei Slider werden nachfolgend dann verwendet um die Shapes reaktiv zu machen.

Schritt 3: Verbinden der Keyframes mit anderen Werten

In meinen Beispielen nehmen die Slider für jeden Frame einen Wert irgendwo zwischen 0 und ungefähr 60 an. In der Theorie kann man nun einfach seine Shape nehmen und den Wert seiner Wahl (z.B. scale) über das Pickwhip-Tool an den Slider linken und schon verändert sich die Größe des Objekts mit dem Beat. So einfach das klingt ist es aber leider nur selten, da die Werte-Range (wir erinnern uns 0-60) im Beispiel der Größe einfach viel zu starke Sprünge macht und das Shape so in einem Frame 0% groß ist und im nächsten vielleicht gleich 60. Daher muss man sich hier mit Expressions behelfen. Auch ist nicht immer die Größe der sinnvollste Wert, um ihn an das Audio zu linken. Daher hier meine Erfahrungen:

Welche Werte man am besten linken kann

Im Grunde bietet sich natürlich der scale am besten für die Verbindung zum Audio an, da auch wirklich jedes Objekt diesen besitzt. Neben dem scale der ganzen Layer kann hierbei zum Beispiel auch nur die Größe des Repeater Effekts (in meinem Fall) oder eines anderen Generators. Neben der Scale bieten sich aber auch einige andere Eigenschaften gut an. In meinen Tests hat zum Beispiel alles was eine “Evolution” Einstellung hat immer sehr gut mit dieser funktioniert. Sinnvoll kann aber auch ein eigener Effekt sein den man nur zu diesem Zwecke verwendet. In meinen Fällen hat da zum Beispiel “Color Balance HLS” sehr gut funktioniert um kleine Farbverschiebungen auf den Takt der Musik möglich zu machen. Hat man beispielsweise über der gesamten Compostion eine Adjustment Layer mit Effekten, kann es auch gut funktionieren diese Effekte an den Slider zu koppeln. Die Möglichkeiten sind aber natürlich grenzenlos.

Wie man sinnvolle Ergebnisse erhält

Um das oben geschilderte Problem (dass die automatisch generierten Werte der Keyframes für die verlinkte Eigenschaft einfach zu extrem sind, oder einfach keinen Sinn ergeben) muss man kreativ werden. Ich habe, um beim scale zu bleiben, meist mit einer Art Basis gearbeitet. Statt also den Scale direkt an die einzelnen Keyframes zu linken und damit extreme Schwankungen zwischen den einzelnen Frames zu haben, habe ich in den Expressions mit verschiedenen Varianten gespielt. Oft bestand die Expression dann aus der Basis (z.B. 60% scale) plus die Werte aus dem Slider. Diese habe ich dann häufig noch durch fünf oder zehn geteilt, einfach um die Auswirkungen des Sliders etwas abzuschwächen.

Fazit

Audioreaktive Animationen in After Effects sind tatsächlich leichter als gedacht. Jedoch gibt es oft keine schnelle Lösung und man muss einfach verschiedene Werte mit verschiedenen Expressions durchprobieren bis man etwas visuell ansprechendes erhält.

NIME Review – Juggling for Beginners by Zeynep Özcan, and Anıl Çamcı

I recently read a paper presented at NIME 2024 called “Juggling for Beginners: Embracing and Fabricating Failure as Musical Expression”. It immediately caught my attention, not only because of its playful title, but because it challenges some of the deepest assumptions we have about performance, skill, and music-making.

What the paper is about

The paper I read introduces a musical interface that is unlike anything I’ve seen before. Instead of rewarding precision or control, it creates music from failure. The authors designed a system that turns unsuccessful attempts at juggling into expressive sound.

The concept is as charming as it is deep. A person begins juggling (or trying to), and the system tracks their movements. Instead of focusing on how well the person juggles, the software listens for the irregularities—the clumsy throws, the missed catches, the awkward flailing—and those gestures are what drive the music. The worse you are at juggling, the more interesting and expressive the sound becomes.

This flips the usual narrative of performance entirely on its head. Instead of needing years of practice to produce something worth hearing, this instrument invites beginners to make music from the get-go. It doesn’t ask you to be good—it asks you to be honest and in motion.

A beautiful rethinking of performance

What I found most powerful in this work is the idea of embracing mistakes not just as accidents, but as an essential part of the musical expression. In so many areas of life—especially in music, dance, and design—we are taught to rehearse, refine, and perfect. Only when we’ve eliminated our errors do we feel ready to perform. But this project suggests the opposite. What if mistakes are the very thing that makes a performance meaningful?

This feels incredibly precious and unusual. It invites a kind of vulnerability that we don’t often associate with technology-based interfaces. There is something beautifully human about using failure as a medium. And more than that, it opens the door to people who might never have considered themselves performers. You don’t need skill to play this instrument. You just need to show up and try.

The paradox of getting better

One interesting point the authors raise is that, over time, players naturally begin to improve at juggling—even without trying. Our bodies quietly refine our motor skills in the background. As a result, the spontaneous mistakes that originally made the music expressive start to disappear, and the performance begins to feel more controlled and less surprising.

To counteract this, the authors suggest modifying the sound engine itself to subtly provoke mistakes. By introducing stochastic elements—randomized or unpredictable changes to how juggling movements are translated into sound—they can gently “distract” the performer. The idea is that the sonic feedback becomes less stable, less predictable, and this in turn prompts more slips and errors. I found this approach really elegant because it keeps the performer in that beautiful, vulnerable space of not quite knowing what’s going to happen next.

My thoughts

Personally, I find the idea of making music from failure deeply moving. It’s not just a technical innovation—it’s a philosophical one. It makes space for the unpolished, the nervous, the beginner. It reminds me that expression doesn’t have to come from mastery. It can come from trying, from stumbling, from not quite knowing what you’re doing.

In a culture that constantly pushes us toward perfection, this work feels like a breath of fresh air. It reminds me that technology doesn’t have to make us faster, better, or more precise. Sometimes, the most poetic thing it can do is reflect our imperfections back to us in a way that feels like music.

Prototyping V: Image Extender – Image sonification tool for immersive perception of sounds from images and new creation possibilities

Integration of AI-Object Recognition in the automated audio file search process:

After setting up the initial interface for the freesound.org API and confirming everything works with test tags and basic search filters, the next major milestone is now in motion: AI-based object recognition using the GeminAI API.

The idea is to feed in an image (or a batch of them), let the AI detect what’s in it, and then use those recognized tags to trigger an automated search for corresponding sounds on freesound.org. The integration already loads the detected tags into an array, which is then automatically passed on to the sound search. This allows the system to dynamically react to the content of an image and search for matching audio files — no manual tagging needed anymore.

So far, the detection is working pretty reliably for general categories like “bird”, “car”, “tree”, etc. But I’m looking into models or APIs that offer more fine-grained recognition. For instance, instead of just “bird”, I’d like it to say “sparrow”, “eagle”, or even specific songbird species if possible. This would make the whole sound mapping feel much more tailored and immersive.

A list of test images will be prepared, but there’s already a testing matrix for different objects, situations, scenery and technical differences

On the freesound side, I’ve got the basic query parameters set up: tag search, sample rate, file type, license, and duration filters. There’s room to expand this with additional parameters like rating, bit depth, and maybe even a random selection toggle to avoid repetition when the same tag comes up multiple times.

Coming up: I’ll be working on whether to auto-play or download the selected audio files, and starting to test how the AI-generated tags influence the mood and quality of the soundscape. The long-term plan includes layering sounds, adjusting volumes, experimenting with EQ and filtering — all to make the playback more natural and immersive.

Prototyping IV: Image Extender – Image sonification tool for immersive perception of sounds from images and new creation possibilities

Tests on automated audio file search via freesound.org api:

For further use in the automated audio file search of the recognized objects I tested the freesound.org api and programmed the first interface for testing purposes. The first thing I had to do was request an API-Key by freesound.org. After that I noticed an interesting point to think about using it in my project: it is open for 5000 requests per year, but I will research on possibilities for using it more. For the testing 5000 is more than enough.

The current code already searches with a few testing tags and gives possibilities to filter the searches by samplerate, duration, licence and file type. There might be added more filter possibilities next like rating, bit depth, and maybe the possibility of random file selection so it won’t be always the same for each tag.

Next steps would also include to either download the file or just play it automatically. Then there will be tests on using the tags of the AI image recognition code for this automated search. And later in the process I have to figure out the playback of multiple files, volume staging and filtering or EQing methods for masking effects etc…

Test gui for automated sound searching via freesounds.org API

02.03: Gradients und erste Gehversuche

Nach der doch ausführlichen Einführung (was für ein Wortspiel) im letzten Post habe ich mich seither stark auf eine sehr spezielle Design-Entscheidung innerhalb der Motion Graphics spezialisiert: dem Design mit Gradients. Das und noch viel mehr heute, hier, im besten Blog der Welt. Nur ein Spot, dann gehts los.

Da ich, wie bereits angekündigt, nicht mehr ausnahmslos alle Lessons des Kurses machen werde, waren nun als erstes die Einheiten zu Gradients dran. Dabei ist mir bewusst geworden, dass Gradients im Grunde sehr leicht zu erstellen sind. Die einfachste Methode für Text oder Shapes ist dabei direkt in den Fill-Einstellungen, für Dinge wie Solids ist aber auch der Effekt 4-Colour-Gradient sehr hilfreich.

Will man diese basic Gradients besser gestalten kommen dann meist Effekte über eine Adjustment Layer ins Spiel, dabei besonders hilfreich: verschiedene Arten von Blur (directional, radial, gaussion) oder Effekte wie Twirl, Posterize oder Glow lassen Gradients direkt geschmeidiger aussehen.

Um Gradients zu animieren gibt es mehrere Möglichkeiten, ich habe mich jedoch dafür entschieden bereits gelerntes aus den Basics anzuwenden und meine Shapes über Paths zu animieren, damit sich diese bewegen. Das Verziehen der Anchor Points im 4-Color-Gradient geht aber auch sehr gut.

Mit diesem Wissen habe ich mich dann gleich an mein erstes eigenes After Effects Projekt gesetzt, ohne einfach nur stur ein Tutorial nachzubauen. Ziel war eine ansprechende Visualisierung mit verschiedenen Gradient-Effekten. Dafür habe ich im Grunde all das kombiniert was in bisherigen Posts von mir zu lesen war. Das Ergebnis ist dieser Loop:

Im nächsten Schritt möchte ich weiter auf smoothe Easings sowie speziellere Anwendungsfälle für die Datenvisualisierung eingehen, um dann am Ende für meinen Prototyp gut gerüstet zu sein.

Pain Creature: Interdisciplinary Collaboration in the Design of an Embodied Textile Instrument for Interactive Dance


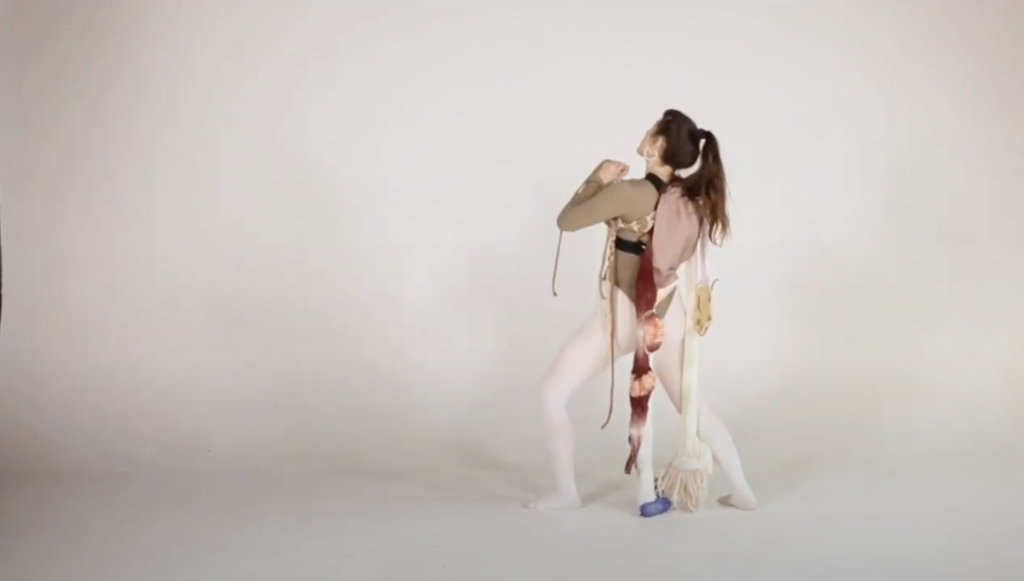
The paper Pain Creature by Madaghiele and Demir presents an innovative interdisciplinary project combining textile design, sonic interaction, and dance to create an embodied textile instrument. The artifact, Pain Creature, serves as both a reflective tool for chronic pain experiences and a performance instrument.

The paper highlights a successful collaboration between a sonic interaction designer (Madaghiele) and a textile designer (Demir), merging expertise in sound, textiles, and movement. This approach led to a design where material properties directly influenced sound interactions.

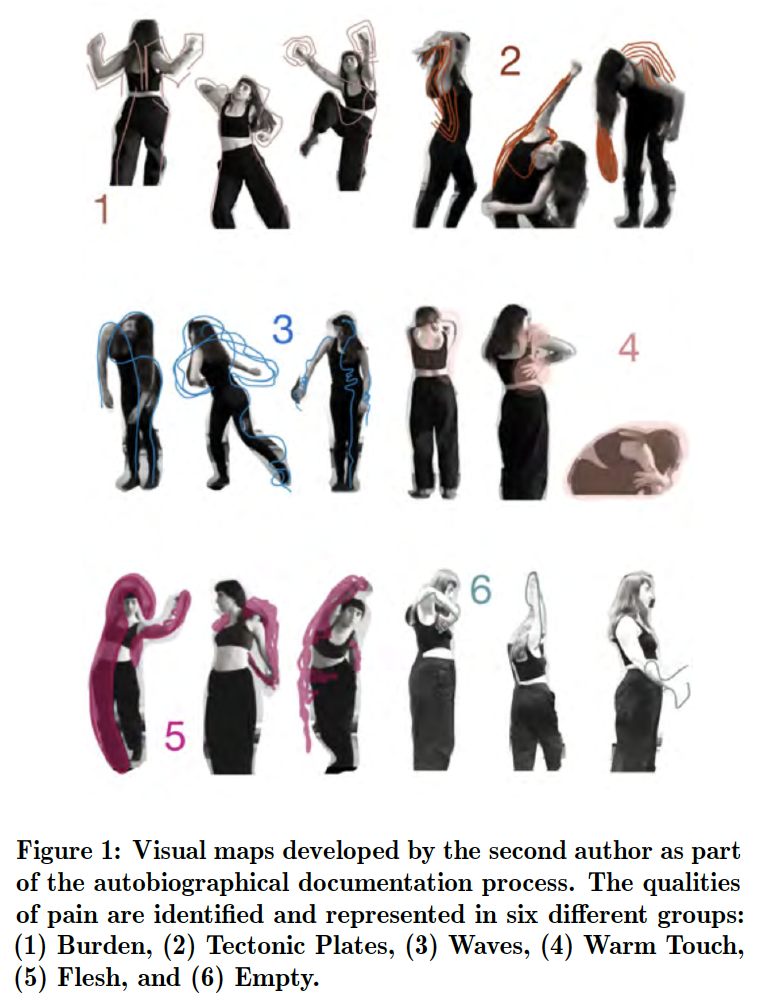
Through the use of soma design method, including first-person exploration of chronic pain, the designers translated subjective pain experiences into tangible textile-sound mappings.

The artifact was integrated into an improvisational dance performance, where it functioned as a “parasitic” extension of the dancer’s body, narrating stages of pain. Through this approach, the artifact bridges materiality, sound and movement and offers the audience a richt, multi-sensory experience.

As far as I understand the Bela Mini’s computational constrains forced the designers to constrain the sound design to simpler forms, e.g. omitting the Empty dimension. This highlights a trade-off between complexity and real-time performance limitations. Another critical aspect that was missing in the paper was the effectiveness of the mappings on the audience and how well they were perceived. While the paper notes the importance of gesture-sound mappings for audience understanding, no empirical evaluation of this took place.

As the Bela Mini offers limited dynamic control over musical parameters, the performance could also get stale the longer the performance goes on. With the implication of a live performing musician this could be negated, but the risk of loosing the connection between gesture-sound mapping through a diluted soundscape is very high.

This paper in my eyes documents a novel, interdisciplinary design process and its theoretical grounding in somaesthetics. However, it could be strengthened by implementing audience studies to evaluate how performers and audiences interpret the instrument’s mappings and how much difference it makes compared to a pre-recorded soundscape. I also would love to know how the design would evolve with more advanced textile instruments. Unfortunately, the PD patch documentation is very limited which hinders fellow designers to reproduce the Artifact.

IRCAM Forum Workshops 2025 – Promenade Sonore

Sound Meets the City: Nadine Schütz’s Promenade Sonore Transforms a Footbridge into a Living Instrument

We first encountered Nadine Schütz’s fascinating work during her presentation at the IRCAM Forum Workshops 2025, where she introduced her project Promenade Sonore: Vent, Soleil, Pluie (“Wind, Sun, Rain”). The talk offered deep insights into her creative process and the technical and ecological thinking behind the installation.

In the heart of Saint-Denis, just north of Paris, Swiss sound artist Nadine Schütz has reimagined the way we move through and experience urban space. Her project Promenade Sonore: Vent, Soleil, Pluie (“Wind, Sun, Rain”) is not just a public art installation—it’s a multi-sensory experience that turns an ordinary walk across a footbridge into an acoustic encounter with the environment.

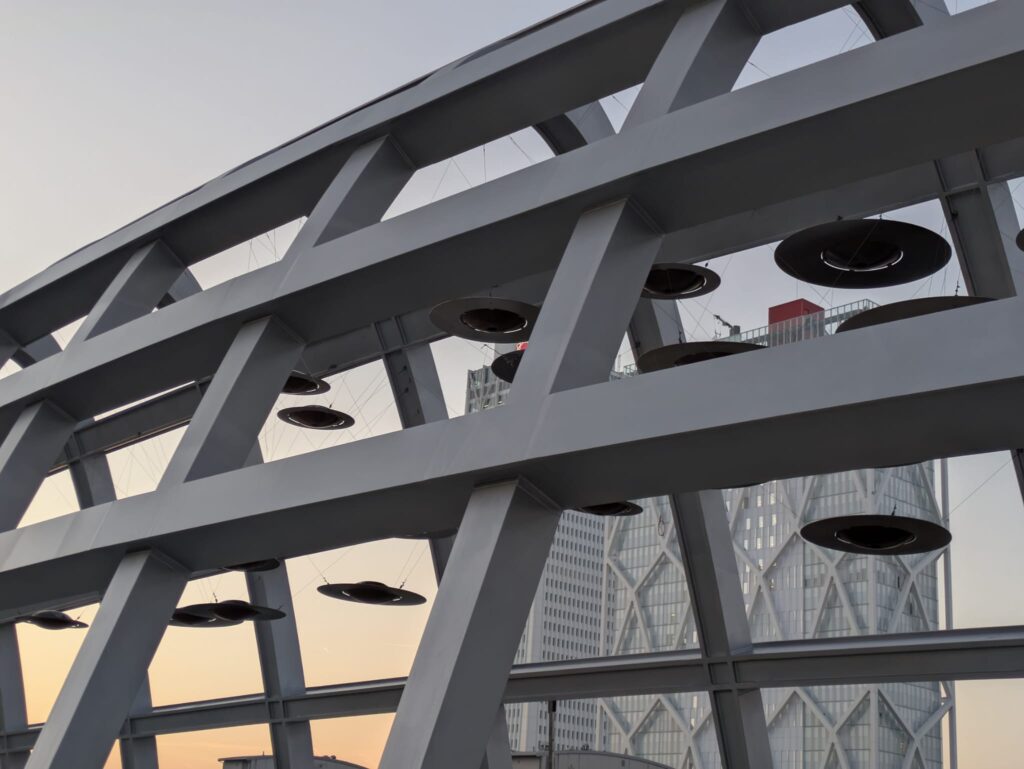
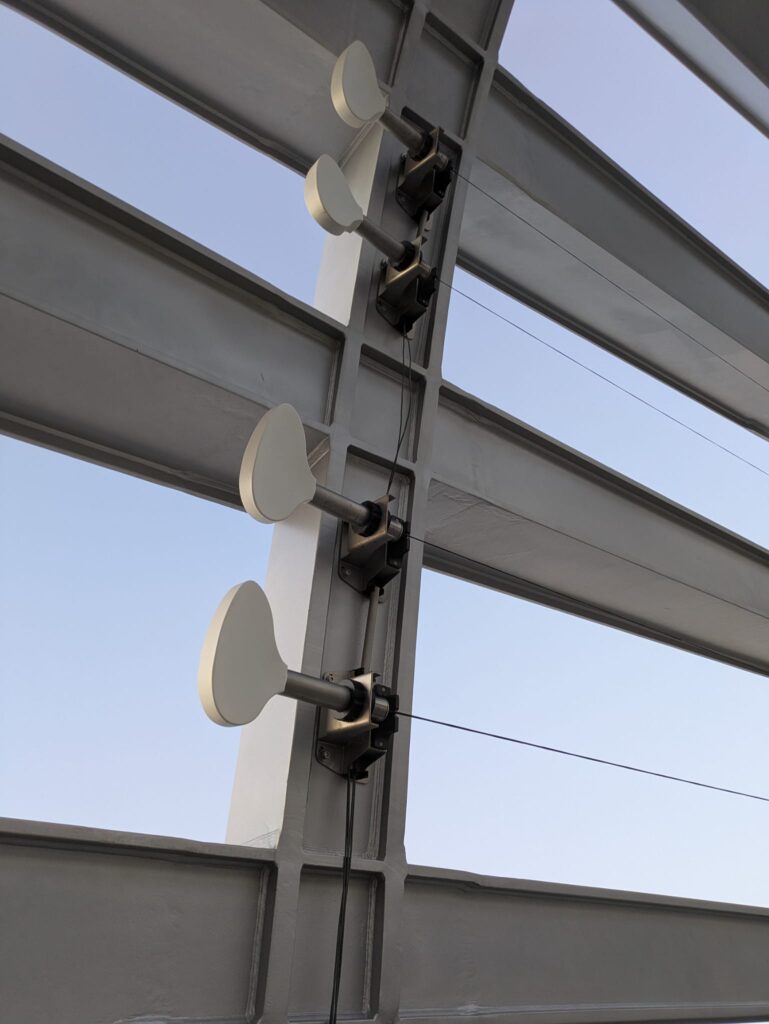
Commissioned by Plaine Commune and developed in close collaboration with architect-engineer Marc Mimram, the installation is located on the Pleyel footbridge, a key link between the neighborhoods of Pleyel and La Plaine. Rather than adding passive sound or music, Schütz has embedded three sculptural sound instruments directly into the architecture of the bridge, each one activated by a different natural element: wind, sun, and rain.

These instruments aren’t just symbolic; they actually respond to the environment in real time. Wind passes through a metal structure that produces soft, organ-like tones. When sunlight hits specific points, it activates solar-powered chimes or sound emitters. During rainfall, the structure becomes percussive, resonating with the rhythm of droplets. The bridge becomes a living, breathing instrument that reacts to weather conditions, turning nature into both performer and composer.

What makes Promenade Sonore truly compelling is how seamlessly it blends technology, ecology, and design. It’s not loud or intrusive—it doesn’t drown out the urban soundscape. Instead, it subtly enhances the auditory experience of the city, encouraging passersby to slow down and listen. It transforms a utilitarian space into a space of poetic reflection.

Schütz’s work is rooted in the idea that sound can deepen our connection to place. In this project, she brings attention to the sonic qualities of weather and architecture—things we often overlook in our fast-paced, screen-driven lives. The soundscape is never the same twice: it shifts with the wind, the angle of the sun, or the mood of the rain. Every walk across the bridge is a unique composition.

More than just an artistic gesture, Promenade Sonore is part of a broader vision of “land-sound” design—a practice Schütz has pioneered that treats sound as an essential component of landscape and urban planning. In doing so, she challenges traditional boundaries between art, science, and infrastructure.

Visit of the pleyel bridge

We had the chance to visit the Pleyel footbridge ourselves—and it was a one-of-a-kind experience. Walking across the bridge, immersed in the subtle interplay of environmental sound and sculptural form, was both meditative and inspiring. While on site, we also conducted our own field recordings to capture the dynamic soundscape as it unfolded in real time. Listening through headphones, the bridge became even more alive—each gust of wind, each shifting light pattern, each ambient tone weaving into a delicate, ever-changing composition.