EP #7: MEMS Microphones – Miniaturizing the Soundfield

Traditional Ambisonics arrays are bulky and expensive. In contrast, MEMS (Micro-Electro-Mechanical Systems) microphones offer a promising alternative: they are tiny, digital, and energy-efficient.

This semester, I investigated how a tetrahedral MEMS array could be integrated into a mobile system. Calibrated for gain and phase alignment, and paired with head orientation data, such a rig could offer a portable first-order Ambisonics input for spatial field recording.

The challenge lies in the signal integrity: capsule mismatch, noise floors, and synchronization need to be addressed. But the vision is clear — a pocket-sized array that records the world in full 3D sound, for music, XR, and soundscape preservation.

Trying Things Out One by One: My First Days with Arduino Sensors

This is officially my first time working with Arduino and honestly, it’s kind of funny how I began. I started with the simplest possible circuit: an LED light and a resistor, just to see something turn on. That small success was weirdly exciting. From there, I began testing each sensor individually, one by one, to understand how they work and what kind of interactions are possible.

I treated it like a kind of warm-up exercise. I wanted to get the logic behind each sensor, what it senses, how it reacts, what kind of output it gives, and how I could use that in my prototype. Here’s how the testing phase went, step by step:

1. The Doorbell (Button + Buzzer)

This was the very first interaction I tried out. A classic doorbell setup: you press the button, and the buzzer buzzes. Super simple and it worked immediately. A perfect confidence booster to start with!

2. The Door Beam Sensor

Next up was the door sensor using a KY-010 beam sensor and an RGB light. The idea was: if the beam is blocked (door closed), the light stays off; if the beam is clear (door open), the RGB light turns on. At first, it worked the other way around but that was just a logic issue, and the fix was quick. Once reversed, it worked great.

3. The Drawer Sensor (Conductive Tape + Light)

This one was really fun. I used two pieces of conductive tape inside the drawer, when they touch, it means the drawer is open and a soft yellow light turns on so you can see what’s inside. It was cute and cozy, and it worked smoothly right away.

4. The Laptop Interaction (Ultrasonic Sensor + Light)

Here I used an ultrasonic sensor. When you come close to the “laptop,” the light turns on, like you’re opening it. This interaction also worked as planned from the start, and I was pretty happy with how natural it felt.

5. Adding a Photoresistor for Sleep Mode

Finally, I added a photoresistor to control the same light as the door sensor. The idea was: the light turns on when the door opens but if you go to bed and cover the photoresistor with a blanket, the light turns off. I had some trouble with the values at first (it worked in reverse again), but I adjusted the threshold and fixed it quickly. It’s a small detail, but it adds a nice touch of realism.

Day Two: Combining It All

The second day was about combining all the sensors to work together. That’s when things got a bit tricky. One of the main challenges was the wiring, especially since I wanted to keep all components off the breadboard and inside my little room model. Managing all the cables without losing my mind took some time.

And then, a surprise problem appeared: the laptop interaction stopped working. No matter what I did, the ultrasonic sensor just wouldn’t respond. After lots of trial and error, I realized the issue wasn’t in the code, it was power. The Arduino couldn’t handle all the sensors at once.

The Fix: Two Arduinos Are Better Than One

To solve the power issue, I decided to connect the laptop interaction to a second Arduino board. And voilà, it worked again! I even added a little sound interaction: when you come close to the laptop, it lights up and plays a soft “turning on” sound. When you leave, the light turns off and you hear a subtle “shutting down” tone. It made the interaction feel much more alive.

Next Steps

In my next blog post, I’ll describe how I’m placing all the sensors, lights, and elements inside the mini room itself. Now that everything works, it’s time to bring the little artist’s space to life!

Blog Post 5: Reality of Developing in AR and struggles

With my designs and architecture complete, I dived into Unity, eager to bring my vision to life. The first step was to implement the core QR code scanning feature. My initial research led me to Meta’s developer documentation and some promising open-source projects on GitHub, like the QuestCameraKit, which gave me a solid conceptual starting point. I found a QR scanning script that seemed perfect and began integrating it.

What followed wasn’t a straight line to success. It was a multi-week battle against a ghost in the machine—a frustrating cycle of failures that taught me a crucial lesson about AR development.

Things never work out your way

My initial prototype worked flawlessly within the Unity editor on my laptop. I could scan QR codes, trigger events—everything seemed perfect. But the moment I deployed it to the actual AR device, the Quest headset, it fell apart.

This is where I hit the wall. The symptoms were maddening: controller tracking was erratic and unpredictable, user input would get lost entirely, and the UI was completely unresponsive. After weeks of frustrating trials, debugging scripts line-by-line, and questioning my own code, I finally diagnosed the root cause. It wasn’t a simple bug; it was a foundational incompatibility.

The QR scanning asset I had chosen was built on the legacy Oculus XR Plugin. However, my project was built using the modern XR Interaction Toolkit (XRI), which is designed from the ground up to work with Unity’s new, standardized OpenXR backend. I was trying to force two different eras of XR development to communicate, and they simply refused to speak the same language.

The Turning Point: A Foundational Pivot

The “aha!” moment came with a tough realization: no amount of clever scripting or patchwork could fix a broken foundation. I had to make a difficult but necessary decision: stop trying to patch the old system and re-architect the project onto the modern standard.

This architectural pivot was the most significant step in the entire development process. It involved three major updates:

  1. Embracing the Modern Standard: OpenXR My first move was to completely migrate the project’s foundation from the legacy Oculus plugin to OpenXR. This involved enabling the Meta Quest Feature Group within Unity’s XR Plug-in Management settings. This single, critical step ensures all of Meta’s specific hardware features (like the Passthrough camera) are accessed through the modern, standardized API that the rest of my project was using.
  2. Rebuilding the Eyes: The OVRCameraRig With the OpenXR foundation in place, the old camera rig that the QR scanner depended on immediately broke. I replaced it entirely with the modern OVRCameraRig prefab. This new rig is designed specifically for the OpenXR pipeline. It correctly handles the passthrough camera feed, and a key component of my project—the QR scanner—instantly came back to life.
  3. Restoring the Hands: The XRI Controller Prefab Finally, to solve the erratic tracking and broken input, I replaced my manually configured controllers with the official Controller Prefab from the XR Interaction Toolkit’s starter assets. This prefab is guaranteed to work with the XRI and OpenXR systems, which immediately restored precise, stable hand tracking.

The Result: A Seamless Prototype

With the new foundation firmly in place, the chaos subsided. The final pieces fell into place with a central UIManager to manage the UI pages and a persistent DataManager to carry scanned information between scenes. The application was no longer a broken, unusable mess on the headset; it was stable, responsive, and worked perfectly.

This journey was a powerful reminder that in the fast-moving world of XR development, sometimes the most important skill is knowing when to stop patching a problem and instead take a brave step back to rebuild the foundation correctly. Here is few images from me trying to make it work.

This stable, working prototype is the culmination of that effort. In addition, I realize how these concepts can be complex and not make sense but I hope may be in can help someone in the future. In my final post, I’ll stop telling you about it and finally show you. Get ready for the full video demonstration.

EP #6: Building the Tools – A Mobile App to Record and Experience Space

The heart of the project is a custom Swift-based iOS application I developed: a tool to record impulse responses, estimate acoustic parameters like RT60, and apply spatial convolution in real time. The app consists of several modular components:

  1. A mic selector that supports mono, stereo, and (planned) Ambisonics input.
  2. A recording module that captures signals from sweep tones or balloon pops.
  3. A deconvolution processor that transforms recorded responses into usable IRs.
  4. A convolution engine that allows users to load external sounds and place them in the captured space.
  5. A visual interface that shows waveforms, energy decay, and export options.

Built using AVAudioEngine and SwiftUI, the app runs entirely on-device, making spatial recording accessible to artists, researchers, and designers

EP #5: Listening Like a Camera – Redefining Field Recording through Acoustic Photography

This semester, my research expands on a deceptively simple question: What if we could photograph sound?
In the age of mobile spatial computing, we no longer need heavy microphones or studio rigs to capture acoustic character. Instead, we can begin to treat spaces as sonic images — snapshots not of light, but of reflection, decay, and depth.

Through the combination of impulse response recording, real-time convolution, and MEMS microphone arrays, I’m developing a system that captures and reconstructs spatial audio impressions in real-world environments. Using mobile tools and 3D sound formats like Ambisonics, the project proposes a new workflow: lightweight, precise, and perceptually informed.

But more importantly, this shift is artistic. Just like a photographer frames a scene, we as sound designers can frame how a space sounds — and how it feels. This opens up new territory between documentation, storytelling, and sonic composition.

Current workflow experiences for my Einzelprojekt

Workflow

For the production of ‘Stand By’, I chose to record and edit everything in Cubase 12, as it’s my main DAW and I’m highly familiar with its workflow, shortcuts, and overall layout. The entire project contains nearly 150 tracks, all recorded & edited in Cubase.

When it came to mixing in 3D audio, I decided to begin my spatial audio journey using Ambisonics and Reaper rather than Dolby Atmos. This decision was largely influenced by the IEM Plugin Suite, which offers powerful and intuitive tools for Ambisonics mixing — making the entry into 3D audio more approachable and flexible.

I chose to work with fifth-order Ambisonics for this project to achieve a more accurate and immersive rendering of diffuseness, spaciousness, and spatial depth. While first-order Ambisonics might seem sufficient due to the even nature of diffuse sound fields, in practice, their low spatial resolution leads to high directional correlation during playback, which significantly impairs the perception of these spatial qualities. Higher-order Ambisonics, in contrast, improves the mapping of uncorrelated signals and preserves spatial impressions much more effectively. Psychoacoustic research has shown that an Ambisonic order of three or higher is required to perceptually preserve decorrelation between neighboring loudspeakers, which is crucial for rendering depth and diffuseness. Fifth-order Ambisonics further enhances this, particularly outside the sweet spot, providing a more consistent spatial experience across a larger listening area. As demonstrated in the IEM CUBE, a fifth-order system allows nearly the entire horizontal listening plane—in this case, a 12 × 10 m concert space—to become a valid and perceptually plausible playback zone. [1]

Thus, fifth-order Ambisonics is not only a practical choice for immersive production in larger spaces, but it also strikes an effective balance between spatial resolution, technological complexity, and perceptual benefit [2].

I also had the opportunity to experience this myself during a small listening test we conducted with Matthias Frank. We listened to first-, third-, and fifth-order Ambisonics in a blind comparison and were asked to rate certain spatial parameters like spatial depth or localization. The first order was quite easy to identify due to its limited spatial resolution. However, distinguishing between third- and fifth-order Ambisonics proved to be much more challenging, as the differences were often subtle and less immediately perceptible.

After that, I started with setting up the routing, which was one of the most underestimated parts of this project. Similar to a traditional stereo production, I created a structure of groups and subgroups, but adapted it for Ambisonics. For example, in the drum section, encoding happens at the main drum group via the IEM MultiEncoder. All individual channels are routed into that group, allowing me to process them using conventional stereo plugins before spatializing them — saving both CPU resources and maintaining flexibility in the early mixing stages.

Within the drum routing, I created subgroups for kick, snare, overheads and the droom, allowing for finer control and processing. When dealing with coherent signals, such as double-tracked guitars, I first routed both signals (panned hard L & hard R) into a stereo group to conserve CPU power by processing them together. This group is then routed into a master guitar group that handles Ambisonics encoding. Since the L and R signals remain separated, you can still treat them independently from each other in the encoder. So I can still place them individually in the 3D field — even though they were previously grouped.

I followed the same approach with vocals, organizing them into groups before routing them into the Multiencoder. For specific adlibs, I used the GranularEncoder to create glitchy, scattered spatial effects.

To add a sense of depth and immersion to the vocals, I used a little bit of the FDN Reverb for diffuse reverb and the Room Encoder for some early reflections – all plugins are from the IEM Suite.

Finding this optimal signal flow took quite a bit of time and experimentation. It was a major learning process to understand how to best structure a large session for Ambisonics, and I’m still refining my approach. I’ve already begun mixing in the production studio at IEM, and although there’s certainly still room for improvement, I’m genuinely happy with the current state of the mix.
This being my first attempt of a spatial audio mix, I see it as a solid starting point — and I’m excited to continue learning and evolving through hands-on experience.


[1] Franz Zotter und Matthias Frank, Ambisonics: A Practical 3D Audio Theory for Recording, Studio Production, Sound Reinforcement, and Virtual Reality, Bd. 19, Springer Topics in Signal Processing (Cham: Springer International Publishing, 2019), 18–20, https://doi.org/10.1007/978-3-030-17207-7.

[2] Zotter und Frank, 19:18–20.

#2.04 Sketches & First Quick Prototype

Sketches

I also began sketching out ideas for how the lamp could look like. I think I decided to go into round and soft forms quick, since they intuitively feel more calming and emotionally inviting than angular or rigid shapes. I feel I was guided more by the emotional tone of the object – a gentle presence on the desk – than by the function for now.

Some initial inspirations:

  • Lava lamps: their fluid, continuous motion has a calming and almost hypnotic effect, which aligns perfectly with the idea of supporting focus without creating stress.
  • Organic shapes: neutral, timeless. These shapes don’t scream “technology,” which is important for creating a non-intrusive and emotionally grounding experience.
  • Japanese lanterns and soft-diffuse paper lights: I love the ambient softness and the quiet presence they have in a room.

I didn’t only sketch the shape of the lamp itself but also how the dock, where you put the phone, could look like. The first try was a square shape which fits the phone – but then as soon as I cut the cardboard, I realized the whole lamp + dock is probably too big, because it would take up a lot of space on the desk.

First Quick and Dirty Prototype

To move from the abstract idea and the theories and frameworks in the background to a tangible experience, I built a quick proof-of-concept prototype using ZigSim, Max/MSP, Resolume Arena and a basic lightning setup with some led-strips for the quick testing for now. This is actually less about the design of the lamp but more about the technology in the background and the core interaction loop:

  • Phone placed on dock > soft, calming light is triggered
  • Phone removed from dock > light changes

I also experimented with using transparent paper as a diffuser to soften the LED light, aiming to create a more ambient and less direct glow.

This was just a quick prototype as a proof of concept for the interaction loop.

Next steps

  • Prototyping with Arduino
  • Integrate a proximity sensor to detect whether the phone is in the dock or not.
  • Redesign the dock and where to put the phone + sensor
  • Use a different source of light which is smaller than the LED strips
  • build a prototype of the lamp itself
  • Experiment with softer shapes and better light diffusion to create a calming, ambient presence that supports focus

Sound Design & First mixing attempts for my Einzelprojekt

In “Stand By”, sound design plays a critical role in reinforcing the song’s emotional core — the psychological entrapment of a toxic relationship, which parallels the patterns of addiction.

To support the emotional arc of Stand By, spatial elements were deliberately positioned behind and around the listener to enhance feelings of tension, disorientation, and emotional overload (more about that below). This approach aligns with findings by Stefanowska and Zieliński (2024), who highlight that rear-positioned and difficult-to-localize sound sources can intensify emotional responses—particularly those associated with discomfort, fear, or psychological distress.[1]

By embracing these psychoacoustic principles, the sound design doesn’t merely illustrate the lyrical content, but actively immerses the listener in the protagonist’s emotional state.

But the key principle that guided my general approach to spatial mixing came from Lasse Nipkow, who emphasized the importance of listener expectation in immersive audio. As he puts it: „Die Leute sind es gewöhnt, dass die Musik vorne spielt, also lasst sie da auch spielen, und packt Wichtiges wie Schlagzeug und Stimme in die vorderen Lautsprecher.[2] Translated: “People are used to music playing from the front—so let it play there, and place important elements like drums and vocals in the front loudspeakers.” This mindset shaped my core mixing philosophy. Instead of treating 3D audio as an opportunity to scatter key musical components arbitrarily throughout the sound field, I chose to respect the listener’s intuitive focus. Drums, lead vocals, and harmonic anchors were mostly placed in the front hemisphere to preserve clarity and narrative drive, while the rest of the spatial field—especially the sides, rear, and height—became a playground for emotional and textural enhancement. This balance allowed me to stay immersive without losing musical coherence.

The track begins intentionally narrow and intimate, with the vocal placed front and center and only minimal ad-libs distributed in the surrounding space – Like fleeting thoughts echoing in the periphery. The guitar is slightly off the center, a second guitar plays the octaves of the riff, positioned at low volume on the other side of the room. Subtle rim hits on the rack tom foreshadow the emotional unravelling to come, creeping in like the early signs of danger.

As the second verse enters, the space opens drastically. The full drum kit kicks in with a deep floor tom and a palm-muted guitar part, tracked four times, creates a dense rhythmic bed. Meanwhile, a haunting “Uhh” choir swirls around the listener. This ghostly texture mirrors the psychological fog of emotional abuse — disembodied voices, indifferent and cold, being around you. It captures the emotional numbness and disorientation of dependency: the sense of being surrounded, yet entirely alone.

In the chorus, additional guitar layers are spread wide across the field, amplifying the pressure. Key lyrical lines are doubled with backing vocals:

I’m running in circles
‘Forced to stay’
I want to leave this place
‘But I can’t get away’
It’s frustrating
‘And suffocating’
Promised paradise is a lie — so ‘I’ stay on stand by

After each chorus, the song narrows again, mimicking the push-and-pull dynamic of emotional manipulation — the moments of clarity crushed by renewed confusion. At the line “You made me crazy when you…”, only the lead vocal and one side of the choir remains — before the wall of sound returns suddenly in verse two. This verse escalates with ‘open’ guitar chords (as opposed to the palm-muted ones before), and the drummer expands the groove with the addition of the rack tom.

To emphasize the transition into the second chorus, guitar death notes are layered with the snare hits in the fill — eight tracks in total, radiating outward. The final vocal line “Bursting away” is spatially fractured and scattered in all directions, as if the voice itself is breaking apart under the weight of emotional overload.

Then, after the second chorus, comes the confrontation: four cycles of build-up, followed by four of breakdown. During the build-up, a series of toxic phrases like “After everything I’ve done for you”, “Don’t push me”, “You’re nothing without me” — are placed chaotically into the space. Each one is distorted and spatially placed. Some are passed through granular synthesis (via the IEM Granular Encoder), transforming them into chaotic, stuttering fragments that glitch and scatter unpredictably. It places the listener inside the chaos of an abusive dynamic, where reason disintegrates and confusion dominates.

The tension is increased through a gradual high-cut filter on the guitars — which opens more and more, the closer the breakdown comes. A burning fuse — a literal sound effect — moves around the listener, traveling over their head just before the drop, suggesting both tension and inevitability.

At the start of the breakdown, a sub-drop slams in, marking the collapse. The four breakdown cycles remain true to traditional rock instrumentation but are widened into immersive 3D space.

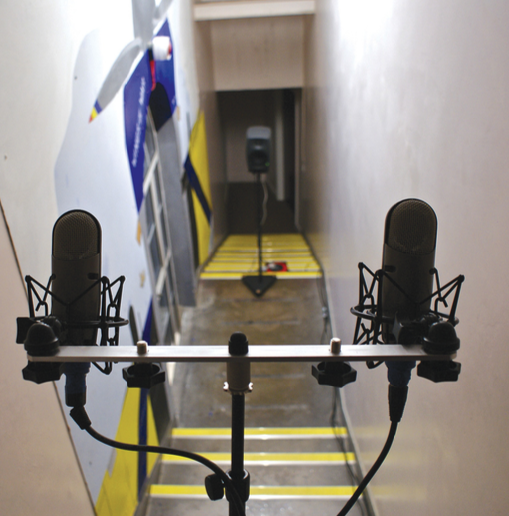
Then, the moment of illusion arrives. We transition into the stairwell reverb section — a metaphor for the seductive promise of escape. Instead of distributing the stairwell recording (captured with five microphones) across the room, I placed the microphones behind the listener, emphasizing the contrast with the confined front-space. The mix collapses forward again, symbolized by sliding guitars that pan from back to front and the return of the fuse sound, automated to rush toward the listener. It’s the false hope of recovery — crushed by relapse.

The final chorus hits harder. The bass becomes more expressive, adding fills to push the groove forward. The word “suffocation” is no longer static — it’s sung alternately on the left and right, while the lead vocal itself begins to drift toward the backing voices, suggesting emotional fragmentation.

The line “Promised paradise is a lie” is repeated three times in the final chorus. And after that the final lyric line of the song comes – “And I stand on stand by”. A solitary voice. Nothing more. Just like addiction, the emotional trap is isolating. You’re still there. Still connected. But unable to move.


[1] Antonina Stefanowska und Sławomir K. Zieliński, „Spatial sound and emotions: A literature survey on the relationship between spatially rendered audio and listeners’ affective responses“, International Journal of Electronics and Telecommunications, 25. Juni 2024, 297, https://doi.org/10.24425/ijet.2024.149544.

[2] Hans-Martin Buff, Überall., 2020, 60.

Aditional recordings for my Einzelprojekt

Guitar & Bass Recordings

For the bass, we used a Fender Jazz Bass, recorded directly through my Line 6 Helix modeller. We chose a amp simulation that included impulse responses (IRs) replicating the mic’d sound of a cabinet captured with an Audix D6 (typically a kick drum mic) and a Shure SM57. This unusual combination provided exactly what I was looking for: deep, punchy lows from the D6 and more defined highs from the SM57 — a perfect balance for our mix.

With the electric guitars, we kept the 3D audio production in mind throughout the entire process. That’s why we recorded multiple layers to allow for spatial variation during mixing. I played the guitar parts using both a Gibson Les Paul Standard and a custom-built Telecaster — again routed through the Line 6 Helix, which offered us a broad palette of amp and cab simulations with consistent quality.

Vocal Recordings

Vocals were recorded using my Neumann TLM102. We tested several microphones, including the AKG C414 as well as the new version of this microphone, the Austrian Audio OC818. In the end, the TLM102 simply fit Lukas’s voice the best. For certain shouts and accents, we recorded more takes to give us more layering options in the mix.

Backing vocals and harmonies were performed by Clemens (our bassist), Lukas (our lead vocalist), and myself. We used a variety of techniques — including thirds above and below the lead vocal — and occasionally doubled the lead in octaves to add emotional weight or build intensity in specific sections.