2.5 Quick User Tests: Observations and Future Directions

Over the past few days, I conducted three quick user tests to gain early feedback on my analog prototype – the breathing circle. Although the tests were informal and low-pressure, they offered helpful insights into how others interpret and interact with the object. I invited Žiga (26), Nika (24), and Črtomir (62) to try it out. Each session lasted around 5 minutes.

Test Setup

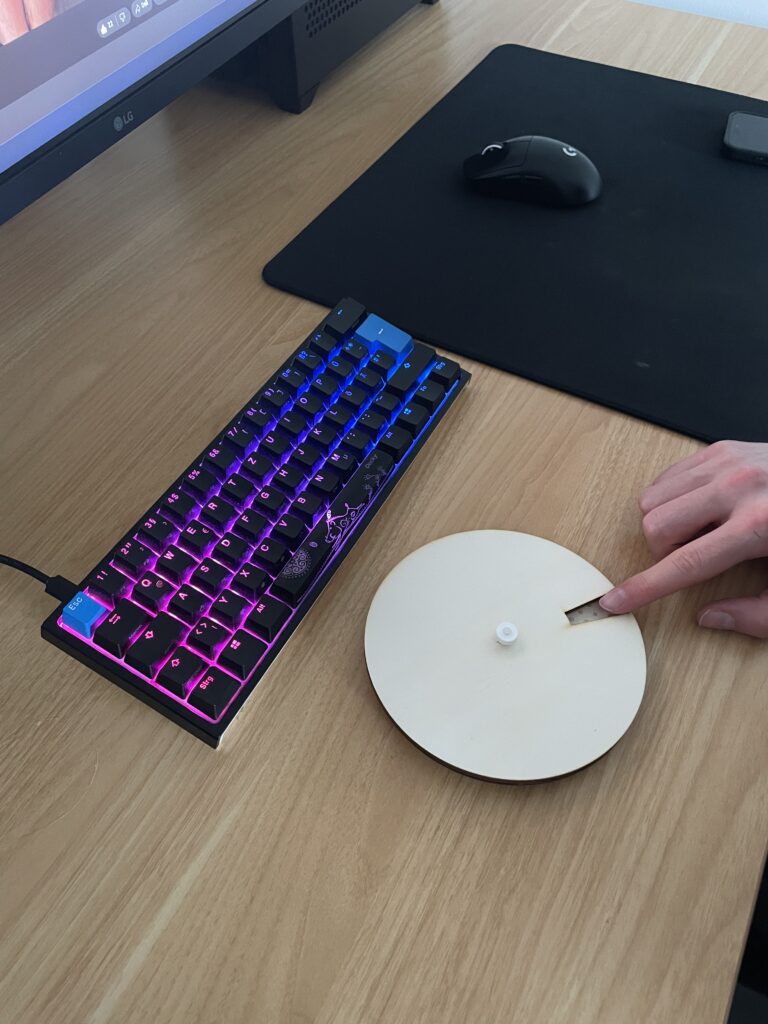
I placed the plywood breathing circle on a table and gave minimal instructions: “This is a tool for guided breathing. Feel free to explore it and describe what you think it’s doing or how you would use it.” I asked them to use the think aloud method, meaning they should voice their thoughts as they interact with the object: what they believe it is, what it might do, and how they feel using it.

The goal was to observe how people interacted with the object naturally, especially how they understood the engraved inhale–hold–exhale sections, the circular form, and the rotating movement of the top plate.

After each test, we spent some time discussing their experience and gathering suggestions for improvements and potential uses.
User 1: Žiga (26, software developer)

Žiga intuitively understood what the breathing circle was for. Without much hesitation, he picked it up, started turning the top plate, and said something like, “Ah, this is for breathing, right?” He immediately began mimicking the rhythm of inhale–hold–exhale as he turned the plate. He noted that the movement felt a bit stiff and suggested a smoother surface or finish to make the rotation feel more meditative and pleasant.

He also raised several ideas during our conversation afterward: “I’d use this during online meetings. I often catch myself scrolling or clicking random things without paying attention. Having this in my hand would keep my fingers busy and help me focus.”

He added that he would be more likely to use it if it were smaller and made of a more satisfying material, something smoother and less rough than bare plywood. He liked the idea of it being minimalistic and aesthetically pleasing: “If it looked like a clean, white decorative piece, I’d definitely keep it on my desk. It could be like a fidget toy for adults.”

Key takeaway: Žiga saw real use potential in focused work contexts and as a physical alternative to digital distractions. He emphasized the importance of both feel and aesthetics, suggesting that people might be more likely to use something that feels good in the hand and looks good in the environment.

User 2: Nika (24, pedagogy master’s student & HR assistant)

Nika was initially unsure how to interact with the breathing circle. She wondered aloud whether she should turn it only one way or back and forth. After some time exploring, she closed her eyes to focus more on the texture. She liked the tactile feel and suggested the engraved areas could be more pronounced so the different phases of the breathing cycle are easier to recognize by touch alone. Although she didn’t see herself using it frequently, she said she might carry a smaller version in her purse if it were about the size of a fidget spinner.

Drawing from her background working with children, she immediately thought about potential classroom uses, especially for kids with attention difficulties. “I see more and more kids who can’t calm down. Something like this could help them focus during class, they could use it with one hand while listening or drawing. If they focused on this, maybe they wouldn’t be so ‘naughty.’” She emphasized that a child-friendly design is important: sturdy, colorful, and available in different versions with language-appropriate text. She sees real potential for the breathing circle as a calming tool for kids.

“I really enjoy doing breathing exercises without screens. I never liked guided YouTube meditations. This feels more real.”

Key takeaway: Nika prefers meditating without any digital interfaces and enjoys practicing breathing exercises undistracted. She sees strong potential for the breathing circle to support children with attention and self-regulation challenges, especially in educational settings. Enhancing the tactile experience and making the design kid-friendly could open valuable new applications.

User 3: Črtomir (62, electrical engineer)

At first, Črtomir had some difficulty understanding the English words engraved on the breathing circle, but with his basic knowledge, he soon figured out the inhale–hold–exhale instructions. He said, “I wasn’t sure at first what these words meant, but I got it after a moment.”

He shared that he has never tried meditation before but could see this tool being useful for people who are stressed or those who always feel the need to hold something in their hands. He also agreed that the breathing circle could work well for children in school settings. When asked how he might use it, he said, “Maybe before bed or while watching TV, something to help you relax.”

Since he didn’t understand the concept right away, I explained a bit more about its purpose before we discussed further. Črtomir thought it was a smart and simple solution but suggested some digital enhancements, such as connecting to a phone to show heart rate. He recommended versions with instructions in different languages and a brief explanation on the device to help new users. He joked about the size, saying it should be made for bigger fingers too.

Key takeaway: Črtomir appreciated the simplicity of the breathing circle and its potential to help people manage stress or restlessness, even if they’re new to meditation. Clear instructions and multilingual options would improve accessibility, and some might value digital features for added feedback. Making the design inclusive for different hand sizes could also broaden its appeal.

What I Learned

  • Users value a smooth, satisfying rotational movement and a pleasant material feel.
  • Size matters: many suggested smaller, more portable versions.
  • Clear tactile differentiation for inhale–hold–exhale phases is important.
  • Different user groups have distinct needs: minimalistic and elegant for adults; sturdy, colorful, and kid-friendly for children.
  • Clear instructions or icons help users understand how to use the tool quickly.
  • Some users are interested in optional digital features but want to keep the core experience analog and distraction-free.

Next Iteration Ideas

  • Experiment with different materials and surface finishes to improve rotation smoothness and tactile satisfaction.
  • Develop smaller versions suitable for carrying in a purse or pocket.
  • Enhance tactile cues with deeper engraving or raised elements for easier recognition by touch.
  • Design variants tailored for children: durable, colorful, and with language-appropriate text.
  • Integrate subtle instructional text or simple icons on the device to aid understanding.
  • Explore potential optional digital integrations, like app connectivity, while maintaining a primarily analog experience.

What’s Next?

This initial round of testing provided valuable insights that will guide the next steps in refining the breathing circle. In my upcoming blog post, I’ll share a video showcasing this stage of the prototype in action and reflect on whether it’s meaningful to develop the concept further. Stay tuned to see how this simple analog tool might evolve into a practical aid for mindful breathing and focus.
16 Morse Code with Arduino Summary + Video

Over the semester, I built a simple Arduino-based Morse code prototype. It started with just three buttons to create Morse code messages, which were then turned into sound. I quickly realized that keeping it on one device didn’t make much sense, so I connected the Arduino to Wi-Fi and used OSC to send messages to my laptop. From there, I added a decoding function that translated Morse into readable text. In the final step, I built a basic web interface where you could type a message, send it to the Arduino, and see it displayed on an LED matrix. My idea is to use this setup to teach kids about encryption in a playful way. Along the way, I learned a lot about Arduino syntax, using libraries, and how to build Wi-Fi and web-based interfaces—opening up tons of new creative possibilities for me.

2.4 BTS: Laser Cutting and Assembly of My Prototype

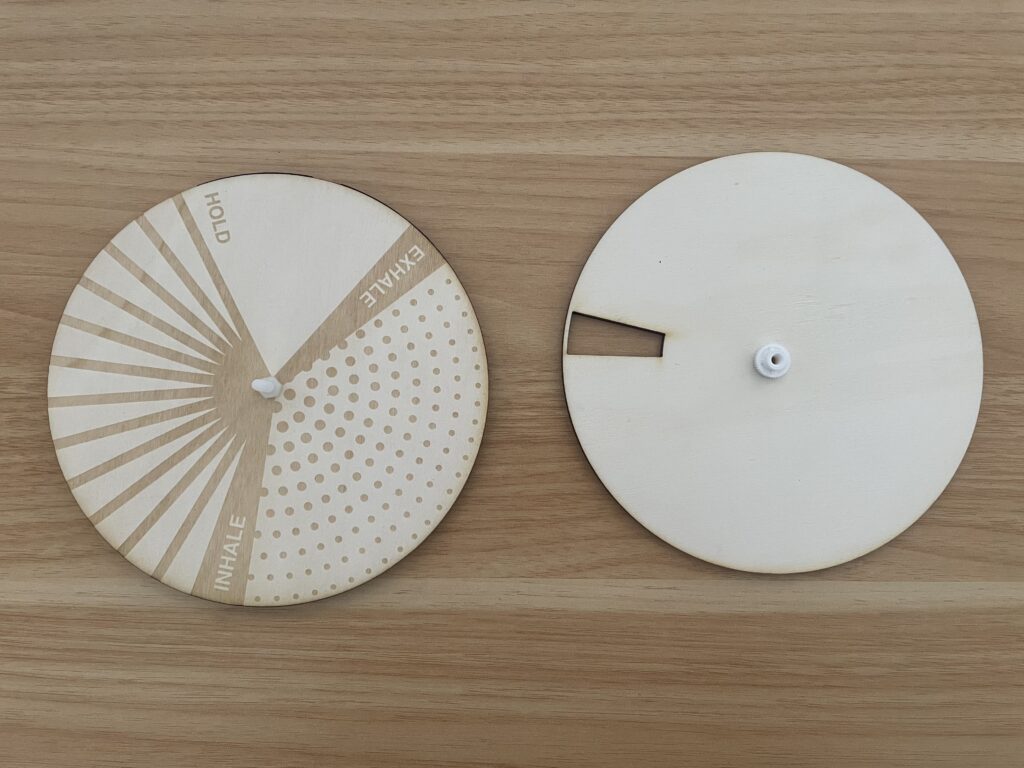
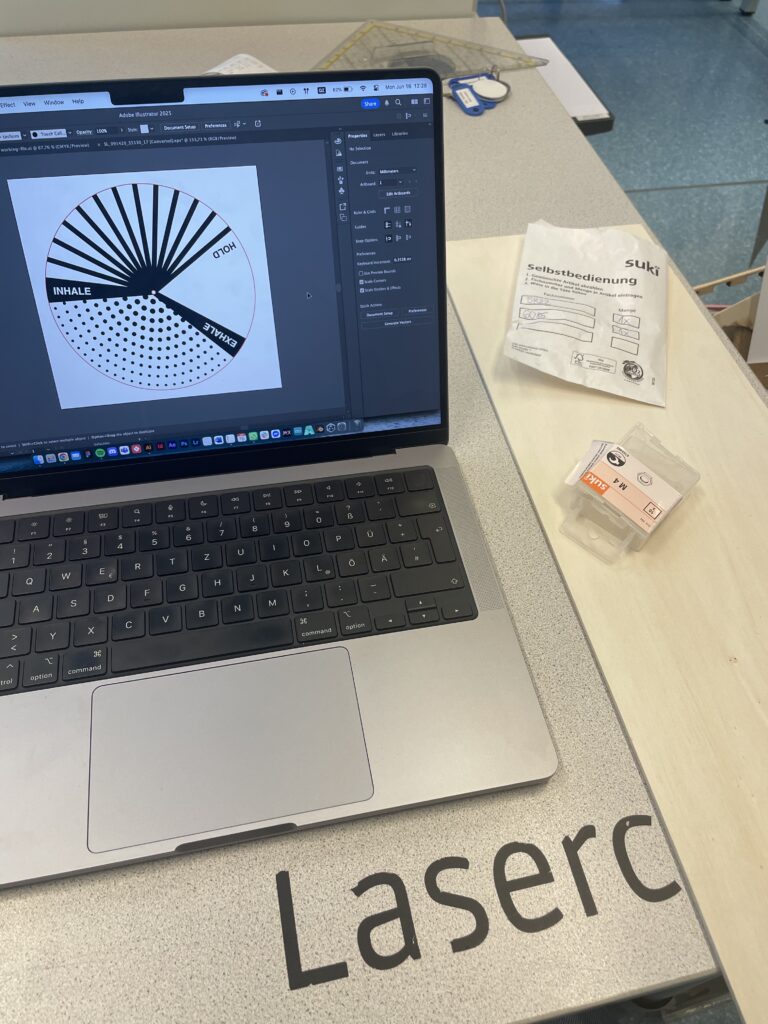
After finishing the design phase, I moved on to creating the physical prototype using the university’s Lasercutter CO2 Trotec Speedy 360. The material I chose was 4mm thin plywood, sturdy enough for the breathing circle but still easy to work with. Before starting the machine, I prepared my design in Adobe Illustrator. To make sure the laser cutter knows what to cut and what to engrave, I used two different colors in the file: red lines show where the laser should cut completely through the plywood, outlining each piece of the breathing circle, black lines and textures represent areas to engrave, like the tactile patterns for the inhale, hold, and exhale sections, plus small text labels.

This separation is important because engraving only burns the surface lightly, creating texture and detail without cutting all the way through. Since I’m relatively new to laser cutting, I was careful not to engrave too deeply – wood can start to burn quickly if the settings are too strong. This cautious approach helped me keep the surface textures clear and clean.

Once the file was ready, I set up the materials and workspace with the 4mm plywood sheets and M4 size plastic screws. These screws allow the plates to rotate smoothly while keeping the holes minimal and unobtrusive, maintaining a clean and minimalistic look.

The laser cutter produced very precise pieces with clean edges. The engraved sections added subtle textures that can be felt by touch, which is essential for the breathing circle’s interactive experience.

At this stage, the prototype pieces were not yet assembled, but it was exciting to see the parts come to life physically. The cutouts and engraving matched the digital design well, making assembly straightforward.

Final Thoughts

Using the laser cutter was a key step in turning the concept into something tangible. This process allowed me to explore the tactile qualities of the breathing circle and how the physical form supports the interaction. Even though the prototype isn’t complete, the precise cuts and engraved textures already give a strong sense of how users might experience it.

This phase reinforced how prototyping, especially analog and lo-fi methods, can reveal important insights early in the design process. It’s not just about finishing a perfect product but about thinking through the physical experience, testing ideas, and learning along the way.

Next, I will do some user testing to gather feedback and observe how the prototype works in practice.

2.3 Sketching and Developing the Breathing Circle

What kinds of interactions actually support mental focus in everyday life? And how can something as simple as a small, analog object stand up to the constant pull of digital notifications?

These questions guided me as I moved from concept into the practical development of the Breathing Circle. This was the moment where abstract ideas started becoming real: sketching, measuring, refining. But it wasn’t just about making a “nice object”, it was about intentionally designing a pause. A pause that resists the speed and urgency of digital life.

Here’s how I started shaping that pause into form.

Sketch of the Breathing Circle

Turning Breath into Form

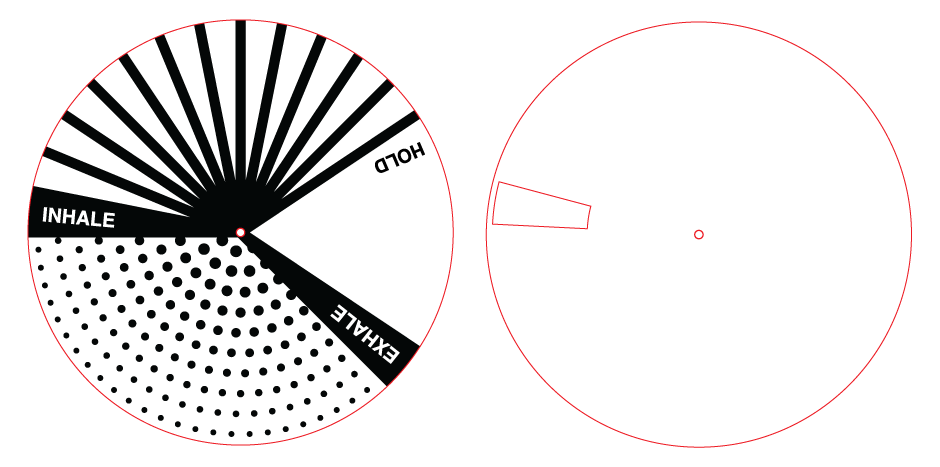
I wanted each part of the breathing process to feel different, so that people don’t have to think about what comes next, they can simply follow the texture with their fingers and focus on their breath. Since the prototype will be laser-cut, I chose engraved textures over raised ones. The engraved patterns are subtle but distinct, providing just enough tactile guidance without being distracting or overstimulating.

The Three Phases of Breath
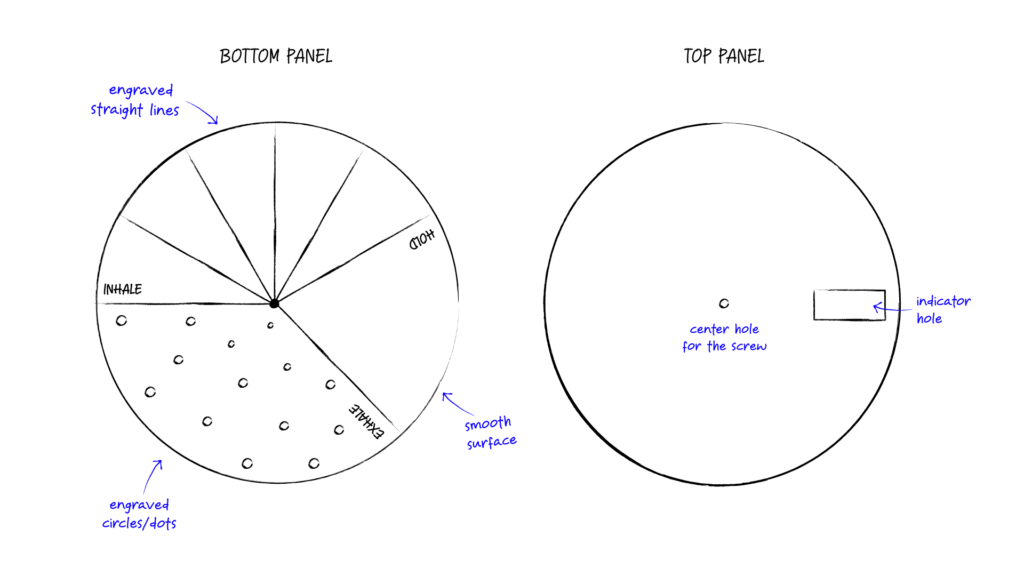
  1. INHALE – Straight Lines – Why? Inhaling feels like steadily drawing in air, filling the lungs. The lines guide the fingers steadily inward, like gathering energy.
  2. HOLD – Smooth / Flat – Why? Holding the breath is a still moment. By removing texture, I’m reinforcing that pause, offering tactile neutrality to match the emotional neutrality of holding.
  3. EXHALE – Engraved Dots – Why? Exhaling is about release. The dotted texture creates a gentle sense of dispersal, like bubbles or soft particles letting go.
Proportions of the Circle

2/5 inhale, 1/5 hold, 2/5 exhale – Why? This ratio reflects a calming breathing rhythm, with enough space for a longer exhale to naturally relax the body.

Other Functional Details
  • Center hole for screwing together both plates, allowing rotation.
  • Indicator hole to show which breathing phase you’re currently on (“inhale,” “hold,” or “exhale”).
  • Text engravings to match, visible through the moving layer, guiding the flow.

Why Analog? Why This?

Screens offer too much speed. This small, analog tool offers something different: focus through simplicity. For me, this isn’t just a prototype, it’s a way to answer a frustration I’ve experienced myself: forgetting to breathe properly in stressful, digital spaces. Making this helps turn that small frustration into a thoughtful pause.

Next, I’ll bring this sketch into reality through laser cutting, testing proportions and feel. In the following blogposts, I’ll reflect on that process, and eventually create a video that brings the whole journey together.

Trying Things Out One by One: My First Days with Arduino Sensors

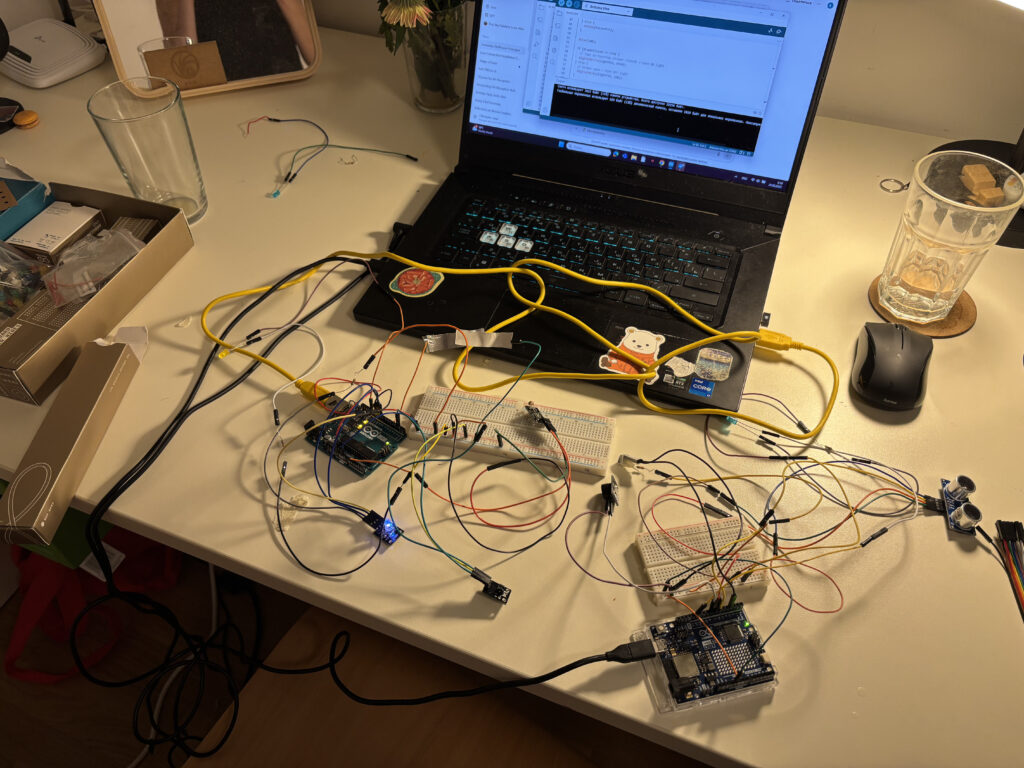
This is officially my first time working with Arduino and honestly, it’s kind of funny how I began. I started with the simplest possible circuit: an LED light and a resistor, just to see something turn on. That small success was weirdly exciting. From there, I began testing each sensor individually, one by one, to understand how they work and what kind of interactions are possible.

I treated it like a kind of warm-up exercise. I wanted to get the logic behind each sensor, what it senses, how it reacts, what kind of output it gives, and how I could use that in my prototype. Here’s how the testing phase went, step by step:

1. The Doorbell (Button + Buzzer)

This was the very first interaction I tried out. A classic doorbell setup: you press the button, and the buzzer buzzes. Super simple and it worked immediately. A perfect confidence booster to start with!

2. The Door Beam Sensor

Next up was the door sensor using a KY-010 beam sensor and an RGB light. The idea was: if the beam is blocked (door closed), the light stays off; if the beam is clear (door open), the RGB light turns on. At first, it worked the other way around but that was just a logic issue, and the fix was quick. Once reversed, it worked great.

3. The Drawer Sensor (Conductive Tape + Light)

This one was really fun. I used two pieces of conductive tape inside the drawer, when they touch, it means the drawer is open and a soft yellow light turns on so you can see what’s inside. It was cute and cozy, and it worked smoothly right away.

4. The Laptop Interaction (Ultrasonic Sensor + Light)

Here I used an ultrasonic sensor. When you come close to the “laptop,” the light turns on, like you’re opening it. This interaction also worked as planned from the start, and I was pretty happy with how natural it felt.

5. Adding a Photoresistor for Sleep Mode

Finally, I added a photoresistor to control the same light as the door sensor. The idea was: the light turns on when the door opens but if you go to bed and cover the photoresistor with a blanket, the light turns off. I had some trouble with the values at first (it worked in reverse again), but I adjusted the threshold and fixed it quickly. It’s a small detail, but it adds a nice touch of realism.

Day Two: Combining It All

The second day was about combining all the sensors to work together. That’s when things got a bit tricky. One of the main challenges was the wiring, especially since I wanted to keep all components off the breadboard and inside my little room model. Managing all the cables without losing my mind took some time.

And then, a surprise problem appeared: the laptop interaction stopped working. No matter what I did, the ultrasonic sensor just wouldn’t respond. After lots of trial and error, I realized the issue wasn’t in the code, it was power. The Arduino couldn’t handle all the sensors at once.

The Fix: Two Arduinos Are Better Than One

To solve the power issue, I decided to connect the laptop interaction to a second Arduino board. And voilà, it worked again! I even added a little sound interaction: when you come close to the laptop, it lights up and plays a soft “turning on” sound. When you leave, the light turns off and you hear a subtle “shutting down” tone. It made the interaction feel much more alive.

Next Steps

In my next blog post, I’ll describe how I’m placing all the sensors, lights, and elements inside the mini room itself. Now that everything works, it’s time to bring the little artist’s space to life!

Blog Post 5: Reality of Developing in AR and struggles

With my designs and architecture complete, I dived into Unity, eager to bring my vision to life. The first step was to implement the core QR code scanning feature. My initial research led me to Meta’s developer documentation and some promising open-source projects on GitHub, like the QuestCameraKit, which gave me a solid conceptual starting point. I found a QR scanning script that seemed perfect and began integrating it.

What followed wasn’t a straight line to success. It was a multi-week battle against a ghost in the machine—a frustrating cycle of failures that taught me a crucial lesson about AR development.

Things never work out your way

My initial prototype worked flawlessly within the Unity editor on my laptop. I could scan QR codes, trigger events—everything seemed perfect. But the moment I deployed it to the actual AR device, the Quest headset, it fell apart.

This is where I hit the wall. The symptoms were maddening: controller tracking was erratic and unpredictable, user input would get lost entirely, and the UI was completely unresponsive. After weeks of frustrating trials, debugging scripts line-by-line, and questioning my own code, I finally diagnosed the root cause. It wasn’t a simple bug; it was a foundational incompatibility.

The QR scanning asset I had chosen was built on the legacy Oculus XR Plugin. However, my project was built using the modern XR Interaction Toolkit (XRI), which is designed from the ground up to work with Unity’s new, standardized OpenXR backend. I was trying to force two different eras of XR development to communicate, and they simply refused to speak the same language.

The Turning Point: A Foundational Pivot

The “aha!” moment came with a tough realization: no amount of clever scripting or patchwork could fix a broken foundation. I had to make a difficult but necessary decision: stop trying to patch the old system and re-architect the project onto the modern standard.

This architectural pivot was the most significant step in the entire development process. It involved three major updates:

  1. Embracing the Modern Standard: OpenXR My first move was to completely migrate the project’s foundation from the legacy Oculus plugin to OpenXR. This involved enabling the Meta Quest Feature Group within Unity’s XR Plug-in Management settings. This single, critical step ensures all of Meta’s specific hardware features (like the Passthrough camera) are accessed through the modern, standardized API that the rest of my project was using.
  2. Rebuilding the Eyes: The OVRCameraRig With the OpenXR foundation in place, the old camera rig that the QR scanner depended on immediately broke. I replaced it entirely with the modern OVRCameraRig prefab. This new rig is designed specifically for the OpenXR pipeline. It correctly handles the passthrough camera feed, and a key component of my project—the QR scanner—instantly came back to life.
  3. Restoring the Hands: The XRI Controller Prefab Finally, to solve the erratic tracking and broken input, I replaced my manually configured controllers with the official Controller Prefab from the XR Interaction Toolkit’s starter assets. This prefab is guaranteed to work with the XRI and OpenXR systems, which immediately restored precise, stable hand tracking.

The Result: A Seamless Prototype

With the new foundation firmly in place, the chaos subsided. The final pieces fell into place with a central UIManager to manage the UI pages and a persistent DataManager to carry scanned information between scenes. The application was no longer a broken, unusable mess on the headset; it was stable, responsive, and worked perfectly.

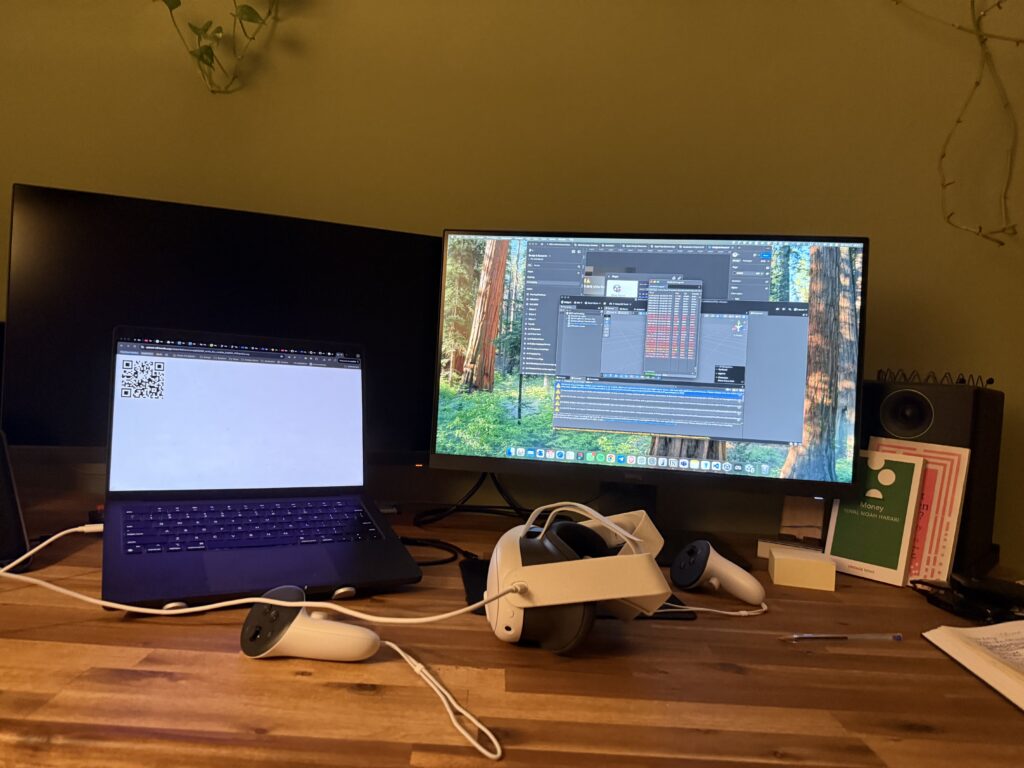
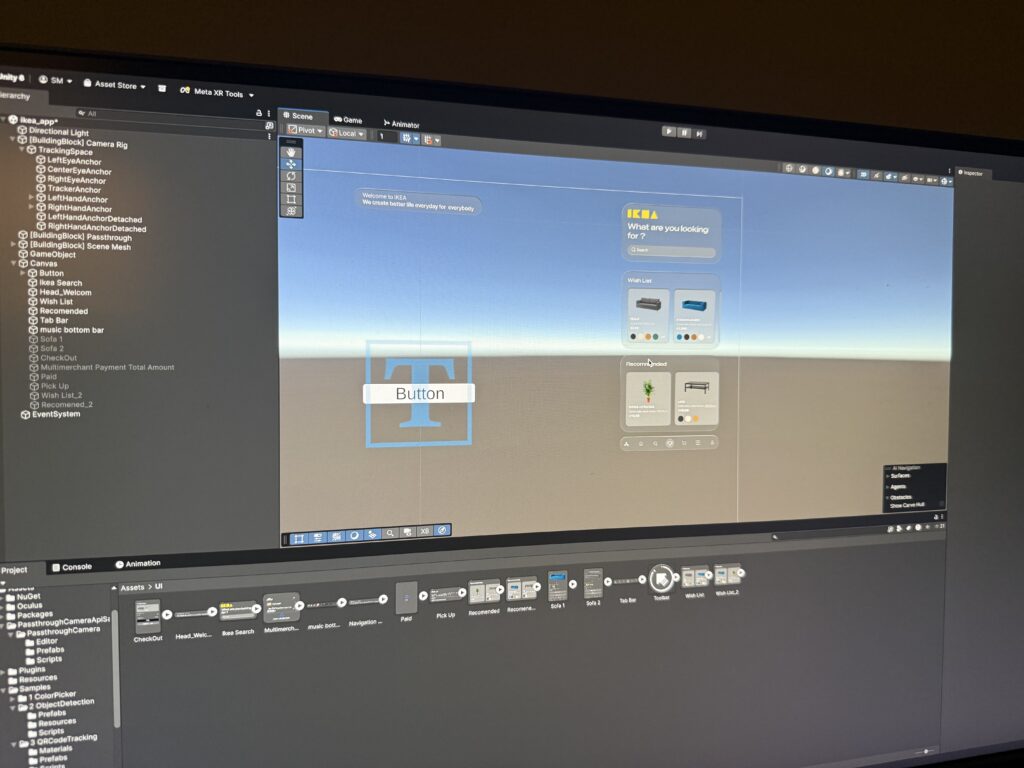
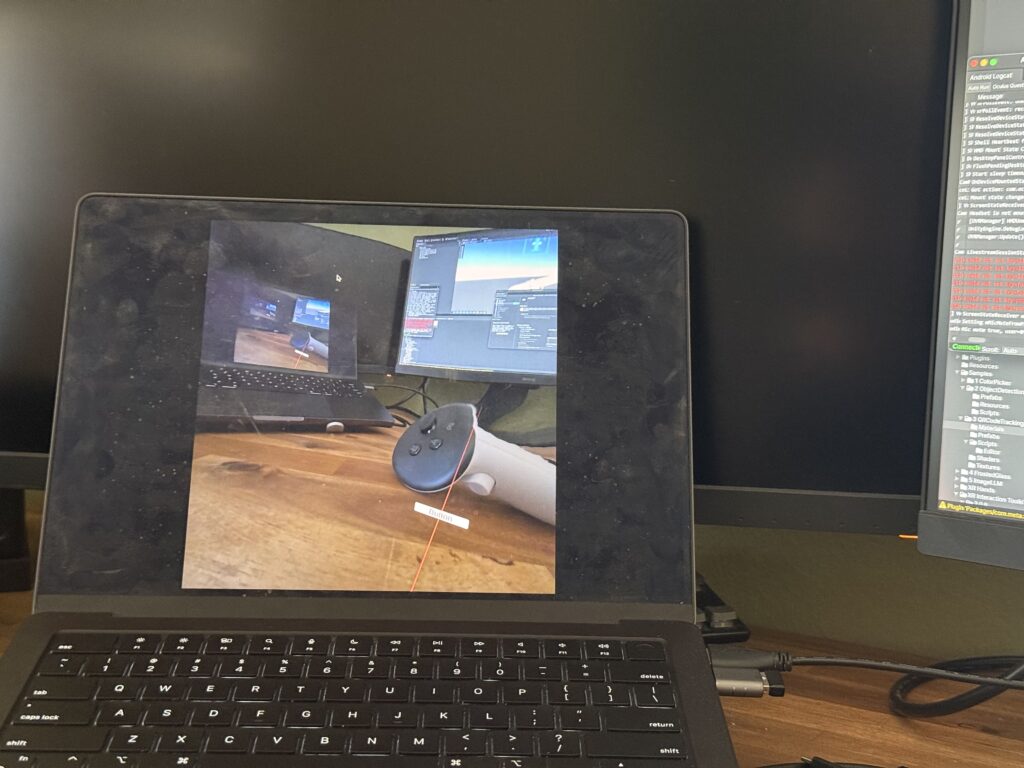
This journey was a powerful reminder that in the fast-moving world of XR development, sometimes the most important skill is knowing when to stop patching a problem and instead take a brave step back to rebuild the foundation correctly. Here is few images from me trying to make it work.

This stable, working prototype is the culmination of that effort. In addition, I realize how these concepts can be complex and not make sense but I hope may be in can help someone in the future. In my final post, I’ll stop telling you about it and finally show you. Get ready for the full video demonstration.

#2.04 Sketches & First Quick Prototype

Sketches

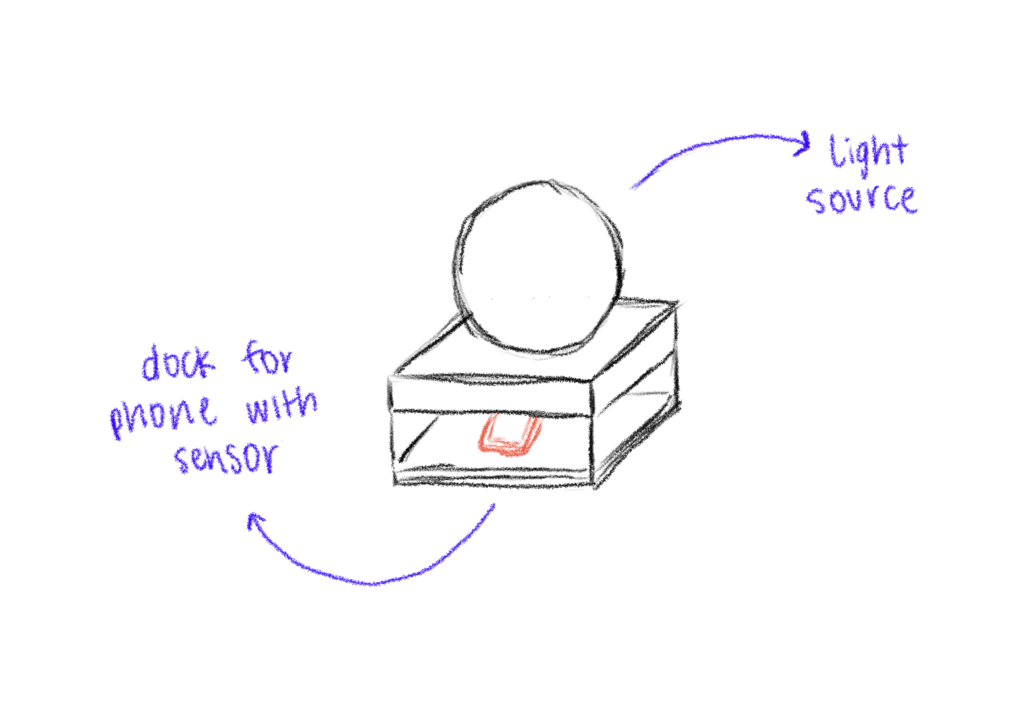
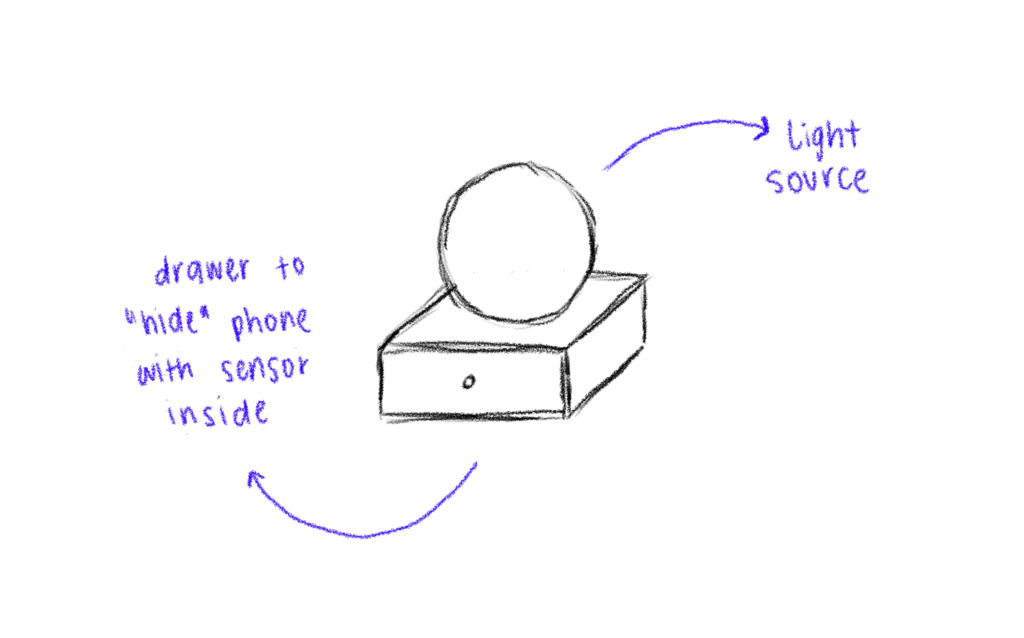
I also began sketching out ideas for how the lamp could look like. I think I decided to go into round and soft forms quick, since they intuitively feel more calming and emotionally inviting than angular or rigid shapes. I feel I was guided more by the emotional tone of the object – a gentle presence on the desk – than by the function for now.

Some initial inspirations:

  • Lava lamps: their fluid, continuous motion has a calming and almost hypnotic effect, which aligns perfectly with the idea of supporting focus without creating stress.
  • Organic shapes: neutral, timeless. These shapes don’t scream “technology,” which is important for creating a non-intrusive and emotionally grounding experience.
  • Japanese lanterns and soft-diffuse paper lights: I love the ambient softness and the quiet presence they have in a room.

I didn’t only sketch the shape of the lamp itself but also how the dock, where you put the phone, could look like. The first try was a square shape which fits the phone – but then as soon as I cut the cardboard, I realized the whole lamp + dock is probably too big, because it would take up a lot of space on the desk.

First Quick and Dirty Prototype

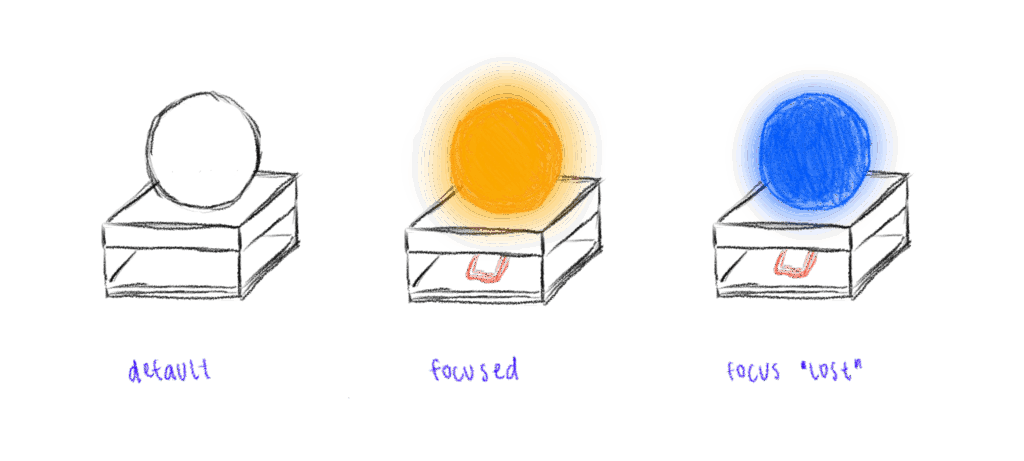
To move from the abstract idea and the theories and frameworks in the background to a tangible experience, I built a quick proof-of-concept prototype using ZigSim, Max/MSP, Resolume Arena and a basic lightning setup with some led-strips for the quick testing for now. This is actually less about the design of the lamp but more about the technology in the background and the core interaction loop:

  • Phone placed on dock > soft, calming light is triggered
  • Phone removed from dock > light changes

I also experimented with using transparent paper as a diffuser to soften the LED light, aiming to create a more ambient and less direct glow.

This was just a quick prototype as a proof of concept for the interaction loop.

Next steps

  • Prototyping with Arduino
  • Integrate a proximity sensor to detect whether the phone is in the dock or not.
  • Redesign the dock and where to put the phone + sensor
  • Use a different source of light which is smaller than the LED strips
  • build a prototype of the lamp itself
  • Experiment with softer shapes and better light diffusion to create a calming, ambient presence that supports focus

Exploring Art Through the Artist’s Room: My First Interactive Prototype

My idea began with a simple question: How can we bring people closer to art, especially those who might not know much about it? Museums often present artworks as static, untouchable objects. You’re meant to look, admire, and move on. But what if there was a way to help people feel art more directly, to experience the context in which it was created?

My original idea was to create miniature versions of famous artists’ studios. The idea came from something I’ve always found fascinating: an artist’s workplace can reveal so much about their process, personality, and even their emotional world. The arrangement of objects, the choice of lighting, the mess or the order, it all speaks. A workspace tells the story behind the art, sometimes more clearly than a wall label ever could.

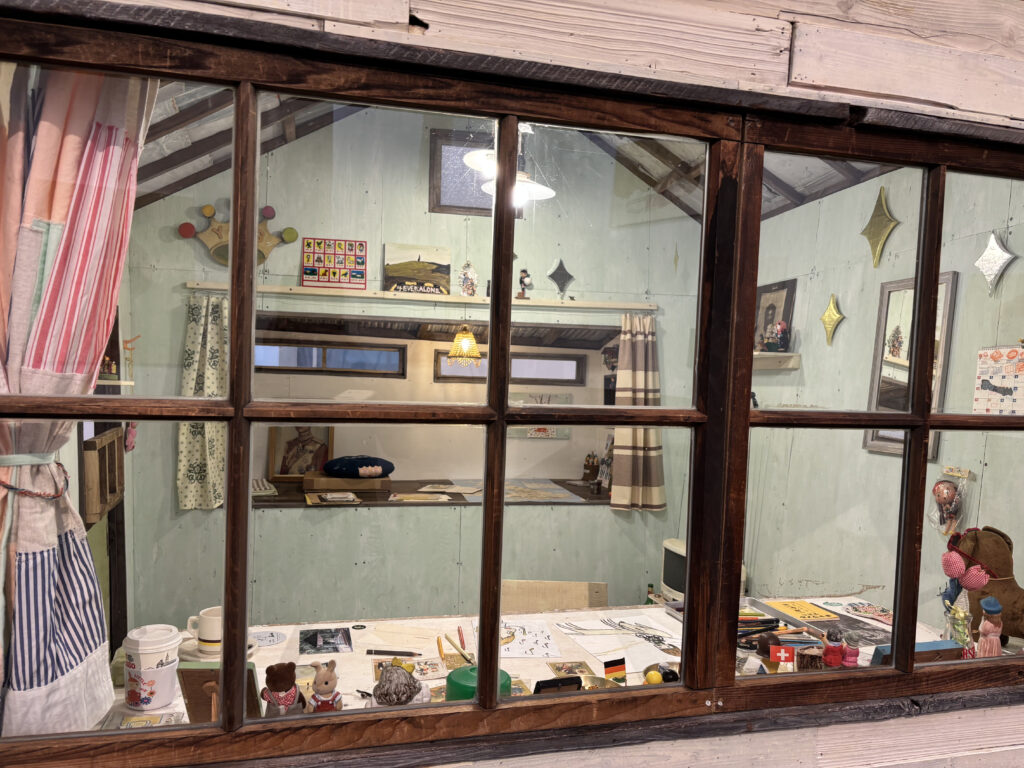
I first truly felt this while visiting Yoshitomo Nara’s installation “My Drawing Room” in Baden-Baden. It was a scaled-down version of his studio, full of intimate, personal touches: scribbled notes, half-used materials, posters on the wall, and most memorably, cute little toys and dolls scattered across the room. These weren’t just decorations, they were expressions of his character and influences, part of the world he builds when he works. Even his favorite rock music was playing in the background. It felt like stepping into a hidden part of his mind. And for someone unfamiliar with Nara’s art, this room offered a beautiful, gentle entry point.

After my first consultation with Birgit, we realized it could be even more compelling if the room wasn’t just something to look at but something you could interact with. Art in museums is often so untouchable, so distant. This could be different. That’s when I decided to dive into Arduino and sensors to make a room that actually responds to you.

For the first prototype, I didn’t focus too much on the detailed decoration of a specific artist’s studio. Instead, I created a simplified miniature room, kind of like my own room here in Graz. You know, I am something of an artist myself.

Then I began researching what kinds of Arduino interactions are possible and which sensors could work for what I had in mind. The first obvious choice was a door interaction: when you enter the room, the light turns on. Simple, but already gives the space life. Then I found tutorials about TV or laptop interactions and added those as well. One by one, the room began to feel more real.

Here are the sensors and interactions I used in the prototype:

  • KY-010 Beam Sensor (door sensor): detects when the door is open, triggering the room light.
  • KY-018 Photoresistor: simulates natural lighting—when the room is dark (like at night), the behavior changes but for my prototype I used to detect the lack of light, so if you go to bed and cover it with a blanket, it turns the light off.
  • Conductive Tape Sensor (drawer interaction): when the drawer is open, a soft light turn on.
  • Ultrasonic Sensor (HC-SR04): detects if someone approaches the TV. When you get close, the TV turns on and a soft startup sound plays. When you leave, it powers off with a shutdown sound.
  • Button and Buzzer: originally used as a basic interaction tool to test sound responses, I used it a doorbell.

By combining all these elements, I planned to create a small room that responds to the presence and actions of a visitor. The lights change. Sounds react. It’s still just a prototype but already it’s something you don’t just look at. You feel it. And maybe, through this interactive experience, someone who doesn’t normally connect with art might pause and think: “Wait… this is actually interesting.”

#12 A lot of different ideas

This blogpost I wish to dedicate to all my ideas and all the directions I have thought about going. Since I have researched such a broad topic, I also have a broad list of ideas I would like to do.

Ceramic Plate

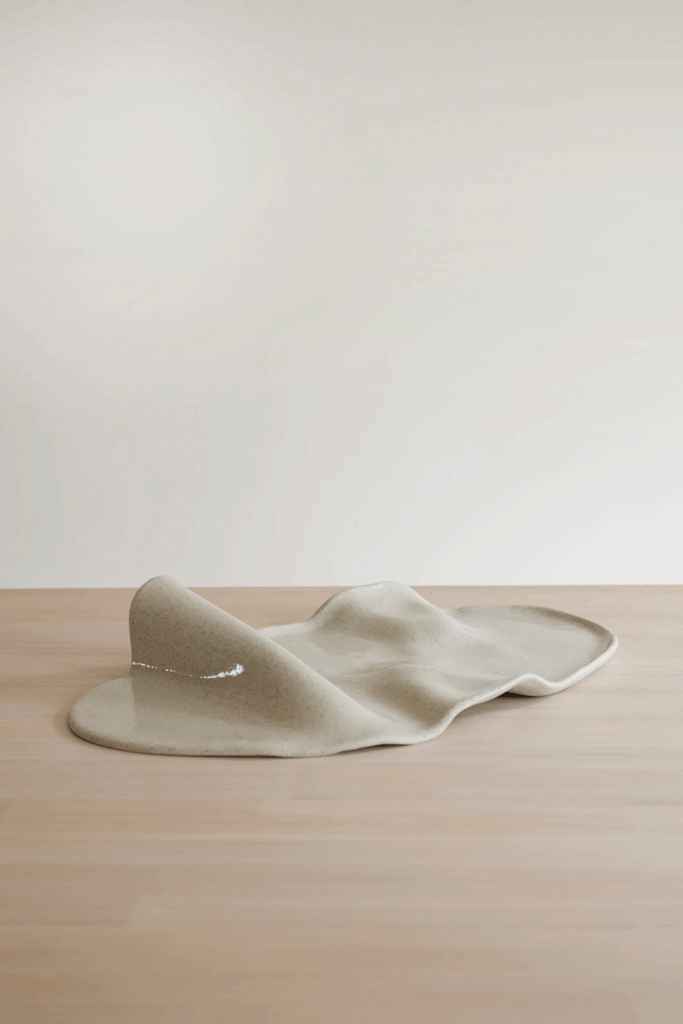
I really wanted to make a clay plate. For a long time, I have wanted to learn ceramics, and thought: maybe I can use this semester to learn this skill! I also found inspiration from a company from New Zealand who became really popular from their “Boring Platter” (see picture below)

The Boring Platter from Author Ceramics

Pros:

  • I might learn a new skill
  • This project moves into the community living world, where multiple people live together and where it may encourage people to share meals

Cons:

  • difficult to get hold of a ceramic workshop and equipment
  • expensive equipment
  • does not make a lot of impact

Stackables

I have also thought about making stackable kitchenware or furniture. This can be stackable tables, chairs, beds, sofas or kitchenware like pots, plates and cups.

It is under the topic of finding new ways to live – with fewer items, in a smaller area, and with multiple people. It tries to tackle the problems of living small and with less – and how to make smart solutions for this. Another factor of these products would of course be that they are made of sustainable or reused materials. I find this very interesting, since I can see myself trying to live like this at some point in my life – and already see the necessity of these kind of products from having a camper. I also like working with my hands, and would love to get better known with different materials, and how to potensially upcycle or reuse something for a different purpose.

Public furniture to encourage interaction

Another way I see myself going is to focus on creating better urban lives. This can be done through welldesigned streets and areas between the houses. I was inspired from seeing a danish series called Byenes Mester, translated to The Master of Cities, featuring the danish architect Jan Gehl. He is one of the earliest architects to talk about planning cities for humans that encourage social interaction and well being, rather than cars and industry. Through the series, we see how his visions transformed some well known cities like Melbourne, New York and Oslo from empty, sad, grey cities into walkable and flourishing cities. I was very inspired by this series to contribute to making cities more human friendly. MaybeI I could do it through making furniture?

By creating an easy to use, accessible and perhaps multipurpose furniture, some urban areas might become a more inviting and better space. This can again increase the chance of someone interacting with each other if it is a stranger or a neighbour – and through this creating community (jippi!!)

A piece of furniture alone will of course not be able to transform a place, but seeing it as a part of a whole would be very interesting. I could also see myself trying to design whole areas, including positioning of the furniture, green areas, the intended flow of people in an existing urban area – so actually going into the world of architecture.

Material Tests

Since this topic is so big, I might try to narrow it down to something very small and tangible. Perhaps investigating what materials (to potentially use for these furnitures) do people like the most. Maybe conduct smell, touch and visual tests to find out what people would like to be surrounded by.

Urban Gardening

Another related topic is urban gardening. This is something I see very important, very useful and as a easy and tangible solution to a lot of problems. As for my self, I am very into gardening and see the values of doing so. I have also used a lot of time and energy to research topics such as urban green areas, biodiversity loss, the environmental crisis, and how green areas are good for peoples mental health – LIKE PLEASE JUST STICK YOUR HANDS IN THE DIRT PLEASE! Science says its good for you!!

The Rest

Now this post is getting very long so I will just list the other ideas/topics I believe in:

  • Research the sociology/psychology aspect of what makes people interact with each other
  • Create the ultimate community(!!!)
    • and perhaps research what are the barriers for “normal” middle class people to live more community like
  • Try to point out and transfer some of the co-living traits to modern urban living
    • case study: what exists of community styles out there?
  • TO GO EVEN BIGGER: try to join the “circular economics” movement – can I contribute here?

Thankyou.