Product XI: Image Extender

From Notebook Prototype to Local, Exhibitable Software

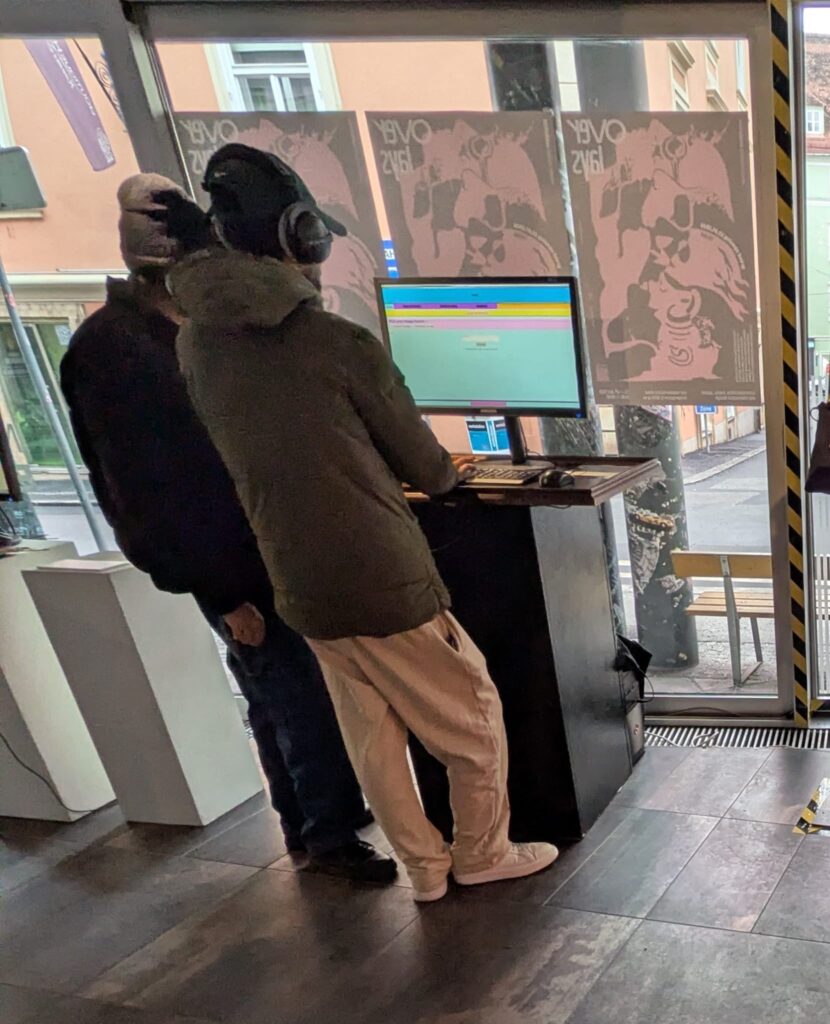
This iteration was less about adding new conceptual capabilities and more about solidifying the system as an actual, deployable artifact. The core task was migrating the image extender from its experimental form into a standalone local application. What sounds like a technical refactor turned out to be a decisive shift in how the system is meant to exist, be used, and be encountered.

Until now, the notebook environment functioned as a kind of protected laboratory. It encouraged rapid iteration, verbose configuration, and exploratory branching. Moving out of that space meant confronting a different question: what does this system look like when it stops being a research sketch and starts behaving like software?

The transition from Colab-style execution to a locally running script forced a re-evaluation of assumptions that notebooks quietly hide:

  • Implicit state becomes explicit
  • Execution order must be deterministic
  • Errors can no longer be “scrolled past”
  • Configuration must be intentional, not convenient

Porting the logic meant flattening the notebook’s narrative structure into a single, readable execution flow. Cells that once assumed context had to be restructured into functions, initialization stages, and clearly defined entry points. This wasn’t just cleanup, it was an architectural clarification.

In the notebook, ambiguity is tolerated. In running software, it accumulates as friction.

Reduction as Design: Cutting Options to Increase Clarity

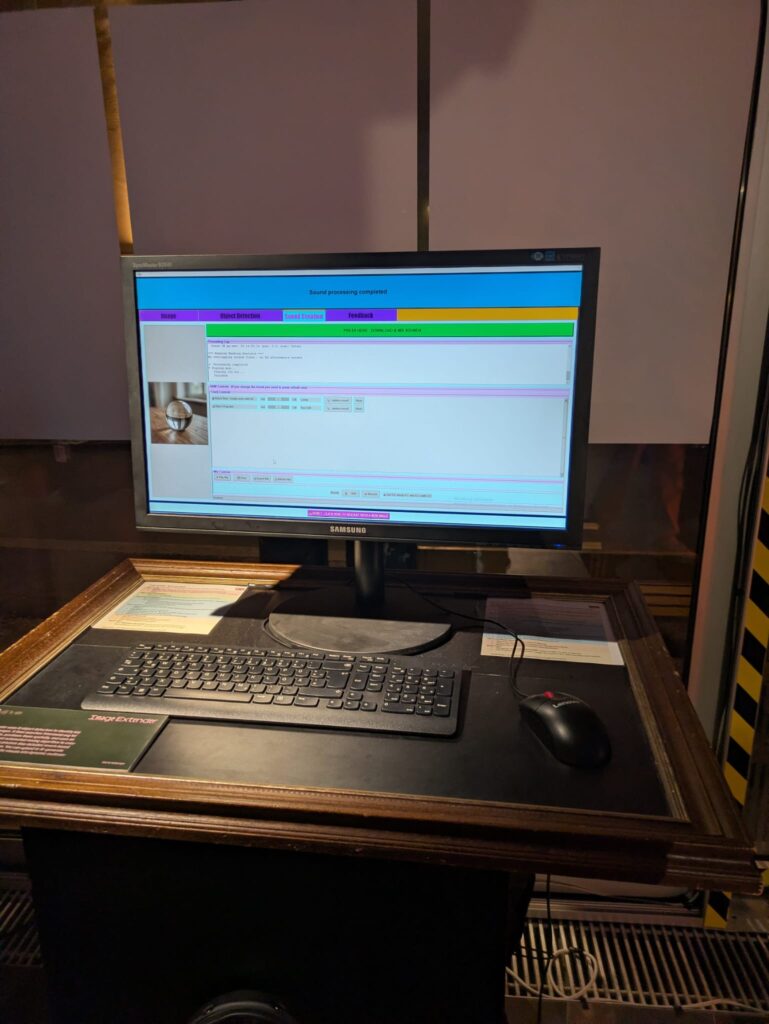
One of the more deliberate changes during this phase was a reduction in exposed settings. The notebook version allowed extensive tweaking, model switches, resolution variants, prompt behaviors, fallback paths, all useful during development, but overwhelming in a public-facing context.

For the exhibition version, optionality became noise.

Instead of presenting the system as a configurable toolkit, I reframed it as a guided instrument. Core behaviors remain intact, but the number of visible parameters was intentionally constrained. This aligns with a recurring principle in the project: flexibility should live inside the system, not on its surface.

Adapting for Exhibition: Y2K as Interface Language

Alongside the structural changes, the interface was visually adapted to match the exhibition context. The decision to lean into a Y2K-inspired color palette wasn’t purely aesthetic; it functioned as a form of contextual grounding.

The visual layer needed to communicate that this is not a neutral utility, but a situated artifact. The Y2K styling introduced:

  • High-contrast synthetic colors
  • Clear visual hierarchy
  • A subtle nod to early digital optimism and machinic playfulness

Rather than competing with the system’s conceptual weight, the styling makes its artificiality explicit.

Stability Over Novelty

Another quiet but important shift was prioritizing stability over feature expansion. The migration process exposed several edge cases that were easy to ignore in a notebook but unacceptable in a live context: silent failures, unclear loading states, brittle dependencies.

Addressing these didn’t add visible functionality, but they fundamentally changed how trustworthy the system feels. In an exhibition setting, reliability is part of the experience. A system that hesitates or crashes invites interpretation for the wrong reasons.

Here, robustness became a form of authorship.

Reframing the System’s Status

By the end of this iteration, the most significant change wasn’t technical, it was ontological. The system is no longer best described as “a notebook that does something interesting.” It is now a runnable, bounded piece of software, designed to be encountered without explanation.

This transition marks a subtle but important moment in the project’s lifecycle:

  • From private exploration to public behavior
  • From configurable experiment to opinionated instrument
  • From development environment to exhibited system

The constraints introduced in this phase don’t limit future growth, they define a stable core from which growth can happen meaningfully.

If earlier updates were about expanding the system’s conceptual reach, this one was about giving it a body.

Hosting Applications (Homelabbing_2) – Impulse #2

In my last blog post I wrote about my first steps in homelabbing, to clarify in homelabbing you try to setup a home server environment to run services, test and learn new stuff. Some examples: Host a cloud service, a picture backup service, a home NAS (Network Attached Storage), your own streaming service or even a Minecraft server. I set up a “home server” an old laptop got it a new operating system and installed the first services.

After this first success, I felt ready to dive deeper. To really host a service, that I can use, maybe even outside of my home network. And the first thing, that came to my mind was a Minecraft server. My cousin had done it, other friends had done it, so it can’t be that hard. And it really isn’t. The documentation is good, all in all it’s just installing java & the basic server run file. I just had one issue, which was exposing a port to the internet, which I could solve after a while of searching through forums. (I ended up finding the answer in the docs, just not where I looked.)

Now, I had used the terminal, I had a service running, why not set up something that I can use in a more productive way? And this one, didn’t go so well. See for a lot of the services most people run on their homelab you need a separate software for them to run properly, most of the time that is Docker. In short, Docker solves the “It works on my machine…” problem, a lot of new software has. (Here is a Network Chuck tutorial explaining Docker in more detail: https://youtu.be/eGz9DS-aIeY?si=aSPVoBCwRwZ6zaLs) It basically creates the perfect environment to run a certain piece of software. And just getting that to work, took me a while, reading documentation, forums, watching video tutorials.

After I had setup Docker and it was running properly, I decided to install a Remote Desktop application, so I could make changes to my home server from where ever I wanted, without having to use the old laptop to do so. I planned to hook it up to my home network and leave it running, without having to open it up to make changes. Through a Reddit post I discovered RustDesk, an open source remote access software, which can be self hosted through Docker. And for the first time, installing a new service just worked. The Docs were easy to follow and in less than an hour, I had RustDesk running.

After this first success I really wanted to have a service running, that would provide a benefit to my day to day life. Three different ones really caught my eye: PiHole, a network wide ad-blocking service, Immich, a Google Photos like picture backup cloud and n8n, a patching tool similar to Max that let’s you create Ai supported automations. (I provided Links to the projects below)

Sadly It was not all fun and games. Like all good homelabbing projects I ran into another problem, which had put this whole experience to a hold. Everything I had done until now ran through the W-Lan of my apartment, which is suboptimal, it clogs up the WiFi for other mobile devices and is slower, compared to a wired connection. Since I planned to put the server somewhere in the apartment and never move it again, I wanted to hook it up immediately. This lead to the laptop not booting, so I couldn’t do anything while it was hooked up to the network, but it would work fine when I unplugged it.

Impact for my Masters Thesis

Thinking back now, when I tried to set up Docker, this actually was my first encounter with a big problem in open source: Bad newcomer onboarding and difficult documentation. As I would find out later, during deepening my research in open source, this is also one of the areas that experts see the most use for UX work, creating an easy to understand onboarding and easy to read documentation. It’s a hit or miss. Sometimes it takes hours to troubleshoot a problem and reading through forum posts, to find the solution, that works for you.

What still stuck with me this whole time, thinking about open source, was the thought of coming into a new area or hobby and trying to solve a problem I don’t truly understand. I have used open source software before, I read docs and learned a lot, still finding a research question or a problem to solve is hard. I guess I need to dive deeper into this whole field to truly understand it. Everything I thought about felt strange, a new person coming in and trying to solve a problem that they read about in some forum or book. This lead me more into the direction of documenting, how to contribute as a designer in the first place or how to run/ start an open source project, since I really like the way of providing a product for others to use and change, best case for free.

Accompanying Links

Here are some links to the different services I mentioned im the blog post:

https://rustdesk.com

https://minecraft.wiki/w/Tutorial:Setting_up_a_Java_Edition_server

https://n8n.io

https://immich.app

https://www.docker.com

https://pi-hole.net

SOFTWARE AND DATA PIPELINE

    1.  Data Flow Overview

The data pipeline is structured in three different phases: acquisition, post-processing, and sonification. The first part, Acquisition includes independent capturing of audio (Zoom H4n, contact microphone), motion (x-IMU3), and video/audio (GoPro Hero 3). Then, in the next step, post-processing uses the x-IMU3 SDK to decode the recorded data. This data is then send via OSC to Pure Data and is there translated into its different parameters. 

The sonification and audio transformation are carried out also using Pure Data.

This architectural structure supports a secure workflow and easy synchronization in post.

  1. Motion Data Acquisition

Motion data was recorded onboard the x-IMU3 device. After each session, files were extracted using the x-IMU3 GUI and decoded into CSVs. These contain accelerometer, gyroscope, and orientation values with timestamps (x-io Technologies, 2024). Python scripts parsed the data and prepared OSC messages for transmission to Pure Data. The timing issue is faced with the help of synchronizing big movements in rotation or acceleration during the long recording all devices. (Wright et al., 2001).

The Audio recorded from the contact mic is a simple mono WAV file and is Pure Data and later Davinci Resolve for the audio video final cut. Looking at the recordings, the signal primarily consisted of strong impact sounds, board vibrations, water interactions and movements of the surfer. These recordings are used directly for the sound design of the movie. During the main part of the movie, when the surfer stands on the board, this audio will also be modulated using the motion data of the sensor reflecting on the gestures and board dynamics. (Puckette, 2007; Roads, 2001).

  1. Video and Sync Reference

Having all this different not in synchronized time recorded data files leaves a great question of exact synchronization. Therefore, a test was conducted which will be explained in more detail in the section: 10. SURF SKATE SIMULATION AND TEST RECORDINGS. The movement of surfing was simulated using a surf skateboard, on which a contact microphone was mounted on the bottom of the deck. In addition to the microphone also the motion sensor was placed next to the microphone. Now, having the image and the two sound sources (contact microphone and audio of the Sony camera) I could synchronize both recordings in post-production using Davinci Resolve. Here the main key findings were the importance of great labeling of the tracks and clear documentation of each recording. During the final recordings on the surfboard the GoPro Hero 3 will act as an important tool to synchronize all the different files in the end. Another audio output of the GoPro acts as an additional backup for a more stable synchronization workflow. Here test runs on the skateboard are essential to be able to manage all the files in post-production later.  (Watkinson, 2013).

The motion data recorded on the ximu3 sensor is replayed on the GUI of the sensor and can then send the data via OSC to Pure Data. Parameters such as pitch, roll, and vertical acceleration can then be mapped to different variables like grain density, stereo width, or filter cutoff frequency. (Puckette, 2007).

  1. Tools and Compatibility

All tools are selected based on compatibility and possibility to record under this special conditions. The toolchain includes:

  • x-IMU3 SDK and GUI (macOS) for sensor decoding
  • Python 3 for OSC streaming and data parsing
  • Pure Data for audio synthesis
  • DaVinci Resolve for editing and timeline alignment

This architecture functions as the basic groundwork of the project setup and can still be expanded using different software’s of python code to add more individualization during different steps of the process. (McPherson & Zappi, 2015).

  1.  Synchronization Strategy

Looking deeper into the Synchronization part of the project, challenges arrise. Because there is no global time setting for all devices, they have to run individually and then be synchronized in post-production. Here working with good documentation and clear labels of each track helps to get a good overview. Especially the data of the motion sensor will have a lot of information and needs to be time aligned with the audio. Synchronizing audio and video, however, is for sure a smaller challenge, because of the multiple different audio sources and the GoPro footage. A big impact or a strong turn of the board can then be mapped to the audio and video timeline. The advantage of one long recording of a 30 min surf session is for sure, that the possibility for such an event increase over time. Tests with the skateboard, external video and audio from the contact microphone were already successful.


On the image the setup in Davinci Resolved shows the synchronization of the contact microphone (pink) and the external audio of the Sony Alpha 7iii (green). Here the skateboard was hit against the floor in a rhythmical pattern, creating this noticeable spikes in audio on both devices. This rhythmical movement can also be seen on the XIMU3 sensor.