01. Turnaround Insights

This semester, I want to focus on modeling a 3D character from 2D concept art. I specifically mention “from 2D concept art” because translating a flat design into a three-dimensional model presents unique challenges—proportions, perspective, and maintaining the stylistic choices of the design which might not translate well in a three-dimensional space. 

After abundant research (a dive into YouTube search for video tutorials), I found the following tutorials and insights useful: 

Creating a Character Turnaround from a Concept Piece – This one goes the simple route of creating a character turn-around by first drawing half of the front piece and then duplicating it so the front would be symmetrical, then copying it in order to do the back-side of the character, after which the side-view is made. While the art was solid it did not give much impression of actual rotation in a 3D space, which, for experienced modellers (of which I am not) might not be an issue. The character design was also incredibly detailed, which of course serves its own challenges.

Another tutorial, more advanced one, for a simpler character concept (How I Make Character TURNAROUNDS and Sheets!) emphasizes the importance of keeping the process simple, as well as well-structured, by thinking about the anatomy of the design and using guiding lines to remain consistent in all the angles – front, back, profile and (!) ¾ view. 

The most useful video I found and which I will use to reference primarily my process was this one: Character Turnarounds: like a Pro! Photoshop Timeline

For the purpose of creating a full turnaround, the animator stresses the need to make 8 individual poses of every single angle the character would be turning in (or 5 in case the design is symmetrical, in which case the different angle poses could be duplicated). This animator, interestingly, started with the ¾ pose and began from there. This, to me, seems to be the most logical step. He states he did that, because it is the main pose in most animated scene where the characters have to both interact with each other and show the majority of their face to the audience. To me, however, it makes even more sense, because the ¾ view is where you get the most context for the shape of the features and the angles and curves of the body. A front view is far too flat, and a side view, while providing information on which parts jut out and which are concave, loses information in regards to the over-all design. After the ¾ is done, the neck is chosen as the pivotal axis on which the character is to revolve (two guides along both lines of the neck and one deadcenter) with additional guides at the outer-most extremities – top of the head, feet, shoulders, waist, chin and mouth, which keeps the proportions in check. Interestingly, the pelvis tilt is different for the front and back ¾ views – which means that the two could not be reversed, as could be done for the front view and the side view. Because of the way the pelvis tilts, it is either tilting upward (in the backview) or upward (in the front view). 

The animator also stresses a key difference between designing for 3D and 2D. In 2D animation, artists often use “cheats”—like Mickey Mouse’s shifting ears, which change position depending on the angle to maintain readability. When translated, the model often looks weird and unnatural. THis can be circumvented by “cheating” the model (automorphing) depending on the angle it is being viewed at, as was done for these two models: https://x.com/CG_Orange_eng/status/1482422057933565953 and https://x.com/chompotron/status/1481553948721180677

But that would be a further blogpost all on its own. 

Now that I’ve gathered these insights, my next task is to select a 2D concept art of a character and create a turnaround sheet before moving into 3D modeling.
02_MadMapper vs. After Effects

After getting a first introduction to projection mapping in my last blog post, it’s time to go further with exploring different program options. Since I’m still figuring out the technical side of things, I decided to test two software options that seem to make the most sens to use for my project: MadMapper and After Effects. As both of them provide different possibilities when it comes to animation and projection mapping I wanted to give both a try. This meant that I started to follow two beginner-friendly tutorials for projection mapping: one for MadMapper and one for After Effects. My goal was not only to understand how these programs and tools work but also to see which one might be the better choice for the project I have planned. As I am right now, also dealing with the challenge of learning a few different platforms at once it sometimes feels like I’m jumping from one tool to another without really getting the chance to master any of them in depth. This makes it difficult to decide which platform to commit to for projection mapping, as I don’t want to add another complicated software to my workflow if it doesn’t help me in the future. 

MadMapper

Starting off with one of MadMapper’s tutorials which introduced me to the basics of the software and started to explain how to set up a projection hereby using simple shapes to create its visuals. What I did like was how intuitive the interface was. Everything seemed to make sense and intuitive, which is great when you want to start learning new software. I started to play around with different shapes and movements, trying to understand how I could later apply these. But mostly it was important to me to just get a sense of the software and understand the basic workaround. When it comes to layering and fine-tuning the animations I however still a bit lost. Since MadMapper is mainly built for projection mapping, it makes sense that it focuses more on mapping visuals rather than creating complex animations from scratch. A big advantage of MadMapper is its real-time contour control, which allows for live adjustments during the production phase and not just before it. That is something After Effects doesn’t really offer, as it mostly stacks layers to create detailed effects.

After Effects

I also wanted to do another After Effect tutorial that was more specifically for projection mapping as this is something I haven’t specifically looked at so far. I already have some basic knowledge of After Effects, so the workflow didn’t feel completely new. The tutorial covered mostly simple animation techniques and how to export the visuals for projection mapping. Which was the part that interested me the most. The biggest advantage I see in using After Effect would be its flexibility. As After Effects is not really made for projection mapping, it still allows for more detailed and layered animations, which could be nice if I decide to go for a more artistic approach when approaching the flowers. At the same time, it also means that I would need another software to actually map the animations onto my objects, which again means I need to familiarize myself with another one and also add another layer of complexity. Another important factor is price. Since I already have access to After Effects through my Adobe Cloud subscription, there would be no additional cost to me. MadMapper, on the other hand, requires a one-time commercial license. I would need to purchase this to be able to use it without watermarks or other restrictions. 

Now that I’ve tested both, I have to decide which one makes more sense for my project. Right now, I feel like MadMapper is the better choice if I want a more direct way to work with projections, while After Effects would allow me to create more detailed visuals. The question is: do I want to focus on animation first and then figure out the mapping part, or should I go straight into projection mapping and accept some limitations in animation?

Concept Idea

Looking at another aspect besides the technical side, I also thought about the mood or concept idea as well as the aesthetic of my project. Since at the end of the project I want to project onto flowers, I have two main ideas. One would be to work with motion that brings the flowers to life, almost like they are moving or shifting beyond a still life. Another idea would be to approach it from a different perspective which would be to visualise the process of photosynthesis more abstractly. I am still thinking about both concept ideas and I will go more into depth maybe brainstorm more and create different animations to work with, but I also don’t want to overcomplicate things especially because this is my first attempt at projection mapping.

Challenges

One of the challenges I already thought about is to balance aesthetic and technical feasibility. And also, I have a bit of a frustration limit. I tend to learn fast but if I get a sense that I am not developing or constantly get the same issues I get frustrated and that leads to procrastination. While I would love to create something detailed and unique, I also have to be realistic about what’s possible with my current skill level. Here I think a good way would be to start with simple shapes and flat surfaces for the next step in my project and then refine the concept once I have a better understanding of the tools.

Erste Testungen: Adobe Firefly Video Model und Sora

Testphase: Visuelle und animierte Elemente mit KI gestalten

Um herauszufinden, wie präzise und leistungsfähig aktuelle KI-Tools im kreativen Gestaltungsprozess sind, habe ich zwei vielversprechende Anwendungen getestet: das Adobe Firefly Video Model sowie Sora von OpenAI. Beide kamen im Rahmen der Entwicklung eines Plakats für eine Veranstaltungsreihe zum Einsatz – mit dem Ziel, sowohl ein visuell ansprechendes Grundmotiv als auch eine subtile, animierte Variante zu erzeugen.

Ausgangslage
Für das statische Design des Plakats wurde zunächst die generative KI in Adobe Photoshop genutzt. Ziel war es, ein Hintergrundmuster zu erstellen, das sich stilistisch harmonisch in die Serie der bereits bestehenden Plakate einfügt. Dabei war wichtig, dass das visuelle Erscheinungsbild – insbesondere die Farbwelt und grafische Struktur – konsistent bleibt, aber dennoch ein eigenständiges Muster aufweist.

Der verwendete Prompt in Photoshop lautete:
„blaue Farben, feine Linien, Stil ähnlich, aber anderes Muster“

Nach einigen Variationen und Anpassungen wurde ein Ergebnis generiert, das sowohl ästhetisch als auch kontextuell gut zum bestehenden Designkonzept passt.

Im nächsten Schritt ging es darum, das statische Motiv dezent zu animieren, um für Social Media eine lebendige, aber nicht aufdringliche Version zu erzeugen. Der Fokus lag auf einer subtilen Bewegung der Linienstruktur, die dem Plakat eine zusätzliche visuelle Tiefe verleihen sollte, ohne den Charakter der Gestaltung zu verändern.

Zur Umsetzung dieser Animation wurden zwei KI-Video-Tools getestet:

  • Adobe Firefly Video Model
  • Sora von OpenAI

In den folgenden Abschnitten werden die jeweilige Vorgehensweise, die generierten Ergebnisse sowie der direkte Vergleich der Tools erläutert.

Adobe Firefly Video Model:

Hier kam das „Bild-zu-Video“-Tool zum Einsatz. Das Hintergrund Bild wurde als Frame hochgeladen, das Videoformat auch Hochformat 9:16 gestellt. Bei Kamera und Kamerabewegung wurde keine Auswahl getroffen. 

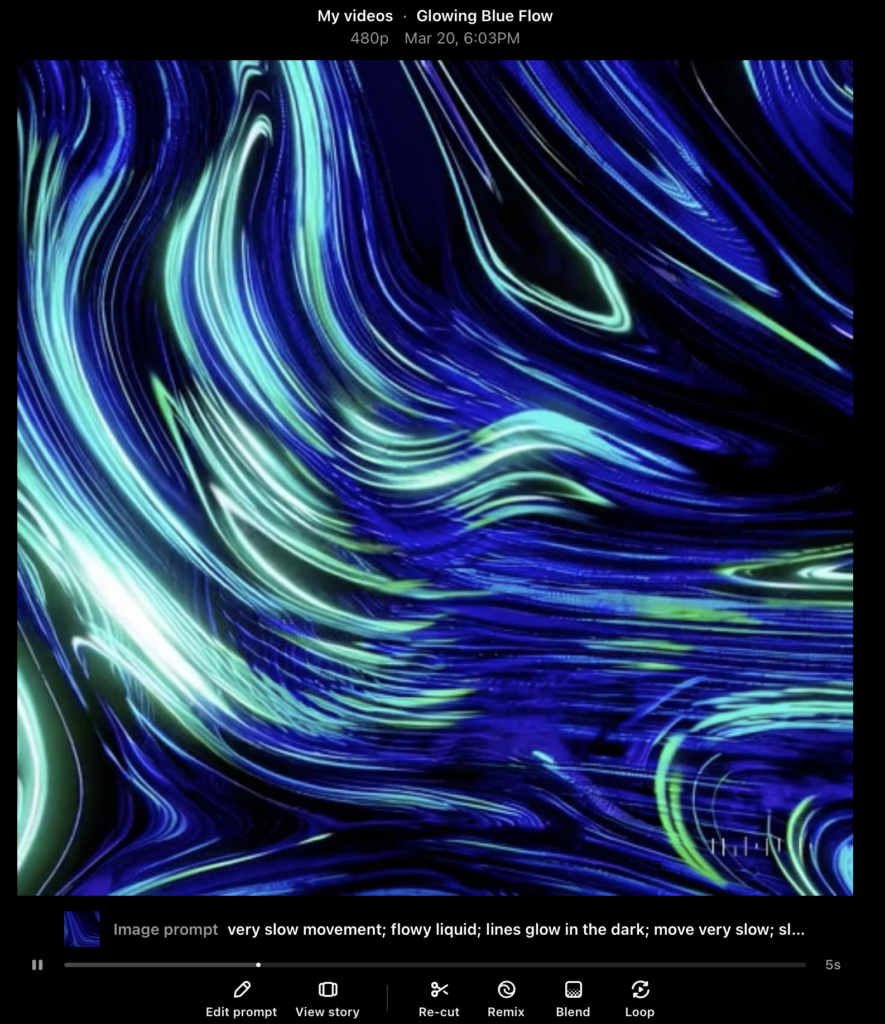
Der Prompt lautete: very slow movement; flowy liquid; lines glow in the dark; move very slow; slimy; flowy, liquid close up

Das erste generierte Ergebnis:

  • An sich tolles Ergebnis
  • Linien bewegen sich relativ schnell aber kontinuierlich
  • Lichtpunkte in den Linien nicht ganz optimal
  •  Fällt zum Schluss in der rechten unteren Ecke sehr ab

Da ich noch nicht zu 100% happy war, generierte ich mit den gleichen Einstellungen und dem identen Prompt eine weitere Version, die schlussendlich die finale Fassung des Plakats wurde:

  • Dynamisches Movement, ohne dass ein Teil „wegfällt“
  • Linien leuchten in sich und nicht nur an gewissen punkten
  • Sehr zufrieden mit dem Ergebnis

An sich war ich an diesem Punkt sehr zufrieden, aber dennoch wäre es aus Sicht der Designer:in gut gewesen, noch eine Version, auch eventuell in einem anderen Stil und anderem Movement auszuprobieren. Doch nach dem zweiten Video war leider die Obergrenze der gratis Videos erreicht. 

Pro:
+ schönes Movement
+ auf Anhieb gute Versionen, die dem Visuellen Anspruch gerecht wurden 
+ sehr einfach Anwendung

Con:
– auf 5 Sekunden limitiert, stellt schon eine große Schwierigkeit in der Verwendung des Videos dar
– die Qualität war nicht zu 100% überzeugend
– leider nach 2 Versionen gratis Versuche aus, keine Möglichkeit außer eines Abo-Abschlusses

Sora by OpenAI

Aufgrund meines ChatGPTs Abos war es mir möglich als zweite Version ein KI-Video von Sora generieren zu lassen. Ebenfalls kam das “Bild-zu-Video”-Tool zum Einsatz. Das Hintergrund Bild wurde als Frame hochgeladen, das Videoformat auf 1:1, 480p, auf 5 Sekunden und auf eine Version gestellt. Hier wäre es an sich möglich, die Dauer des Clips auf 10 Sekunden zu erhöhen, um aber vor allem bei den ersten Versuchen nicht zu viele Credits zu verbrauchen, wählte ich hier ebenfalls die 5 Sekunden. Ebenfalls gibt es in Sora die Möglichkeit ein Storyboard hochzuladen. Generell sind die Möglichkeiten bei diesem Tool großer als bei Adobe Firefly.

Der Prompt lautete gleich wie bei Adobe FireFly: very slow movement; flowy liquid; lines glow in the dark; move very slow; slimy; flowy, liquid close up

Das Ergebnis:

An auch ein sehr großartiges Ergebnis, mit vielen Möglichkeiten, um nachzuschärfen und genau das zu erreichen, das man möchte. Dieses Video „kostete“ 20 Credits.

Pro:
+ länger als 5 Sekunden möglich
+ viele Möglichkeiten der Bearbeitung wie z.B. Remix, Blend oder Loop (siehe Bild)


Con:
– optisch nicht ganz so akkurat wie Adobe Firefly, wirkt so als würde Sora ein eigenes Muster erschaffen und nicht direkt mit dem Bild, das hochgeladen wurde arbeiten (würde sich aber auf jeden Fall durch weiter Prompts und Schleifen ändern und präzisieren lassen)

Fazit:

Sowohl Adobe Firefly als auch Sora von OpenAI haben in meinen Tests visuell beeindruckende Ergebnisse geliefert. Die generierten Inhalte überzeugen durch eine bemerkenswerte Bildqualität, kreative Umsetzung und überraschend hohe Präzision in der Darstellung der Texteingaben.

Wie bereits zuvor erwähnt, bringen beide Tools jeweils ihre individuellen Stärken und Schwächen mit. Insgesamt bieten beide Plattformen spannende Möglichkeiten im Bereich der KI-gestützten Visualisierung. Eine endgültige Bewertung hängt daher stark vom jeweiligen Anwendungsfall und den individuellen Anforderungen ab. In diesem Fall fiel die Wahl auf das Video von Adobe Firefly weil das Ergebnis besser zur Stimmung und Anwendungsfall passt. Dennoch war ich sehr positiv von Sora begeistert und würde für die nächsten KI-Videos definitiv darauf zurückgreifen.

How AI Can Help Directors in the Treatment Process Without Changing the Creative Idea

In my first blog post, I refreshed my knowledge about the difference between a treatment and a script and how these are powerful and necessary tools for directors. Now, I want to dive deeper into how AI can enhance this process and other pre-production tasks, making workflows more efficient while preserving creative intent.

The rise of artificial intelligence (AI) in creative industries has sparked both excitement and concern. While some worry that AI might interfere with artistic decision-making, others recognize its potential to streamline production and help directors shape their vision faster and more effectively. In video production, AI can be a valuable tool in the treatment and scripting process, assisting directors without altering their original ideas. It can help by optimizing workflows, improving collaboration, and simplifying pre-production planning.

AI’s Role in the Treatment Process

As we already know, a treatment is the director’s first opportunity to present their vision to clients, producers, and creative teams and AI can assist in multiple ways:

1. Generating Mood Boards and Visual References

AI-powered platforms like Runway ML and MidJourney can generate images that align with the director’s vision. AI can suggest visual references that match the tone, color scheme, and aesthetics of the project, saving directors time searching for reference materials manually. However, some directors prefer tools like Frame Set or Shotdeck, which provide libraries of real film frames rather than AI-generated images, ensuring a more authentic and cinematic look.

2. Enhancing Concept Development

AI tools like ChatGPT can help structure a director’s ideas into a clear and engaging treatment. While the creative idea remains intact, AI can refine phrasing, eliminate redundancies, and improve overall flow. AI-driven insights can also suggest areas that may need more detail, making the treatment more cohesive and professional.

3. Speeding Up Formatting and Organization

Many directors, myself included, struggle with translating creative thoughts into structured documents. AI text generators can format treatments according to industry standards, ensuring consistency and clarity. They also assist with grammar, readability, and tone, reducing the time spent on revisions. But AI can do more than just refine phrasing—it can also help producers streamline the pre-production process. One of the most exciting areas where AI is making an impact is storyboarding.

Storyboarding with AI

During my research, I came across Previs Pro, an AI tool that allows directors to create rough animated sequences to visualize camera movements and scene pacing before production begins. Instead of manually sketching or hiring a storyboard artist, directors can input their script, and AI generates rough animatics that help visualize the flow of a scene.

Other tools like Boords and Storyboard That use text-to-sketch technology, enabling directors to generate quick storyboards without modeling 3D environments. This is a major advantage, as it allows for rapid iteration, making it faster to refine visual storytelling before production.

AI as a Collaborative Tool, Not a Replacement

The key to integrating AI into the treatment process is to use it as a collaborator rather than a replacement for human creativity. AI does not generate original artistic vision—it enhances workflows, eliminates repetitive tasks, and refines ideas that already exist. Directors remain the ultimate decision-makers, ensuring that the final product aligns with their creative intent.

Conclusion

AI is transforming the way directors approach the treatment and scripting phases of commercial video production. From generating visual references and formatting treatments to refining dialogue, automating shot lists, and assisting in pre-production logistics, AI offers practical tools that support—but do not override—the director’s creative vision. By leveraging AI effectively, directors can focus more on storytelling and artistic expression while benefiting from a more efficient and optimized pre-production process.

References

  • Field, S. (2005). Screenplay: The Foundations of Screenwriting. Dell Publishing.
  • Trottier, D. (2014). The Screenwriter’s Bible: A Complete Guide to Writing, Formatting, and Selling Your Script. Silman-James Press.
  • Rabiger, M. & Hurbis-Cherrier, M. (2020). Directing: Film Techniques and Aesthetics (6th ed.). Routledge.
  • Katz, S. D. (2019). Film Directing Shot by Shot: Visualizing from Concept to Screen. Michael Wiese Productions.
  • McKee, R. (1997). Story: Substance, Structure, Style and the Principles of Screenwriting. HarperCollins.
  • Runway ML. (2023). AI-Powered Creative Tools. Retrieved from https://runwayml.com
  • Final Draft. (2023). AI Story Mapping in Screenwriting. Retrieved from https://www.finaldraft.com
  • Boords. (2023). Storyboard Software for Filmmakers. Retrieved from https://boords.com


CHATGPT 4.0 was used as grammar and spellchecking-tool

The Difference Between a Treatment and a Script in Commercial Video Production

In the world of commercial video production the terms “treatment” and “script” are often used interchangeably by those unfamiliar with all the parts of pre-production. For professionals in the industry, these documents serve essential functions. While both are crucial for ensuring the success of a project, they differ in purpose, structure, and impact of the final video. Understanding the difference between a treatment and a script is fundamental for directors and also for producers, and creatives wanting to produce commercial or narrative videos.

What Is a Treatment?

A treatment is a conceptual document that outlines the creative vision for a video. It is typically created during the pre-production phase and serves as a pitch to clients, agencies, or productions. The treatment provides a clear overview of the look, feel, and storytelling approach before a full script is developed.

A standard treatment includes:

  • Logline: A one- or two-sentence summary of the concept.
  • Synopsis: A more detailed narrative explaining the story, visuals, and themes.
  • Tone and Style: A description of the aesthetic, mood, and overall cinematic approach.
  • Visual References: Mood boards, color palettes, or sample images to illustrate the intended look.
  • Character Descriptions (if needed): Brief descriptions of key figures in the video.
  • Shot Ideas: Possible cinematographic approaches and framing suggestions.

Treatments vary in length, it often depends on the director’s style and on the project’s complexity. They are often designed to be visually engaging, using imagery and design elements to convey the creative direction effectively.

And What Is a Script?

The script is a detailed document that outlines every scene, action, and dialogue in a video or film. Unlike a treatment, which focuses on concept and vision, the script serves as a precise blueprint for the production. It ensures that all elements of the shoot are planned in advance, minimizing confusion on set.

Key components of a script include:

  • Scene Headings: Indicate the location and time of day (e.g., INT. OFFICE – DAY).
  • Action Descriptions: Describe the movement and actions of characters or visual elements.
  • Dialogue: Spoken lines for actors, voice over, or narration.
  • Camera Directions (optional): Notes on specific shots, angles, or transitions.

Scripts follow standardized formatting to maintain consistency across the industry. They are crucial for directors, cinematographers, and editors to align on how the final video will unfold.

Why Are These Steps Important?

Both the treatment and the script serve essential roles in ensuring a seamless production process. Their impact extends far beyond the pre production phase and directly influences the efficiency and final quality of the video.

  1. Client and Stakeholder Approval

    – Treatments are often used in the pitching phase to secure client buy-in. They help non-technical stakeholders visualize the concept before significant resources are committed.

    – Scripts provide the final detailed plan, ensuring that all parties agree on the creative execution before production begins.
  2. Creative Alignment

    – A well-crafted treatment ensures that the entire creative team, from directors to designers, shares the same vision.

    – The script provides detailed instructions for actors, cinematographers, and editors, reducing misinterpretations of the vision.

3. Impact on the Final Video

  • A strong treatment ensures that the final video aligns with the brand’s message and audience expectations.
  • A well-structured script guarantees smooth execution and post-production, leading to a polished, professional result.

    The Impact of a well executed Treatment and Script:

    Picture this, a global fashion brand, Carhartt WIP, commissions a production team to create a commercial that showcases its latest collection. The creative team begins by brainstorming the key themes: authenticity, urban culture, and timeless style. They want to capture the raw energy of streetwear in a way that connects with their target audience.

    To set the creative direction, the director develops a treatment that paints a vivid picture of the campaign. The vision centers around a community of young people—skaters, basketballers, dancer —enjoying the time of their life. The treatment includes references to raw textures, color palettes, and shots which enhance the brands style. The client, inspired by the mood and aesthetic, approves the concept.

    With the treatment in place, the team moves on to scriptwriting. Each scene is carefully outlined, from a skater grinding along a concrete ledge to a dancer dancing in a abandoned warehouse. The script details every camera movement—close-ups of rugged denim, wide shots of models walking through misty streets, and dynamic handheld shots capturing the pace of people playing ball. Natural lighting, stylized edits, and a pulsating soundtrack are all integrated into the script’s framework.

    As production begins, the crew follows the script to execute the planned shots. The DoP ensures each frame aligns with the intended visual style, while the director guides the models and performers to bring out the raw, effortless energy associated with the Brand. In post-production, editors match the pacing of the footage to the music and colorists enhance the film’s industrial aesthetic.  When the final cut is delivered, the commercial aligns seamlessly with the initial treatment, creating a compelling campaign that stays true to the brands heritage.

    Understanding the difference between a treatment and a script is essential for anyone working in video production. While a treatment establishes the creative vision and secures stakeholder approval, the script provides the detailed framework necessary for execution. Both documents are indispensable for ensuring that a project runs smoothly and delivers a satisfying final product. Mastering their use can significantly enhance the efficiency and quality of video production, making them powerful tools for industry professionals.

    References

    • Field, S. (2005). Screenplay: The Foundations of Screenwriting. Dell Publishing.
    • Trottier, D. (2014). The Screenwriter’s Bible: A Complete Guide to Writing, Formatting, and Selling Your Script. Silman-James Press.
    • Rabiger, M. & Hurbis-Cherrier, M. (2020). Directing: Film Techniques and Aesthetics (6th ed.). Routledge.
    • Katz, S. D. (2019). Film Directing Shot by Shot: Visualizing from Concept to Screen. Michael Wiese Productions.


    CHATGPT 4.0 was used as grammar and spellchecking-tool

    02.01: Wer ist das echte Beast?

    Der Sinn dieser Blog-Post-Serie im zweiten Semester ist einfach wie eingänglich: Man soll etwas lernen… aber was? Rückblickend auf die ersten zehn Blogposts aus dem vergangenen Semester war das für mich recht klar: Ich möchte meine Datenvisualisierungen auf das nächste Level bringen. Dazu braucht es aber zweierlei, mit dem ich mich in den nächsten neun Blogposts befassen werde.

    Einerseits muss die Basis einer jeden guten Datenvisualisierung wissenschaftlich evident gemacht werden. Dazu möchte ich mich durch verschiedenste Fachliteratur kämpfen, um herauszufinden warum manche Visualisierungen funktionieren und manche schlicht nicht. Basisliteratur soll das umfassende (und mir glücklicherweise vom besten Major-Leiter des Instituts zur Verfügung gestellte) Werk “Show Me The Numbers” werden, jedoch möchte ich einen Blogpost auch weiterer Fachliteratur zum Thema widmen.

    Um mit diesem Wissen dann aber auch ordnungsgerecht umgehen zu können, muss natürlich eins her: After Effects. Wie bereits in meiner Themenvorstellung vor ein paar Wochen angekündigt möchte ich dazu einen online Kurs belegen. Welcher das jedoch sein wird, war in den letzten Tagen Kern angeregter Diskussionen zwischen mir und meinen drei anderen Persönlichkeiten (sowie meinen Studienkollegen natürlich). Dabei gibt es zwei große Überlegungen: Einerseits gibt es Kurse speziell für Datenvisualisierungen, diese sind aber eher nieschig, oft bereits älter und nicht von renommierten Lehrern oder Bildungshäusern, hätten aber natürlich den Vorteil genauer auf meine Bedürfnisse einzugehen. Andererseits gäbe es aber natürlich auch allgemeinere After Effects oder im speziellen Motion Design Kurse, deren Skills sicher gut auf Datenvisualisierungen umzumünzen wären.

    Gerade in Hinblick auf andere Kurse in diesem Semester – ich denke da vor allem an Green Utopia sowie Moya – habe ich entschieden, dass es definitiv mehr Sinn machen würde einen allgemeineren Motion Design Kurs zu belegen, da ich die Fähigkeiten definitiv noch an der ein oder anderen Stelle brauchen werde. Stellt sich also nur die Frage welchen…

    Die Auswahl dahingehend ist ja bekanntlich riesig, nicht nur auf Lernplattformen wie Udemy oder Skillshare, sondern auch bei privaten Anbietern. Die beiden Goldstandards in Sachen Motion Design scheinen dabei einerseits der Motion Beast Course und andererseits Design Breakthrough by Ben Marriott zu sein. Beide dieser Kurse warten aber mit horrenden Preisen auf (350 bzw 500 Euro), die ich ehrlicherweise im Moment nicht gewillt bin zu zahlen, auch wenn man mit Investitionen in die eigene Bildung ja eigentlich nie was falsch machen kann. (Ich muss ja auch was essen…) Daher habe ich mich in verschiedenen Foren auf die Suche nach einem preiswerten Ersatz gemacht und bin dabei auf die Seite https://www.learnto.day/aftereffects gestoßen, die im Endeffekt eine Zusammenstellung aller guten kostenfreien Ressourcen und Kurse zum Thema Motion Design darstellt und in einem großen Curriculum einen volleinheitlichen Kurs nachbilden soll. Da laut diverser Forenmitglieder darin mindestens gleich viel, wenn nicht sogar mehr gutes Wissen vorhanden sein soll, als in vielen pay-per-view Kursen habe ich mich schlussendlich dafür entschieden dieses Curriculum auch genau so durchzuarbeiten.

    Zusammenfassend lässt sich also sagen, dass das restliche Semester DesRes für mich klar strukturiert ist. Nachfolgend wird es hier mit Ausschnitten und meinen Key-Learnings aus dem After Effects Curriculum weitergehen, da ich dieses Wissen wohl schon eher früher als später auch in anderen Kurse brauchen werde. Danach folgt die Fachliteratur, um am Ende mit all dem gelernten auch ein ansprechendes Werkstück gestalten zu können.

    Finding The Story of my Semester Project

    Last semester I used some of my blog entries to summarise and reflect on what I had learned from reading the book “Documentaries …and how to make them” (Glynne, 2007) by Andy Glynne. So far I have written about the pre-production of documentaries, what steps are necessary and how to take them. Now to put what I have learned to a practical use, I want to try to approach this semester’s project by going through all of the steps and stages, but on a smaller scale.

    The Idea

    I came across the idea for the semester project because I wanted to shine a light on one group or organisation that is unique to Graz. I then remembered having been to two of these car-free Fridays and how I enjoyed the sense of community and togetherness they created. My motivation to showcase this particular movement stems, on one hand, from the desire to learn more about the possibility of car-free city centres, and on the other hand from the wish to show this community to others.
    I had realised, when talking to my colleagues about my idea, that almost none of them had actually ever heard of Auto:Frei:Tag, even though they all live in Graz, are a similar age as me, and most of them I would also describe as, at least to some extent, invested in climate action.
    Thus my “Why” was developed; I wanted to raise awareness for the organisation and maybe inspire some of my peers to also take action. Due to the fact that I only want to create a short video and I don’t have a lot of time, I have decided to aim for a target group who is already to some extent interested in topics like climate change or car-free city centres, and just needs some inspiration for possible outlets and ways to show their convictions, rather than trying to convince some 60-something year old who has always taken the car everywhere to completely change their lifestyle.

    The Story

    When looking for the story behind my idea, there are a few ways I can see it develop.
    I was thinking I could choose one of the people behind Auto:Frei:Tag and follow their journey of organising one of these events, however when talking to them I found out that it is hardly ever them who actually come up with the idea for an event, but they just provide support for others who want to make themselves heard.
    So another option would be to find someone with a cause worthy of documenting and follow along with the planning and organisation of a car-free Friday, also highlighting the person and the cause behind it. During this process, it would also be possible to reach out to experts on city planning and traffic politics in Graz to get their opinion and expertise on the topic, adding facts and figures into my documentary.
    My third option would be to treat the street itself as my main character, showing the stark contrast between everyday traffic, chaos and noise and the complete opposite mood when the same road is taken over by bikes, people, music and community. This version would be less about the specific cause behind one event, but would highlight the opportunities which could open up when removing cars from the equation. For this idea, possible interviews could be a bit more free and abstract, aiming at capturing feelings rather than facts.

    Possible obstacles or problems to either of the stories could be issues with permits, unhappy neighbours or the inevitable people in cars coming by and complaining about the street being closed. Moreover, obstacles could be seen in the broader sense of the issue, where legislature, politics and influential citizens are the reasons why some efforts to further reduce traffic in the city might be hindered.

    For questions of accessibility, I have already talked to the people behind Auto:Frei:Tag and they have agreed to be filmed and documented, and I also hope for some of the visitors of the event to be willing to be on camera. For filming on a public street I would still need to figure out whether a permit is needed and how to get one.

    Conclusion

    After writing all of this out, I feel the story is beginning to take shape, but there are still a few key decisions that need to be made in order to get to a more precise and well formulated plan which in the end could theoretically be pitched to potential stakeholders. Within the next few blogposts I want to try to narrow down this idea and get it to where it needs to be to move on.

    Literature

    Vergleich verschiedener KI-Video-Tools

    Im ersten Schritt meiner Recherche zu KI und KI-gestützten Video-Tools habe ich mir einen umfassenden Überblick über die gängigen Anbieter verschafft und die verschiedenen Tools einem ersten Test unterzogen.

    Nachfolgend findest du eine detaillierte Auflistung der wichtigsten Funktionen, Preisstrukturen sowie meiner persönlichen Erfahrungen mit den jeweiligen Tools. Abschließend ziehe ich ein Fazit, welches meine bisherigen Erkenntnisse zusammenfasst und eine erste Einschätzung zu den besten Anwendungen für unterschiedliche Anforderungen gibt.

    Adobe Firefly Video Model

    Adobe Firefly Video Model richtet sich primär an professionelle Anwender aus der Film- und Medienbranche, die hochwertige KI-generierte Clips benötigen. Die Integration in Adobe Premiere Pro macht es besonders attraktiv für bestehende Adobe-Nutzer. In der Anwendung überzeugt Firefly mit einer hohen Qualität der generierten 5-Sekunden-Clips, jedoch sind die aktuellen Funktionen im Vergleich zu anderen KI-Video-Tools noch recht limitiert.

    Hauptfunktionen:

    • Generierung von 5-Sekunden-Clips in 1080p​
    • Integration in Adobe Premiere Pro​
    • Fokus auf Qualität und realistische Darstellung​

    Preismodell:

    Gratis/in der Creative Cloud enthalten: 1.000 Generative Credits für Bild- und Vektorgrafik-Standardfunktionen wie „Text zu Bild“ und „Generatives Füllen“+ 2 KI-Videos

    • Basis: 11,08€ pro Monat für 20 Clips​ à 5 Sekunden
    • Erweitert: 33,26€ pro Monat für 70 Clips​ à 5 Sekunden
    • Premium: Preis auf Anfrage für Studios und hohe Volumen

    Fazit:

    + Funktioniert an sich sehr gut, einfaches und logisches Interface, generierte Videos sehr gut (mehr dazu im 2. Blogpost „erste Anwendung“), 

    + unter Bewegungen hat man eine Auswahl an den gängigsten Kamerabewegungen wie (Zoom in/out, Schwenk links/rechts/oben/unten, statisch oder Handheld)

    – leider nur 2 Probevideos möglich, auf 5 Sekunden begrenzt

    –> werde für das Projekt eventuell für 1-2 Monate Adobe Firefly Standard kaufen (je nach Intensivität der Nutzung und Länge des Endprodukts vllt sogar die Erweiterte Version)

    (Quelle: https://firefly.adobe.com/?media=video )

    RunwayML

    RunwayML ist eine vielseitige KI-Plattform, die sich auf die Erstellung und Bearbeitung von Videos spezialisiert hat. Mit einer benutzerfreundlichen Oberfläche ermöglicht sie es, Videos aus Texten, Bildern oder Videoclips zu generieren. Besonders hervorzuheben ist die Text-zu-Video-Funktion, die es ermöglicht, aus einfachen Texteingaben realistische Videosequenzen zu erstellen. Zudem bietet RunwayML die Möglichkeit, erstellte Videos direkt zu exportieren, was den Workflow erheblich erleichtert.​

    Preismodelle:

    • Basic: Kostenlos, 125 einmalige Credits, bis zu 3 Videoprojekte, 5 GB Speicher.
    • Standard: $15 pro Benutzer/Monat (monatliche Abrechnung), 625 Credits/Monat, unbegrenzte Videoprojekte, 100 GB Speicher.​
    • Pro: $35 pro Benutzer/Monat (monatliche Abrechnung), 2250 Credits/Monat, erweiterte Funktionen, 500 GB Speicher.​
    • Unlimited: $95 pro Benutzer/Monat (monatliche Abrechnung), unbegrenzte Videogenerierungen, alle Funktionen enthalten.​
    • Quelle: https://runwayml.com/pricing

    Aber auch die Möglichkeit „Runway for Educators“. Kann man sich anmelden, werde ich definitiv versuchen (man bekommt einmal 5.000 Credits)

    Side note: Runway is incorporated into the design and filmmaking curriculums at UCLA, NYU, RISD, Harvard and countless other universities around the world. Request discounted resources to support your students.

    Fazit: sieht an sich sehr vielversprechend aus, werde ich defintiv noch genauer testen,

    werde eine Anfrage für Runway for Educators stellen

    –> ebenfalls eine Überlegung wert ein Abo abzuschließen für den Zeitraum des Projekts, wird aber je nach Anwendung und nach Ergebnissen noch entschieden

    (Quelle: https://runwayml.com )

    Midjourney

    Midjourney ist ein KI-gestützter Bildgenerator, der durch die Eingabe von Textbeschreibungen hochwertige und künstlerische Bilder erzeugt. Die Plattform ist bekannt für ihre Fähigkeit, lebendige und detaillierte Bilder zu erstellen, die den Nutzervorgaben entsprechen. Allerdings liegt der Fokus von Midjourney hauptsächlich auf der Bildgenerierung, und es bietet keine dedizierten Text-zu-Video-Funktionen.​

    Preismodelle:

    • Basis: $10 pro Monat, begrenzte Nutzung.​
    • Standard: $30 pro Monat, erweiterte Nutzung.​
    • Pro: $60 pro Monat, unbegrenzte Nutzung.​

    Fazit:

    Kann allerdings gut mit den anderen beiden KI-Tools kombiniert werden, z.B. Bilderstellung mit Midjourney und „Animation/Bewegung“ in den anderen Programmen

    + an sich ein tolles KI-Tool, vor allem das feature, dass 4 Bilder generiert werden und man sich mit den Verweisen auf die Bilder beziehen kann, liefert tolle Ergebnisse

    – an sich „komplizierter“ als andere KI-Tools dadurch, dass eine „gewisse Sprache“ bei den Prompts verwendet werden muss, macht aber sobald man es einmal verstanden hat keine großen Unterschied

    (Quelle: https://www.midjourney.com/home https://www.victoriaweber.de/blog/midjourney )

    Sora

    Sora ist ein von OpenAI entwickeltes KI-Modell, das es ermöglicht, realistische Videos basierend auf Texteingaben zu erstellen.

    –  Text-zu-Video-Generierung: Sora kann kurze Videoclips von bis zu 20 Sekunden Länge in verschiedenen Seitenverhältnissen (Querformat, Hochformat, quadratisch) erstellen. Nutzer können durch Texteingaben Szenen beschreiben, die dann von der KI in bewegte Bilder umgesetzt werden. ​OpenAI

    –  Remix: Mit dieser Funktion können Elemente in bestehenden Videos ersetzt, entfernt oder neu interpretiert werden, um kreative Anpassungen vorzunehmen. ​

    –  Re-Cut: Sora ermöglicht es, Videos neu zu schneiden und zu arrangieren, um alternative Versionen oder verbesserte Sequenzen zu erstellen. ​

    Preismodell:

    – Plus:
    20$/Monat
    includes the ability to explore your creativity through video
    Up to 50 videos (1.000 credits)
    Limited relaxed videos
    Up to 720p resolution and 10s duration videos

    – Pro
    200$/Monat
    includes unlimited generations and the highest resolution for high volume workflows
    Up to 500 videos (10.000 credits)
    Unlimited relaxed videos
    Up to 1080p resolution and 20s duration videos

    Fazit:

    + tolles Tool, intuitiveres Interface, vor allem sehr attraktiv, da ich bereits ein ChatGPT Plus Abo haben und im Vergleich zu Adobe kein zusätzliches Abo für die Grundfunktionen notwendig ist

    + ebenfalls inspirierend ist die Startseite, auf der viel Inspo und andere Videos zu sehen sind. Keines der anderes Tools war so aufgebaut und förderte so stark und schnell die Kreativität, vor allem sehr gut, da die Prompts immer angeben sind und einen Einblick geben, wie Prompts formuliert werden müssen um gute Ergebnisse zu erhalten

    + ebenfalls sehr gut gelöst, ist die Tutorial Section

    (Quelle: https://sora.com/subscription )

    GESAMTFAZIT:

    Für meinen weiteren Forschungs- und Projektprozess werde ich die verschiedenen KI-gestützten Videotools weiterhin intensiv testen und ausgiebige Experimente durchführen.

    Besonders positiv überrascht hat mich bisher Sora, da der Einstieg dank meines ChatGPT Plus-Abos äußerst unkompliziert war. Bei den anderen KI-Tools prüfe ich derzeit noch, welche Anbieter für meine Anforderungen am besten geeignet sind und ob sich ein Abonnement lohnt. Adobe und Runway stehen dabei aktuell ganz oben auf meiner Liste. Besonders bei Runway hoffe ich, ein Educator-Abo erhalten zu können, um das Tool im vollen Umfang nutzen zu können.

    Why do we need our own Film Emulations

    Introduction

    A Short Blogpost on why Colorists should use their own Luts and should create them, themselves. In modern film and video production, Look-Up Tables (LUTs) play a crucial role in the workflows of cinematographers, editors, and especially colorists. LUTs enable consistent color transformations and help efficiently communicate creative looks. However, pre-made LUTs are often inadequate as they fail to meet the specific requirements of a project or reflect a colorist’s, DP’s or Director’s creative vision. Therefore, it is essential for every professional colorist to create their own LUTs to merge technical precision with artistic control. Almost every DP (Director of Photography) has their own LUT that they use on their Job. Even Roger Deakins, one of the best DPs, always uses the same LUT for his films on set. He might let the colorist alter contrast or saturation to fit the mood of the film.

    1. The Function and Importance of LUTs

    LUTs serve as predefined color transformations that convert an image into a desired color representation. Their primary functions include:

    • Technical Color Transformation: Converting raw camera material (Log or RAW) into a displayable color spectrum, such as Rec. 709 for standard monitors.
    • Creative Color Styling: Applying specific color moods or looks to achieve an aesthetic vision.
    • Consistency in Workflow: Ensuring uniform representation of footage from production through final color grading.

    Since each camera has its own color science and different projects have unique requirements, standard LUTs are often insufficient or introduce unwanted color shifts.

    2. The Limitations of Standard LUTs

    Many filmmakers and colorists rely on pre-existing LUTs, but these have significant drawbacks:

    • Limited Adaptability: They are not optimized for specific lighting conditions, light sources, or individual camera settings.
    • Lack of Individuality: Standard LUTs often create generic looks that do not reflect a film’s creative vision.
    • Lack of Control Over Transformation: A LUT stores a predefined color transformation and cannot perform selective corrections or mask-based adjustments.

    For these reasons, professional colorists must create their own LUTs to perfectly balance their creative signature and technical requirements.

    3. Types of LUTs: Technical, Creative, and Hybrid

    Before a colorist creates their own LUTs, it is important to understand the different types and their applications:

    • Technical LUTs: These transform the color spectrum and gamma curve of a camera sensor into a standardized color profile (e.g., ARRI LogC to Rec. 709). They are based on pure color science without artistic modifications.
    • Creative LUTs: These focus solely on aesthetic adjustments. They alter color tones, contrast, and saturation without performing a color space transformation.
    • Hybrid LUTs: A combination of technical and creative LUTs that incorporates both a color transformation and a specific artistic look. These LUTs are commonly provided by camera manufacturers like ARRI or RED.

    4. The Advantages of Custom LUTs for Colorists

    Creating custom LUTs offers numerous benefits:

    • Customization for Individual Projects: Every project requires a specific color mood. Custom LUTs allow colorists to tailor the colors precisely.
    • Consistency Across Productions: A colorist can maintain their unique visual identity by using similar color palettes for different productions.
    • Optimization for Specific Camera Systems: Different camera sensors have different color characteristics. A custom LUT ensures that footage is optimally interpreted.
    • Increased Efficiency in Workflow: Well-designed LUTs provide a strong starting point for color grading, saving time in post-production.

    5. Creating Custom LUTs in DaVinci Resolve

    Modern color grading software like DaVinci Resolve or nuke provides powerful tools for creating custom LUTs. The process involves several steps:

    1. Setting Up a Proper Test Environment: Selecting reference footage that matches the final shooting material.
    2. Applying a Technical Color Transformation: Performing a neutral color correction to convert the footage from Log or RAW into a usable color spectrum.
    3. Applying Creative Adjustments: Modifying hue, contrast, and saturation to achieve the desired aesthetic.
    4. Exporting the LUT: Saving the color transformation as a .cube file for use in various projects.
    5. Testing & Refining: The LUT should be tested with different shots and lighting conditions and adjusted as needed.

    6. Conclusion

    A professional colorist should not rely solely on pre-made LUTs but should develop their own to ensure maximum creative control and technical precision. Custom LUTs allow for efficient implementation of desired aesthetics and optimize the workflow. Modern tools like DaVinci Resolve or Nuke offer powerful options for creating and refining LUTs, enabling every colorist to shape and preserve their unique color identity.

    Frame.io. (2020). How and why you should build your own LUTs. https://blog.frame.io/2020/07/27/building-your-own-luts-how-and-why/

    Kroll, N. (2018). How to apply color grading LUTs professionally: My workflow explained. https://noamkroll.com/how-to-apply-color-grading-luts-professionally-my-workflow-explained/

    Deakins, R. (n.d.). LUTs. Roger Deakins Forums. Retrieved March 20, 2025, from https://www.rogerdeakins.com/forums/topic/luts/

    Chat GPT 4.0 was used for a grammar and spell check

    Create your own Scene Referred Negative Emulations

    The process of creating scene-referred negative emulations requires a meticulous approach, combining traditional film stocks, digital cinematography, precise lighting conditions, and advanced post-processing techniques. This post outlines the essential tools, film stocks, and preparation steps necessary for accurate film profiling, which serves as the foundation for creating high-quality emulations. The aim is to develop LUTs (Look-Up Tables) that emulate the characteristics of film negatives, preserving their unique response to color and light.

    1. Film Stocks

    To establish a reliable baseline for negative emulations, it is essential to test and profile various film stocks. Luckily a few people already did all the Preparation Parts. I will use scanned film from Nico Fink, an Austrian colourist. He uses the following film stocks for profiling:

    • Kodak 200T (5213) 35mm Motion Picture Film
    • Kodak 500T (5219) 35mm Motion Picture Film
    • Kodak Porta 400 35mm Photo Film
    • Fuji Superia X-Tra 400
    • Silbersalz35 Kodak 50D, 250D, 500T & 200T Motion Picture Film (respooled for stills)
    • Silbersalz35 Fujifilm Vivid 500T Motion Picture Film (respooled for stills)
    • Rollei VarioChrome (Special Edition)
    • Agfa (expired 1979)

    Some additional Stocks are tested as well, including Kodak 250D (5203), Kodak 50D (5207), Cinestill 800T, Fuji Provia 100, Fuji Velvia 100, Kodak Ektachrome E100, and Kodak Gold 200.

    2. Digital Cameras for Profiling

    He achieved comprehensive digital profiling, through a selection of high-end cinema cameras. These cameras are chosen based on their sensor characteristics, color science, and dynamic range:

    • ARRI Alexa Mini
    • RED Helium (initial test camera)
    • SONY FX9
    • Blackmagic Design Pocket 4K or 6K

    Additional cameras, such as the RED Komodo, SONY VENICE, and Blackmagic Design URSAmini 4.6K G2, are also included depending on the project requirements.

    3. Test Charts

    Accurate scene-referred profiling requires precise test charts. These where used to calibrate color response and exposure latitude.

    • X-Rite Digital SG
    • Kodak Grey & White Card R-27
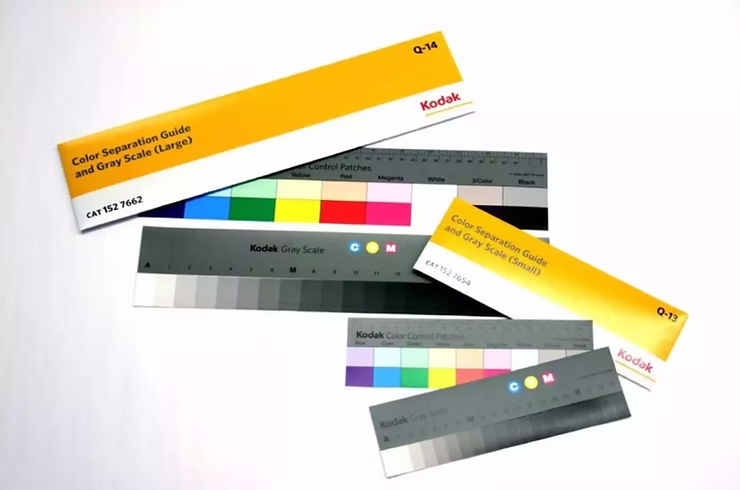
    • Kodak Color Separation Guide & Gray Scale

    Test Charts ©https://www.kodak.com/en/motion/page/color-separation-guides-and-gray-scales

    4. Lighting & Grip Equipment

    Lighting consistency is crucial to ensure reproducibility across tests. An LED light source with accurate color rendition was used:

    • Litepanels Gemini 2×1 RGBWW (chosen for its precision and ability to produce a wide color gamut)
    • Sekonic L758-Cine Light Meter (to ensure precise exposure control)
    • Photo table covered with 18% grey paper (for controlled reflections)
    • Film slate with exposure and white balance information (for accurate documentation)

    5. Scanning & Film Lab Processing

    Scanning is a critical step in film profiling, ensuring high-fidelity digital captures of negatives.

    • Foto Leutner, Vienna (stills scanning)
    • Focus Film Lab, Stockholm (motion picture film processing)
    • Silbersalz35 (providing film processing and scanning using a Cintel Scanner)
    • Scanity 4K Scanner (for high-quality motion picture film scans)

    Scanity 4K Scanner (Pic Credit: ©https://www.focusfilm.se/about)

    6. Software Tools

    To achieve accurate film emulation, a combination of software tools was used for color matching and LUT generation:

    • Blackmagic Design DaVinci Resolve (primary color grading and LUT application)
    • The Foundry Nuke (for precise curve creation and LUT extraction)
    • Adobe Camera RAW (for stills conversion)

    7. Workflow Overview

    The workflow for scene-referred negative emulation consists of multiple controlled steps:

    Conclusion

    1. Capture test charts under controlled lighting conditions at 5600K and 3200K with a digital camera, exposing from -5 to +5 EV in 1-stop increments.
    2. Expose the same test charts under identical conditions using film stocks.
    3. Develop and scan negatives, ensuring high consistency in digital files.
    4. Align digital and scanned film images in Nuke, adjusting for white balance and exposure.
    5. Create a 1D LUT using grayscale steps for R, G, and B channels.
    6. Use Resolve for color matching, refining the LUT with its built-in tools.
      • Alternative: Implement Tetrahedral 3D Interpolation via Blink Script for improved color accuracy.
    7. Apply additional filmic effects, such as halation, grain, and gate weave, to enhance realism.

    These Are the steps one one would have to make, to get an accurate result. It is very expensive and time consuming and there are so many complicated steps that can alter the result in a good and bad way. Luckily Nico Fink provides his scans for little price on his website. This saves a lot of time and the preparations are done by a professional. Now the digital Part starts. Embark with me on a technical journey on how to profile filmstock. We will try and Profile the EastmanEXR100T and 200T Filmstock.

    DeMystify Colorgrading. (n.d.). Film Profile Journey: 02 – Tools, Films & (first) Preparations. DeMystify Colorgrading. Abgerufen am 20. März 2025, von https://www.demystify-color.com/post/film-profile-journey-02-tools-films-first-preparations