Title: Digital Imperfections: Analog Processes in 21st Century Cinema
Degree: Master of Fine Arts, New Media
Institution: University of Lethbridge
Year: 2014
Supervisors: Dr. Aaron Taylor, Deric Olsen
Work piece: Prairie Dog (feature film)
Document type: Support paper (theoretical and methodological companion to a creative thesis)
Structure
The support paper is divided into six main sections:
Introduction
Research Aims
Justification of Research Methods
Prairie Dog Sequence Analysis (subdivided into six sequences)
Conclusion
Works Consulted
Overall Presentation Quality
The thesis presents itself with professional formatting, consistent academic tone, and clear visual documentation (figures, stills, and references to both historical and original materials). The writing is good, and image placement supports the analysis great. The integration of film stills, diagrams, and compositional notes contributes to a high production and presentation standard.
Degree of Innovation
He challenges the dominance of digital perfectionism by reintroducing analog imperfection as a creative and perceptual strategy. The argument, that imperfection restores audience participation in the cinematic illusion, is both original and theoretically grounded. The practical film component (Prairie Dog) provides an artistic experiment that tests these concepts through practice-based research.
Independence
The thesis demonstrates significant autonomy. Evernden independently designed, executed, and documented a complex mixed-media film production. His integration of practical analog effects (miniatures, water-tank photography, matte painting, puppetry) with digital compositing reflects both technical mastery and independent vision.
Organization and Structure
The document follows a coherent progression from theoretical framing to methodological justification and applied analyses. Each chapter builds logically toward the concluding synthesis. The analytical breakdown of individual sequences is systematic and mirrors scientific rigor while maintaining artistic sensibility. Occasionally, the prose becomes dense, and transitions between theory and production description could be better.
Communication
The writing style is formal, precise, and reflective of graduate-level scholarship. Evernden successfully integrates critical theory (e.g., Dudley Andrew, Wollheim, Geuens, Casetti) with personal reflection on artistic process. Occasionally, the text leans toward verbosity and could benefit from tighter phrasing for non-specialist readers. Nevertheless, the articulation of theoretical ideas and practical insights is highly effective.
Scope
The scope is well-calibrated: the paper covers theoretical discourse, historical contextualization, and practical experimentation within the limits of an M.F.A. thesis. It neither overreaches nor becomes superficial. The dual emphasis on analysis and creation ensures both academic and artistic relevance.
Accuracy and Attention to Detail
Citation practices, formatting, and visual documentation are precise. Technical descriptions (e.g., lighting, compositing, analog setups) are specific and carefully recorded. A few passages might have benefited from additional proofreading for stylistic conciseness, but overall, the attention to both linguistic and formal detail is impressive.
Literature
The bibliography is well-curated and demonstrates deep engagement with film theory, aesthetics, and digital media studies. Authors such as Dudley Andrew, Francesco Casetti, and Jean-Pierre Geuens are effectively contextualized. However, the inclusion of more recent sources (post-2010 digital cinema criticism) would have strengthened the contemporary dialogue.
Overall Assessment
Christopher Evernden’s Digital Imperfections: Analog Processes in 21st Century Cinema is an exceptional M.A. thesis that merges scholarly analysis with creative experimentation. Its strengths lie in conceptual originality, technical sophistication, and theoretical depth. The creative project, Prairie Dog, serves as both proof-of-concept and aesthetic manifesto, embodying the thesis argument that imperfection re-humanizes the digital image.
Eine Analyse der affektiven Bildwirkung am Beispiel von „First Speech“ und „Through my Eyes“
Im Genre des Branded Short Film und explizit in den Formaten von NGOs wie dem UNHCR oder journalistischen Kampagnen, ist die Zeit die kritischste Ressource. Um innerhalb von 120 bis 180 Sekunden eine nachhaltige emotionale Resonanz zu erzeugen, reicht eine lineare Narration oft nicht aus. Eine Synthese aus der klassischen Filmtheorie André Bazins und aktuellen neuroästhetischen Untersuchungen legt nahe, dass die visuelle Raumkonstruktion der entscheidende Faktor für die Induktion von Empathie ist. Elen Lotman argumentiert in ihrer Untersuchung, dass die visuelle Verstärkung von Tiefe eines der am häufigsten genutzten Werkzeuge ist, um die wahrgenommene Empathie gegenüber Leinwandcharakteren zu steuern.
Bazin und die psychologische Notwendigkeit des Raumes
André Bazin sah im „Mythos vom totalen Kino“ das Bestreben, die Realität in ihrer räumlichen und zeitlichen Integrität zu rekonstruieren. Für ihn war die Tiefenschärfe kein bloßer Stil, sondern ein ontologisches Mittel, um dem Zuschauer die Freiheit der Wahrnehmung zurückzugeben und ihn in das Bild „einzubeziehen“.
Diese theoretische Annahme findet nun eine neurophysiologische Entsprechung. Lotman verweist darauf, dass neurobiologische Beweise eine Verbindung zwischen emotionaler Empathie und der Nutzung raumschaffender visueller Werkzeuge nahelegen. Wenn wir verstehen, wie das Gehirn Raum verarbeitet, verstehen wir auch, wie wir in Formaten wie First Speech Nähe erzeugen können.
Embodied Simulation vs. Theory of Mind: Die Wahl der Empathie
Um die Wirkung von Branded Shorts zu präzisieren, muss zwischen zwei Klassen empathischer Prozesse unterschieden werden, die Lotman unter Rückgriff auf Zaki und Ochsner definiert:
Experience Sharing (Embodied Simulation – ES): Dies beschreibt eine affektive Reaktion, bei der der emotionale Zustand einer anderen Person geteilt wird (emotionale Ansteckung oder Resonanz).
Mentalising (Theory of Mind – ToM): Hierbei handelt es sich um die kognitive Fähigkeit, die Perspektive einer anderen Person einzunehmen (Sympathie, Mitgefühl).
Für emotionale Kampagnenfilme ist meist die Embodied Simulation das Ziel. Lotman postuliert, dass bestimmte visuelle Werkzeuge genutzt werden, um diese Form der „verkörperten Simulation“ durch eine tiefenbetonte Bildgestaltung zu verstärken. Im Gegensatz dazu führen Techniken, die die Räumlichkeit reduzieren (Verfremdung), eher zu kognitiven Prozessen der Theory of Mind.
Die Amygdala als Schnittstelle von Raum und Affekt
Die Korrelation zwischen Raumwahrnehmung und Gefühl ist neuroanatomisch fundiert. Forschungsergebnisse deuten darauf hin, dass die Amygdala, zentral für emotionale Bewertungen auch eine entscheidende Rolle bei der Kodierung von räumlichen Informationen spielt. Die Amygdala moduliert die Raumwahrnehmung und ist gleichzeitig essenziell für das Empfinden emotionaler Empathie. Eine Bildgestaltung, die den Raum betont, signalisiert dem Gehirn somit eine höhere Salienz (Salienz [engl. salience; lat. salire springen], [SOZ], Bedeutsamkeit, das Hervortreten, z. B. von Merkmalen bei einer Person) und erleichtert die emotionale Involvierung.
Fallbeispiel I: „Through my Eyes“ (UNHCR) – Die Konstruktion der physischen Präsenz
Im Kontext von POV Szenen wie in Through my Eyes wird die Notwendigkeit der Embodied Simulation besonders deutlich.
Visuelle Strategie: Es wird mit Augenähnlichen Brennweiten gefilmt, die noch mehr die POV Symbolik verstärken sollten. Die Einstellungen sind of sehr eng und zeigen nicht viel vom Frame. dies hat wahrscheinlich damit zu tun, das die Sets nicht riesig waren und damit man das Gefühl von Enge vermitteln kann.
Anwendung der Theorie: Experience Sharing (Embodied Simulation – ES). Der Zuschauer fühlt sich in der Situation gefangen. Am Ende schwingt der Film um auf Mentalising (Theory of Mind – ToM) um. Wir fühlen mit der Person mit und was sie erlebt hat.
Der Effekt: Durch diese Hyper-Räumlichkeit wird die Amygdala aktiviert. Der Zuschauer „denkt“ nicht über das Flüchtlingslager nach (ToM), sondern sein Gehirn simuliert die physische Anwesenheit (ES). Die emotionale Distanz wird durch die räumliche Immersion eliminiert.
Fallbeispiel II: „First Speech“ (Free Press) – Die Isolation des Subjekts
Im Gegensatz zur Isolierung des Subjekts wählt die Kampagne The First Speech einen diametral entgegengesetzten visuellen Ansatz, der die theoretischen Annahmen von Lotman bestätigt. Der Film zeigt nicht die Redner (die Diktatoren), sondern die Zuhörer die Bürger in ihren Wohnzimmern, Cafés und Arbeitsplätzen, die hoffnungsvoll den ersten Worten ihrer neu gewählten Führer lauschen.
Visuelle Strategie: Integraler Realismus und Kontext Anstatt den Raum zu eliminieren, zelebriert die Kamera hier den Kontext. Wir sehen detailreiche, tief gestaffelte Tableaus des alltäglichen Lebens. Die Lichtarchitektur ist naturalistisch („Space-inducing Light“), oft mit weichen Texturgradienten und einer spürbaren räumlichen Tiefe, die durch Fenster, Möbel und die Anordnung der Personen im Raum erzeugt wird.
Anwendung der Theorie: Embodied Simulation durch Immersion Nach Lotman triggert diese Betonung von Räumlichkeit und Kontext („Depth Cues“) die Embodied Simulation (ES). Das Gehirn des Zuschauers rekonstruiert den dreidimensionalen Raum und platziert sich zu den Bürgern. Wir beobachten sie nicht distanziert (was eine Theory of Mind-Reaktion wäre, bei der wir über ihre Naivität urteilen könnten), sondern wir „bewohnen“ denselben Raum. Die Amygdala kodiert die räumliche Nähe als emotionale Relevanz.
Der Effekt: Affektive Dissonanz Der Film nutzt die durch die Rauminszenierung erzeugte Embodied Simulation, um eine emotionale Falle zu stellen. Da wir visuell und affektiv mit den hoffnungsvollen Bürgern verbunden sind („Experience Sharing“), spüren wir ihre Zuversicht physisch mit. Wenn wir dann realisieren, wessen Worte dort gesprochen werden (z.B. Putin oder Erdoğan) und wie sich die Geschichte entwickelte, entsteht eine schmerzhafte Dissonanz. Die visuelle Nähe zwingt uns, den Verrat an der Freiheit nicht als historisches Faktum zu analysieren, sondern als persönlichen Verlust zu empfinden. Eine flachere, distanziertere Bildsprache hätte uns erlaubt, sicher im „Hier und Jetzt“ zu bleiben; die immersive Tiefe jedoch zieht uns in das fatale „Damals“ der Opfer.
Fazit
Die Entscheidung für eine bestimmte Lichtarchitektur ist keine rein ästhetische Frage, sondern eine psychologische Weichenstellung. Wer emotionale Nähe will, muss Raum konstruieren. Die visuelle Verstärkung der Tiefe dient dabei als Trigger für die Amygdala, um den Zuschauer aus der bloßen Beobachtung (Theory of Mind) in das unmittelbare Erleben (Embodied Simulation) zu überführen. Empathie im Film ist somit, wie Lotman zeigt, direkt mit den Parametern der Raumwahrnehmung korreliert. Je mehr Seiten eines Würfels wir sehen, desto räumlicher wirkt er für uns.
Quellen:
Bazin, A. (1967). The myth of total cinema. In H. Gray (Trans.), What is cinema? (Vol. 1, pp. 23–32). University of California Press.
Lotman, E. (2016). Exploring the ways cinematography affects viewers’ perceived empathy towards onscreen characters. Baltic Screen Media Review, 4, 88–105.
Die Debatte über die Überlegenheit von analogem Zelluloid gegenüber digitalen Sensoren wird in der Filmwelt oft mit einer fast religiösen Inbrunst geführt. Während Theoretiker wie André Bazin das Kino als ein „idealistisches Phänomen“ begriffen, das nach einem „integralen Realismus“ strebt, hat die technologische Entwicklung der letzten Jahre die materiellen Bedingungen dieses Strebens radikal verändert. Die wissenschaftliche Untersuchung „As Film Goes Byte“ bietet hier eine entscheidende empirische Basis, um zu verstehen, wie die Wahl des Aufnahmemediums die tatsächliche Wahrnehmung des Zuschauers beeinflusst.
Der Geist des Mediums: Zwischen Vision und Technik
Nach Bazins Auffassung ist das Kino nicht das Resultat technischer Erfindungen, sondern die Realisierung eines uralten Mythos: der vollkommenen Nachahmung der Natur. Er argumentierte, dass die Idee des Kinos bereits „voll bewaffnet“ in den Köpfen der Pioniere existierte, noch bevor die chemischen und mechanischen Voraussetzungen erfüllt waren. In diesem Sinne wäre jede technologische Neuerung – vom Stummfilm zum Tonfilm, von Analog zu Digital, lediglich ein weiterer Schritt zur Erfüllung dieses ursprünglichen Mythos vom „totalen Kino“.
Empirische Realität: Überlebt die Ästhetik den narrativen Kontext?
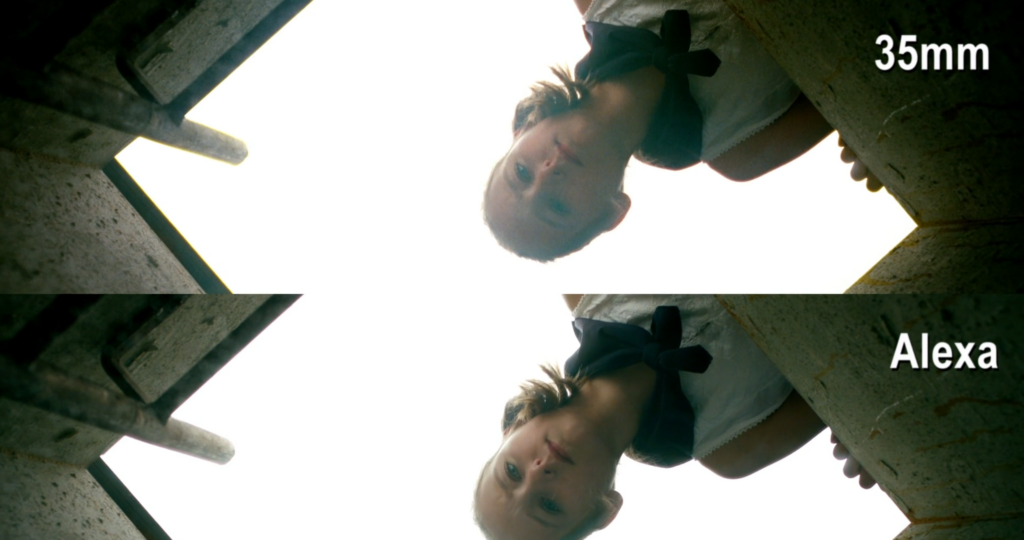
Die Studie von Loertscher et al. (2016) konfrontiert diesen Mythos mit der psychologischen Realität der Zuschauer von heute. In einem kontrollierten Experiment wurden Filme simultan auf 35mm-Film und digital mit einer ARRI Alexa aufgezeichnet, um Unterschiede in der emotionalen und kognitiven Reaktion zu messen.
Die Diskrepanz der Wahrnehmung: Interessanterweise bevorzugten Probanden in kurzen, isolierten Sequenzen ohne Handlung signifikant die analoge Ästhetik, da diese als lebendiger und weniger steril empfunden wurde.
Die Dominanz der Erzählung: Sobald die Zuschauer jedoch vollständige narrative Filme betrachteten, verschwand dieser Präferenzvorteil des analogen Mediums fast vollständig.
Emotionale Gleichwertigkeit: Die Studie belegt, dass die emotionalen und immersiven Erlebnisse, also das, was Bazin als Kern der kinematographischen Erfahrung ansah, bei moderner digitaler Projektion unabhängig vom Aufnahmemedium sind.
Der Faktor der Projektion: Ein bemerkenswertes Ergebnis der Untersuchung ist, dass die Art der Projektion einen größeren Einfluss auf die Emotionen hat als die Kamera selbst: Die mechanische Projektion von Zelluloid rief höhere Level an Empathie und emotionalen Reaktionen hervor als die digitale Variante.
Die kognitive Last der digitalen Schärfe
Ein kritischer Punkt bei der Wahl digitaler Medien ist die durch Signalverarbeitung und Bildstabilität erzeugte „Hyperrealität“. Die Forschungsergebnisse zeigen, dass Zuschauer digitaler Versionen signifikant mehr visuelle Details im Hintergrund erinnerten. Aus filmästhetischer Sicht kann dies paradoxerweise ein Nachteil sein: Wenn die enorme Klarheit des digitalen Bildes die Aufmerksamkeit auf narrative Irrelevantien lenkt, droht der Zuschauer die Bindung zur Handlung und zur Charakterentwicklung zu verlieren.
In Ergänzung zu den theoretischen Überlegungen von André Bazin und den psychologischen Befunden der modernen Forschung lässt sich ein direkter, technischer Vergleich der Aufnahmeformate ziehen, wie er im Rahmen des Projekts der Zürcher Hochschule der Künste (ZHdK) dokumentiert wurde. Während die analoge Aufnahme auf 35mm-Zelluloid durch eine chemische Reaktion von Silberbromidkristallen entsteht, die dem Bild eine organische Struktur und eine charakteristische Instabilität verleihen, basiert die digitale Erfassung auf elektronischen Sensoren mit einem fixen Pixelraster.
In der direkten Gegenüberstellung zeigen sich folgende spezifische Differenzen:
Bildstabilität und Textur: Das analoge Bild weist eine mechanisch bedingte Unruhe und ein veränderliches Filmkorn auf, wohingegen die digitale Aufnahme der ARRI Alexa eine „rock-steady“ Stabilität und eine klinische Klarheit liefert.
Detailwiedergabe: Die digitale Technik ermöglicht durch eine überlegene Farbtrennung und Kantenschärfung eine präzisere Wahrnehmung von Hintergrunddetails, was in Tests zu einer nachweislich besseren Erinnerungsleistung an visuelle Nebensächlichkeiten führte.
Umgang mit Licht: Während digitale Sensoren Informationen in extrem hellen Bereichen oft abrupt „abschneiden“ (Clipping), reagiert chemischer Film nichtlinear und weicher auf Überbelichtung, was zu einer natürlicheren Zeichnung in den Lichtern führt.
Farbreproduktion: Analoges Filmmaterial erzeugt Farben durch subtraktive Mischung in mehreren Emulsionsschichten, was zu einer charakteristischen, nicht-linearen Farbwiedergabe führt, während digitale Systeme Farben linear im RGB-Farbraum kodieren und erst durch aufwendiges Color Grading an den etablierten „Film-Look“ angepasst werden müssen.
Letztlich zeigt der direkte Vergleich, dass die digitale Kinematographie heute zwar in der Lage ist, die technischen Parameter von Zelluloid in Bezug auf Dynamikumfang und Auflösung nahezu perfekt zu emulieren, die spezifische „Aura“ und die psychologische Wirkung jedoch stark von der Art der Projektion und der narrativen Einbettung abhängen.
Das Medium als Werkzeug, nicht als Ziel
Die Wahl des Mediums scheint heute weniger eine Frage der emotionalen Wirksamkeit auf das Publikum zu sein, sondern vielmehr eine Entscheidung über die kognitive Führung des Zuschauers. Während das digitale Medium durch seine Präzision besticht, bietet das analoge Medium – insbesondere in der Projektion – eine spezifische kulturelle und atmosphärische Rahmung, die den „Mythos des Kinos“ weiterhin nährt. Letztlich bestätigt die moderne Forschung Bazins Intuition: Das Kino ist eine psychologische Sehnsucht, die sich zwar technischer Mittel bedient, deren Erfolg aber primär an der Kraft der Erzählung hängt, welche die materiellen Grenzen des Mediums transzendiert.
Der Ikarus-Komplex der Filmgeschichte: Der Mythos des totalen Kinos
In der Geschichtsschreibung der Technik dominiert zumeist ein materialistischer Determinismus: Man geht davon aus, dass wissenschaftliche Durchbrüche und ökonomische Rahmenbedingungen die notwendige Basis bilden, auf der kulturelle Ausdrucksformen wie das Kino erst erwachsen können. Doch André Bazin, der geistige Vater der Nouvelle Vague, unterzieht in seinem essenziellen Text „Der Mythos vom totalen Kino“ genau diese Annahme einer radikalen Revision. Er postuliert eine paradoxe Umkehrung der Verhältnisse zwischen der ökonomisch-technischen Evolution und der schöpferischen Imagination der Pioniere.
Die Umkehrung der Kausalität: Geist über Materie
Bazin meint, dass die Entstehung des Films, entgegen marxistischen Deutungsmustern, wie sie etwa Georges Sadoul vertrat, nicht zwangsläufig aus der industriellen Infrastruktur des 19. Jahrhunderts hervorging. Vielmehr scheint die historische Kausalität auf dem Kopf zu stehen: Die grundlegenden technischen Entdeckungen waren für Bazin lediglich „glückliche Zufälle“, die weit weniger ins Gewicht fielen als die vorgefassten, fast schon im „Himmel“ schwebenden Ideen der Erfinder.
Das Kino, so Bazin, ist ein idealistisches Phänomen. Die Vision einer totalen Repräsentation der Realität existierte in den Köpfen der Forscher bereits in vollendeter Form, lange bevor die chemischen und mechanischen Mittel zu ihrer Realisierung bereitstanden. Was die Frühgeschichte des Films prägt, ist daher weniger die Unterstützung der Phantasie durch die Technik, sondern vielmehr der „hartnäckige Widerstand der Materie gegen die Idee“.
Die „Monomanen“ und der Widerstand der Technik
Ein zentrales Argument Bazins ist die Charakterisierung der Gründerväter des Kinos. Er unterscheidet strikt zwischen dem echten Wissenschaftler (Savant) und dem besessenen Erfinder. Während ein Wissenschaftler wie Marey lediglich an der Analyse von Bewegung interessiert war, also daran, die Zeit anzuhalten, statt sie zu rekonstruieren, waren Männer wie Muybridge, Niepce, Leroy oder Lumière in erster Linie „Monomanen einer fixen Idee“.
Muybridge und das Unmögliche: Bereits zwischen 1877 und 1880 realisierte Muybridge dank der Finanzierung eines Pferdeliebhabers komplexe Versuchsreihen, obwohl ihm zwei der drei technologischen Grundvoraussetzungen (die trockene Emulsion und die flexible Basis) noch gar nicht zur Verfügung standen. Er erzwang das Resultat mit nassen Kollodiumplatten auf Glas – ein technischer Anachronismus im Dienste einer Vision.
Der Bastler als Prophet: Selbst Thomas Edison wird von Bazin nicht als Wissenschaftler, sondern als „do-it-yourself man of genius“ beschrieben. Diese Pioniere waren keine kühlen Kalkulatoren der Industrie, sondern Visionäre, die eher bereit waren, wie der Töpfer Bernard Palissy ihr Mobiliar zu verbrennen, um für wenige Sekunden ein zitterndes Bild zu erzeugen.
Der Mythos vom totalen Kino: Das Ziel ist die totale Illusion
Der Kern von Bazins These liegt im Begriff des integralen Realismus. Der leitende Mythos, der die Erfindung des Kinos befeuerte, war die Sehnsucht nach einer Rekonstruktion der Welt nach ihrem eigenen Ebenbild – eine Wiedergabe, die unbeschwert ist von der interpretativen Freiheit des Künstlers oder der Unumkehrbarkeit der verstreichenden Zeit.
Daraus ergeben sich weitreichende Konsequenzen für unser Verständnis der Filmgeschichte:
Der Stummfilm als Mangelzustand: Es wäre absurd, den Stummfilm als einen Zustand ursprünglicher Vollkommenheit zu betrachten, den man später durch Ton und Farbe korrumpiert hätte. In der Vorstellung der Erfinder war das Kino von Beginn an mit Sound, Farbe und räumlicher Tiefe (Stereoskopie) konzipiert.
Die Verspätung der Apparaturen: Da die optischen Prinzipien (wie die Netzhautträgheit) bereits seit der Antike bekannt waren, ist die späte Erfindung des Kinos nicht wissenschaftlich, sondern nur psychologisch zu erklären. Die Menschheit wartete darauf, dass die Chemie (die Fotografie) einen Weg fand, das Bild automatisch zu fixieren, bevor sie sich der Synthese der Bewegung widmete.
Ein unendlicher Prozess: Da das Ziel eine vollkommene, identische Kopie der Natur ist, kommt Bazin zu dem provokanten Schluss: „Das Kino ist noch nicht erfunden!“ Jede neue technologische Stufe ist lediglich ein weiterer Schritt zur Realisierung des ursprünglichen Mythos.
Das Kino als metaphysisches Streben
Indem Bazin das Kino als ein Produkt der Imagination definiert, das seiner technischen Realisierung vorausging, enthebt er das Medium einer rein funktionalen Technikgeschichte. Er vergleicht das Streben nach dem Kino mit dem Ikarus-Mythos: So wie der Traum vom Fliegen seit Urzeiten in der menschlichen Seele wohnte und lediglich auf den Verbrennungsmotor wartete, so wartete der Traum vom totalen Realismus auf die chemische und mechanische Industrierevolution des 19. Jahrhunderts.
Das Kino ist somit nicht das Kind der Wissenschaft, sondern das Kind eines metaphysischen Bedürfnisses nach Realität. Damit lässt sich auch rückwirkend sagen, dass die Technik niemals ein Hinderniss war das Kino weiterzuentwicklen. Wichtiger sind Ideen, Gefühle und Emotionen um uns den Filmrealismus näher zu bringen. Natürlich kommen mit neueren Technologien (AI, etc.) auch neuere Möglichkeiten und neue Stile die sich ins Kino einbringen. Dies ist aber nicht anders als wie als Beispiel genannt, der Verbrennungsmotor um fliegen zu können.
Quellen:
Bazin, A. (1967). What is cinema? 1. Univ. of Calif. Press.
In installation art, the physical presence of the viewer is not optional but it is essential. Ilya Kabakov famously stated that “the main actor in the total installation is the viewer; they are the center toward which everything is directed.” This focus on the viewer, however, often leads to a paradox: instead of being placed at a privileged point, the viewer is physically decentered. There is no single, ideal position from which the work can be fully understood. Meaning emerges only through movement within the space (Bishop, 2005). Another key aspect of installation art is duration. While a painting often suggests an instant or timeless moment, an installation requires time. The viewer must walk through it, pause, return, and explore. In this sense, installation art shares qualities with theater or film, yet differs in one crucial way: the visitor remains autonomous. They choose their own path, pace, and length of engagement (Zhihan Ren, 2025).
Contemporary museums increasingly respond to these demands with dynamic exhibition design. Static white walls are replaced by flexible and mobile elements that can adapt to movement and interaction. A notable example is the exhibition Homo Ludens where visitors were able to change the spatial setup themselves using mobile devices. Architecture becomes a “living” part of the experience, something that reacts and evolves through human presence.
Technological developments have further expanded these possibilities. Hereby immersive exhibitions today often use:
High-resolution projection mapping, allowing images to be projected precisely onto irregular surfaces such as columns or curved walls, making architecture appear fluid or unstable (Johnson, 2025a)
Spatial sound systems, with multiple speakers creating soundscapes that move around the visitor and envelop them acoustically (Johnson, 2025a)
Haptic feedback, such as vibrating floors or handheld controllers, which add a tactile layer to perception (Johnson, 2025a)
These technologies are not meant as pure spectacle. Their goal is to intensify emotional and sensory engagement and to encourage visitors to reflect on their own perception and their relationship to the surrounding world.
Richard Serra and Time as Matter
Richard Serra’s monumental installation The Matter of Time (2005) in the Guggenheim Museum Bilbao is one of the most radical explorations of space, time, and bodily experience. Installed in the 130-meter-long, column-free gallery, the work consists of eight massive Cor-Ten steel sculptures that activate the entire space (Johnson, 2025b).
Rather than presenting individual objects, Serra creates an environment that unfolds through movement. The viewer becomes the subject, and meaning is produced through walking.
Physical disorientation: The tilted and curved steel walls create a constant sense of imbalance. Scale and orientation shift continuously, challenging spatial perception.
Proprioceptive awareness: Moving through narrow passages makes visitors more aware of their own bodies, their breathing, rhythm, and physical limits. The acoustics of the steel amplify footsteps and ambient sounds, intensifying feelings of isolation or compression.
Time as material: The title emphasizes that time itself is sculptural. Each form leads to the next, subtly altering the visitor’s orientation in relation to the museum architecture.
Serra’s approach is influenced by his study of Japanese Zen gardens, which he understood as spatial fields that can only be experienced through movement. In Bilbao, Frank Gehry’s architecture functions as a resonant shell around the sculptures, creating a quiet, almost meditative space where perception slows down.
Olafur Eliasson and Perceiving Perception
Olafur Eliasson places the viewer at the absolute center of his work. His installations often function as tools that invite visitors to step back and reflect on their own actions and sensory processes. Eliasson frequently works with natural elements such as light, fog, water, and ice to heighten sensory awareness. Blurring subject and object: In Your Imploded View (2001), a polished aluminum sphere reflects the surrounding space but distorts it so strongly that viewers see themselves from unfamiliar perspectives. The artwork no longer dominates; instead, a dialogue emerges between observer and object (Malone, 2007).
Individual experience: Eliasson’s frequent use of the word “Your” in his titles emphasizes that meaning is personal and shaped by memory, expectation, and physical position.
Collective awareness: At the same time, these highly subjective experiences make visitors aware of others sharing the space. Being surrounded by fog or light creates temporary communities and encourages reflection on social responsibility.
A clear example is Beauty, where a rainbow appears through light and fine mist. The rainbow is only visible from a specific angle and exists solely in the act of seeing. Here, the viewer does not just observe the image but actively produces it through their position in space.
Installation art shifts the focus away from the artwork as an isolated object and toward experience as a process. Movement, time, and bodily presence are not secondary effects but core components of meaning. Whether through massive steel structures or fragile light phenomena, these works demand active participation and awareness. Rather than offering clear messages, they create situations in which perception itself becomes unstable, and it is precisely within this instability that reflection begins.
Bibliography
Bishop, C. (2005). Installation Art. Tate Publishing. https://www.scribd.com/document/463827422/Installation-Art-Claire-Bishop-pdf
Johnson, F. (2025a, September). Immersive Art Museum: A Deep Dive into Digital Experiences, Future Trends, and Visitor Engagement. Wonderful Museums. https://www.wonderfulmuseums.com/museum/immersive-art-museum/
Johnson, F. (2025b, November). Richard Serra Guggenheim Museum Bilbao: Exploring the Monumental Steel Sculptures Within Frank Gehry’s Architectural Masterpiece. Wonderful Museums. https://www.wonderfulmuseums.com/museum/richard-serra-guggenheim-museum-bilbao/
Malone, M. (2007, December). Ólafur Eliasson, Your Imploded View, 2001. Mildred Lane Kemper Art Museum. https://www.kemperartmuseum.wustl.edu/learn/learning-resources/eliasson-olafur-your-imploded-view-2001/type/essays
Zhihan Ren. (2025). When the Black Box Meets the White Cube: Spatial Shifts and Postdramatic Aesthetics in Performance Art. ResearchGate. https://www.researchgate.net/publication/392611552_When_the_black_box_meets_the_white_cube_spatial_shifts_and_postdramatic_aesthetics_in_performance_art
For my workpiece connected to my master’s thesis I want to create a short documentary dealing with the topic of sustainable travel by accompanying a travel group visiting Lapland. In previous blog posts I have outlined my plans and ideas for the project as well as some of the concerns and fears I had beforehand. Well, all of that planning is currently being tested in real life and while some of it turned out feasible and very valuable, other aspects and ideas proof to be a little less realistic. I am currently in Lapland, more precisely in Jokkmokk where we spent the last two days on the Sami winter market. We started our journey five days ago in Linz and have spent two nights and countless hours on trains and busses since. In this blog entry I want to reflect on my impressions of the journey as well as the project so far and maybe see what I can improve for the next ten days.
What worked and what didn’t I have already collected lots of footage for my documentary as well as for the travel agency as advertising material and every evening so far I have sat down to save everything to a hard drive and edit the photos I took that day. I am also planning to start creating a premiere pro project to already start sorting through video footage as well, however every single day so far has been so packed that I was only finished with editing my pictures at around one in the morning and after that I just wanted to sleep. But I am hoping that I will get around to it the next couple of days. Editing the photos daily really helps me stay motivated and focused, because I tend to take tons of photos and then just never edit them. It will feel amazing getting home from a trip and knowing that all of the photos are actually already done. So in a nutshell, keeping up to date with the photos works really well, keeping up to date with video footage works as far as securing data goes, but could be improved by sorting through footage already.
Another thing that has been working well enough so far is dealing with the extreme cold. We have had temperatures of below minus 11 degrees Celsius consistently over the last three days and my cameras still work without any trouble. Even the battery life doesn’t seem to suffer too drastically under the extreme temperatures. One thing that kind of scares me is taking the cameras from having been outside for a while to a warm, humid room indoors. From what I have researched beforehand, letting the camera warm up slowly inside of the bag is essential, as well as maybe putting it into a ziplock back to avoid condensation. I have been following these guidelines almost every time when entering a warm room from the outside and haven’t noticed any moisture building up or other issues so far. What is really annoying about this method is that I am practically unable to film anything inside of buildings because coming from the outside the cameras will always be really cold and when looking at an exhibition or watching a short concert, I will not have been inside for long enough to warm up the cameras gradually. So these were the situations where I had to risk it and take the camera out anyway in order to get any footage of the indoor events we visited. But I still avoided exposing the cameras to too much of a temperature shock.
I am also really happy with some of the footage I have so far as well as how our journey has been going so far. Enough problems have come up naturally to create an interesting story arc, but nothing too distracting from the main topic. There have also been a few really fitting quotes from people so far which would be amazing to help the story along, but unfortunately I was not able to record them in most cases. I did, however, write down the exact quote including who said it and when so that I might try to record audio of the people re-enacting their own quotes. We will see if that works but it might be a good solution to my problem. I have also started to carry around a small microphone with internal storage in situations where somebody might say something interesting, just so that I might be able to quickly record the audio. This has relieved me of some of the stress to always film because something useful might be said.
In general, finding a balance between being part of the journey and filming all the time has been kind of tricky but I am finding the right groove to be able to do both.
All in all I would say it is going pretty well with a few hiccups. I do believe that most of the project will be created in post-production anyway and I now just need to make sure that no footage I might need is missing.
Es folgen Zusammenfassungen/Übersetzungen der verschiedenen Parameter von Visual Communication und Language basierend auf Donis A. Dondis’ Buch: Dondis, Donis. A. (1973). A primer of visual literacy. MIT Press.
Ich versuche im folgenden auch, in den verschiedenen Parametern von Dondis schon Skalen für meine spätere Analyse abzuleiten.
Dondis beginnt die Aufarbeitung der verschiedenen Parameter mit Balance, weil Gleichgewicht den Ausgangszustand der visueller Wahrnehmung beschreibt.
Balance ist für ihn eine grundlegende psychologische Erwartung: Unser visuelles System sucht automatisch nach Stabilität und Gleichgewicht. Symmetrische Kompositionen wirken ruhig, kontrolliert und abgeschlossen. Asymmetrische Kompositionen hingegen erzeugen Spannung, Bewegung und Energie.
Jede Gestaltung positioniert sich zwischen diesen beiden Polen. Balance nie neutral, sondern vermittelt immer eine Haltung, etwa Sicherheit oder Dynamik. Balance entsteht durch das visuelle „Gewicht“ von Formen, Farben und Positionen im Raum. Dondis nutzt eine vertikale und eine horizontale Achse um das Glecihgewicht zu illustrieren. (Vgl. Dondis, 1973, pp. 22–23).
Stress / Spannung
Dondis spricht von visuellem Stress. Stress entsteht, wenn Balance gezielt gestört wird, beispielsweise durch Verschiebung, Ungleichgewicht oder durch eine unerwartete Platzierungen. Für Dondis ist Stress kein Fehler, sondern ein Motor der visueller Kommunikation, denn ohne diese Spannung bleibt Gestaltung oft leblos. Stress aktiviert das Auge, erzeugt Aufmerksamkeit und emotionales Engagement. Die Gestaltung lebt davon, dass sie zwischen Ordnung und Störung pendelt. (Vgl. Dondis, 1973, pp. 23–27).
Abb. Harmonie vs Stress (Quelle Dondis, 1973, pp. 23–27)
Ableitungen für Analyse: Stress ist ein Charakterparameter (calm vs bold Brands) visuelle Spannung vermittelt Haltung (konservativ ↔ experimentell) – niedriger Stress →wirkt ruhig, seriös, kontrolliert – hoher Stress →wirkt expressiv, progressiv, emotional
Für Motion: Stress entsteht durch Beschleunigung, Richtungswechsel, Timing-Kontraste – Motion kann Stress aufbauen (Peaks) oder abbauen (Ease-out) – plötzliche Bewegungen = hoher Stress – fließende Übergänge = niedriger Stress
Dondis beschreibt mit Leveling und Sharpening zwei gegensätzliche Strategien visueller Gestaltung. Leveling bezeichnet das Einebnen von Unterschieden: Elemente werden ähnlich gewichtet, Kontraste reduziert und visuelle Hierarchien abgeschwächt – das Ergebnis wirkt ruhig, aber oft auch austauschbar. Sharpening hingegen verstärkt bewusst Differenzen in Größe, Farbe oder Form und schafft so klare Dominanzen, Spannung und Fokus. Während Leveling beruhigt, macht Sharpening Aussagen prägnant. Gestaltung gewinnt erst durch Sharpening an Charakter, da Bedeutung über sichtbare Kontraste entsteht. (Vgl. Dondis, 1973, pp. 27–28).
Ableitungen für Analyse: Leveling = Kontrast wird reduziert Sharpening = Kontrast wird zugespitzt
Eine Marke mit viel Leveling wirkt: zurückhaltend, neutral, generisch Eine Marke mit Sharpening wirkt: selbstbewusst, expressiv, charakterstark
Dondis beschreibt eine wahrnehmungspsychologische Tendenz, nach der der untere linke Bereich eines Bildfeldes in westlichen Lesekulturen als besonders stabil und abschließend empfunden wird. Das hängt mit unserer westlichen Leserichtung zusammen (links nach rechts, oben nach unten): Das Auge startet links oben und bewegt sich diagonal durch das Bild, wobei unten links oft als visueller Ruhepunkt erlebt wird. Elemente in diesem Bereich wirken geerdet, ruhig und „fertig“, während insbesondere der obere rechte Bereich als offen, dynamisch und spannungsgeladen wahrgenommen wird. (Vgl. Dondis, 1973, pp. 28–32).
Ableitungen für Analyse: Platzierung sagt aus ob etwas stabil, progressiv, experimentell ist (ruhig vs dynamisch; abschließend vs offen)
Skala von 1-3 1. stark geerdet (unten links, zentriert) 2. ausgewogen 3. dynamisch/offen (oben rechts, randlastig)
Codierbar: Was sind die bevorzugten visuelle Ankerposition (unten links, zentral, oben rechts, wechselnd)
Attraction and Grouping
Damit beschreibt Dondis ein weiteres Gestaltungsprinzip, dass eine grundlegende Tendenz unseres visuellen Systems aufzeigt: Wir stellen immer Beziehungen zwischen Elementen her. Einzelne Formen „ziehen“ einander an, wenn sie sich ähneln, nah beieinander liegen oder visuelle Gemeinsamkeiten teilen. Gestaltung wird dadurch nicht als Summe einzelner Teile wahrgenommen, sondern als strukturierte Ganzheit. Grouping reduziert Komplexität: Unser Gehirn vereinfacht die visuelle Welt, indem es Muster bildet und Zusammenhänge konstruiert. (Vgl. Dondis, 1973, pp. 32–35).
Für Brand Identity: – Markenwirkung entsteht über visuelle Zusammenhänge, nicht über Einzelteile – Nähe + Ähnlichkeit erzeugen Kohärenz (wirkt „aus einem Guss“) – fehlendes Grouping > fragmentiert oder chaotisch – konsistente Gruppierungsmuster
Für Motion / zeitbasierte Systeme: – Bewegung kann Gruppierung verstärken oder auflösen – synchronisierte Animation = Zugehörigkeit – versetzte Animation = Differenzierung – Motion kann visuelle Beziehungen sichtbar machen und gruppieren (was gehört zusammen?)
Hier geht’s um das Prinzip „Figur und Hintergrund-Trennung“, also das, was wir als „Objekt“ wahrnehmen (positiv) und das, was als Raum darum herum erscheint (negativ). Negativer Raum (= Weißraum) ist nicht leer oder passiv, sondern wirkt aktiv an der Bedeutungsbildung mit. Wenn Positive und Negative eindeutig getrennt sind, entsteht Lesbarkeit und Stabilität. Wenn sie miteinander verschmelzen oder kippen, entsteht Spannung und visuelle Mehrdeutigkeit. (Vgl. Dondis, 1973, pp. 35–38).
Negativraum ist Teil der Markenidentität: – Reduktion über Negativraum kann Eleganz und Premium-Charakter erzeugen – Überfüllte Positivflächen können visuelle Überforderung erzeugen
Möglicher Analyse-Parameter: “Figure–Ground Clarity“ Skala: – sehr klar (dominante Figur, ruhiger Hintergrund) – ausgewogen – ambivalent / kippt (Figur und Grund konkurrieren)
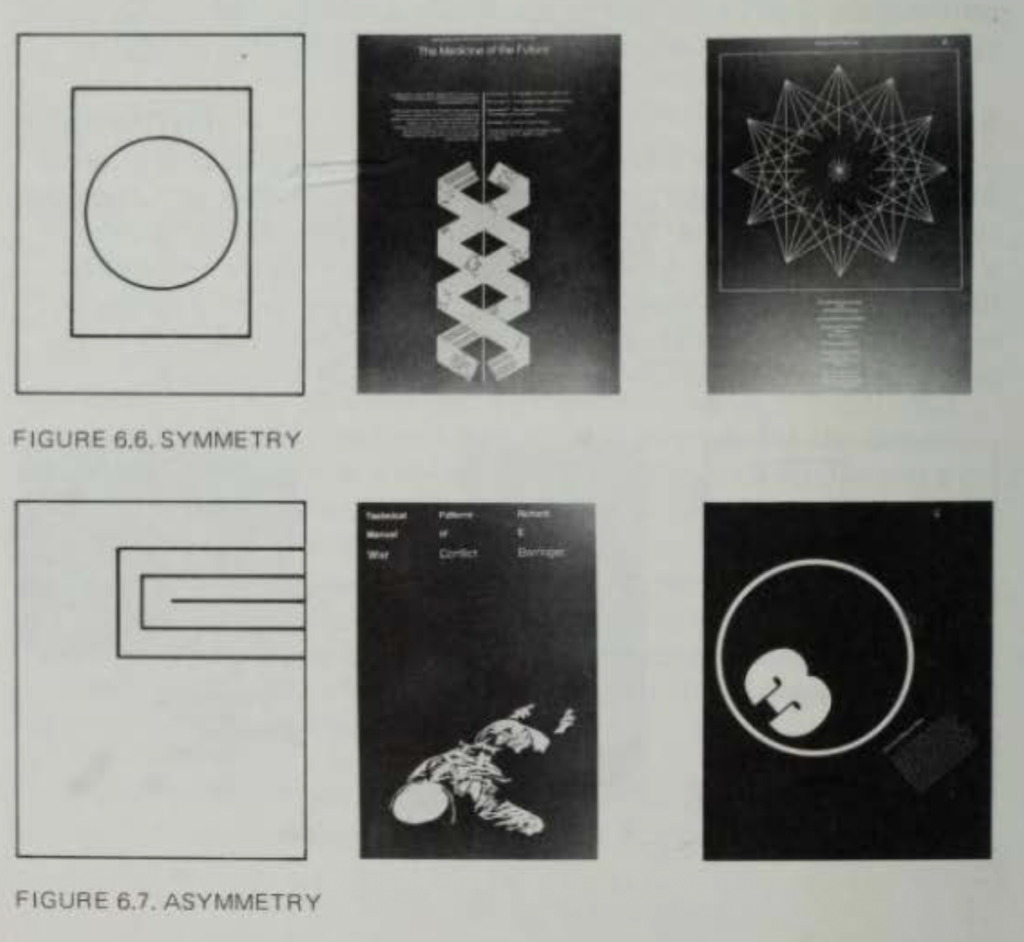
Basiert auf den Erkenntnissen zur Balance allgemein: Symmetrische Balance wirkt ruhig, kontrolliert und abgeschlossen, (formale Ordnung, Vorhersehbarkeit und Ruhe) während asymmetrische Balance Spannung (Dynamik und Aktivität) erzeugt und das Bild dynamischer erscheinen lässt. Balance bedeutet nicht zwangsläufig Gleichheit. Auch ungleiche Kompositionen können ausgewogen wirken, wenn die Kräfte im Bild in Beziehung zueinander stehen. Dondis beschreibt Symmetrie als historisch dominantes Organisationsprinzip, während moderne Gestaltung zunehmend asymmetrische Strukturen nutzt, um Bewegung und Zeitlichkeit auszudrücken. (Vgl. Dondis, 1973, pp. 112–113).
Oder codierbar: Balance-Strategie: symmetrisch/asymmetrisch/wechselnd (je nach Touchpoint) Kompositionsprinzip: axial symmetrisch/partiell symmetrisch/vollständig asymmetrisch Motion-Achsen: zentral synchron / partiell versetzt/frei / ungebunden
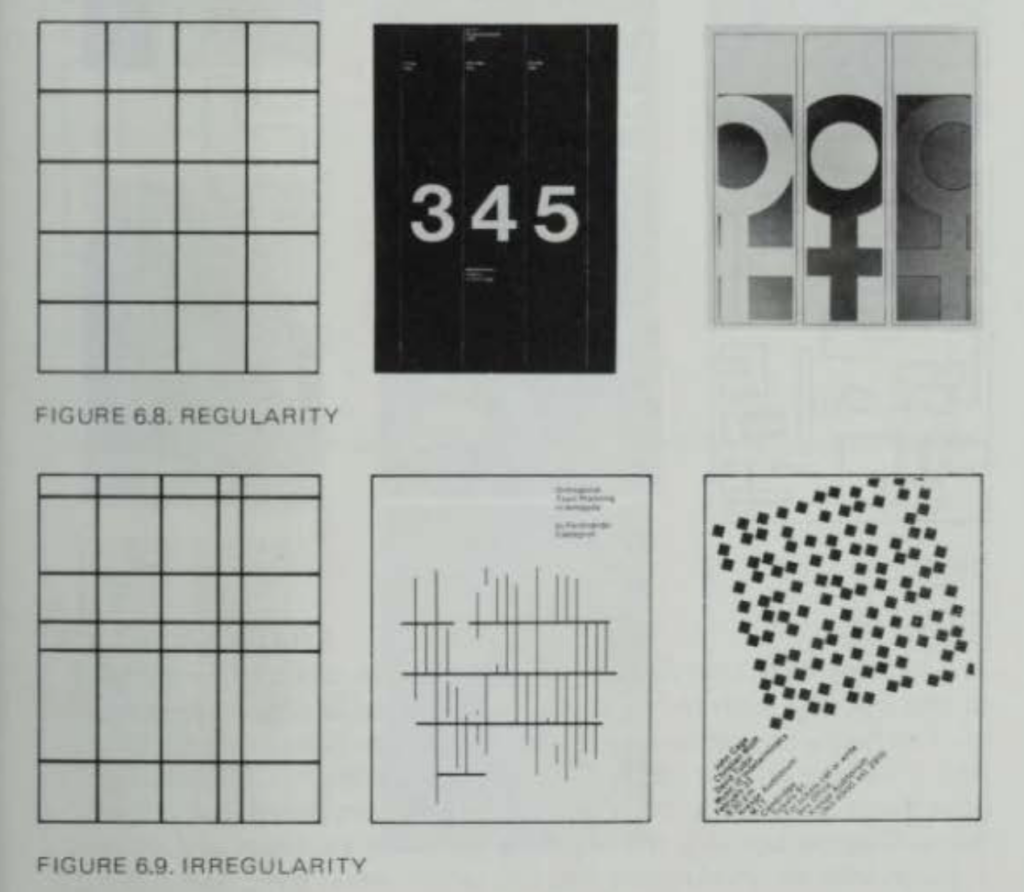
Regularität und Irregularität
Regularität meint Wiederholung, Raster, Gleichförmigkeit. Sie vermittelt Struktur, Systematik und Kontrolle. Irregularität bricht diese Ordnung auf: Abweichungen, Verschiebungen oder Unregelmäßigkeiten erzeugen Spontaneität und visuelle Lebendigkeit. (Vgl. Dondis, 1973, pp. 113–114).
hohe Regularität → wirkt strukturiert, rational, professionell hohe Irregularität → wirkt kreativ, emotional, experimentell
Regularität unterstützt Wiedererkennbarkeit und Systemdenken Irregularität vermittelt Individualität und Bruch mit Konventionen (Vgl. Dondis, 1973, pp. 113–114)
Irregularität in Motion erzeugt stärkere Aufmerksamkeit als im statischen Bild Regularität in Motion unterstützt Orientierung und Lesbarkeit
Möglicher Analyse-Parameter: “Regularity Level“
Skala: – stark regelmäßig (Grid, Wiederholung, konstantes Timing) – moderat regelmäßig – stark irregulär (variable Abstände, freies Timing)
Oder codierbar: Strukturtyp: streng gerastert /teil-strukturiert/frei bzw. expressiv Motion-Rhythmus: konstant/ leicht variiert/ stark variierend
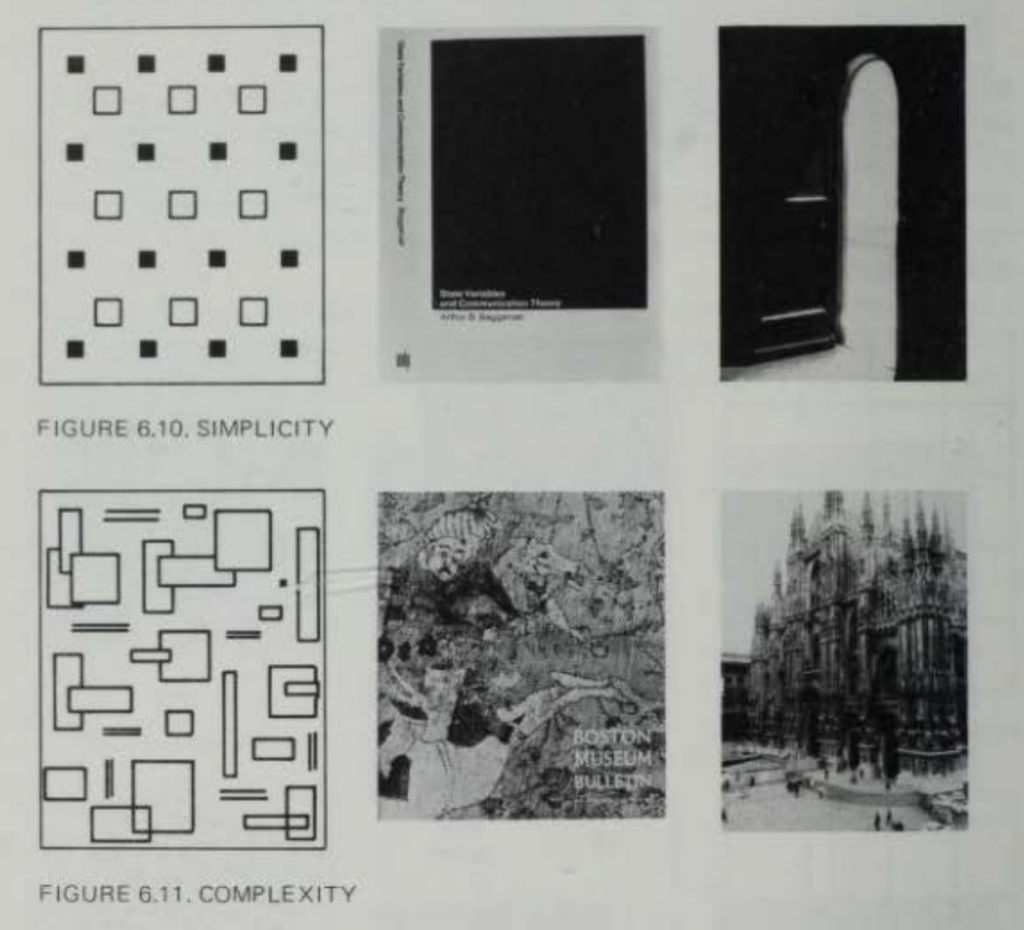
Einfachheit und Komplexität
Einfachheit reduziert visuelle Information auf das Wesentliche. Sie erleichtert Orientierung und Lesbarkeit. Komplexität dagegen arbeitet mit Vielzahl, Überlagerung und Dichte. Sie kann reichhaltig wirken, aber auch überfordern. Zu viel Einfachheit wird langweilig, zu viel Komplexität wird chaotisch. (Vgl. Dondis, 1973, pp. 113–114).
Quelle: Dondis, 1973, pp. 113–114
Brand Identity:
hohe Simplicity >> wirkt klar, modern, souverän, „premium“ hohe Complexity >> wirkt vielschichtig, kulturell aufgeladen, expressiv
Simple Marken treten selbstbewusst und reduziert auf Komplexe Marken erzählen eher Geschichten und arbeiten mit visueller Dichte
Für Motion
simple Motion >> wenige Bewegungen, klare Übergänge, ruhiges Timing komplexe Motion >> mehrere Ebenen, überlagerte Animationen, variable Geschwindigkeiten
Möglicher Analyse-Parameter: “Visual Complexity Level“ Skala: 1. sehr simpel (wenige Elemente, klare Hierarchie) 2. moderat komplex 3. stark komplex (viele Ebenen, hohe Dichte)
Oder codierbar: Komplexitätsgrad: reduziert/ausgewogen/vielschichtig Motion-Komplexität:minimal/gestaffelt/multilayered
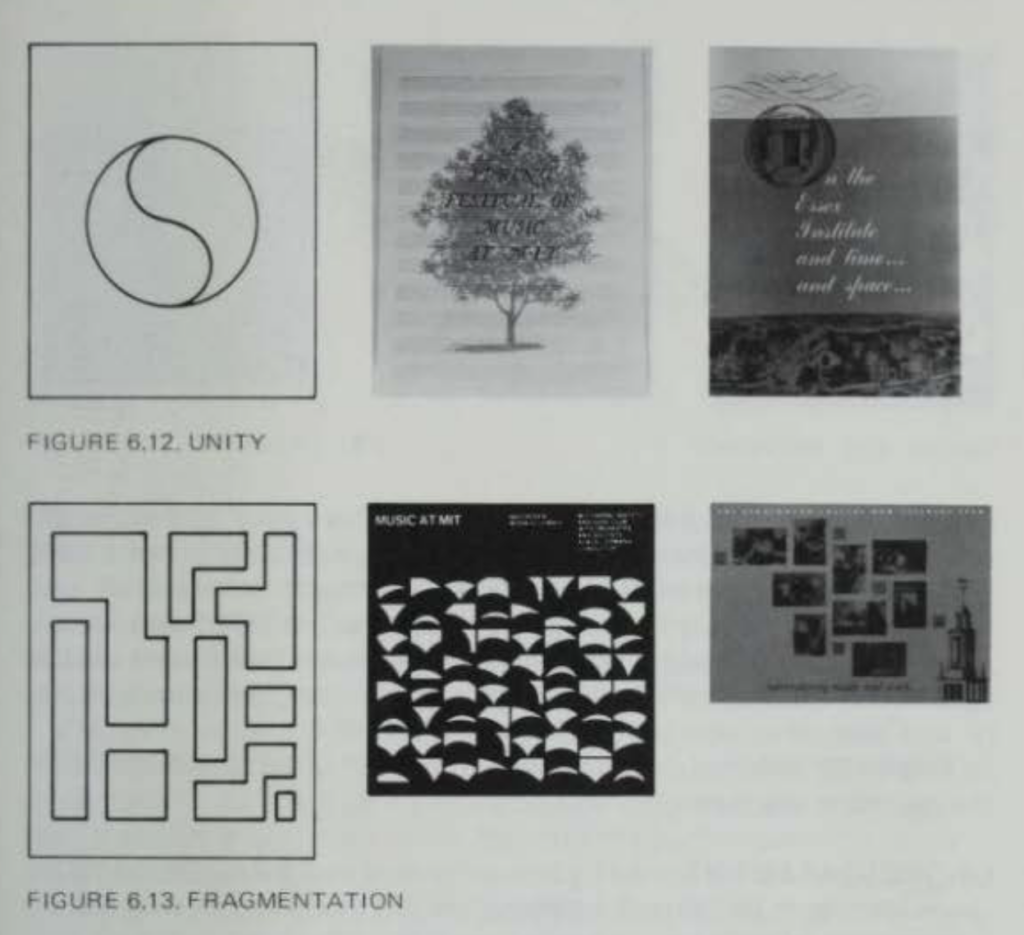
Einheit und Fragmentierung
Einheit beschreibt den Zusammenhalt aller Elemente zu einem geschlossenen Ganzen. Einheit vermittelt Harmonie und Kohärenz. Fragmentierung dagegen zerlegt die visuelle Struktur in Teile. Fragmentierung erzeugt Spannung, Modernität und Offenheit. Für Dondis ist Fragmentierung ein zentrales Mittel zeitgenössischer visueller Kommunikation – sie spiegelt gesellschaftliche Dynamik wider. (Vgl. Dondis, 1973, pp. 114–115).
Quelle: Dondis, 1973, pp. 114–115
Für Brand Identity:
hohe Unity >> wirkt konsistent, vertrauenswürdig, stabil hohe Fragmentation >> wirkt experimentell, disruptiv, zeitgenössisch
Unity unterstützt Markenwiedererkennung über Touchpoints hinweg Fragmentation kann Wandel, Vielfalt oder kulturelle Komplexität ausdrücken
Für Motion:
Unity in Motion >> konsistente Bewegungslogik, einheitliche Übergänge Fragmentation in Motion >> abrupte Schnitte, wechselnde Rhythmen, gebrochene Abläufe
Fragmentierte Motion erzeugt Aufmerksamkeit, kostet aber Kohärenz Einheitliche Motion stärkt Markencharakter über Zeit hinweg
Oder codierbar: Kohärenzgrad: geschlossen/hybrid/fragmentiert
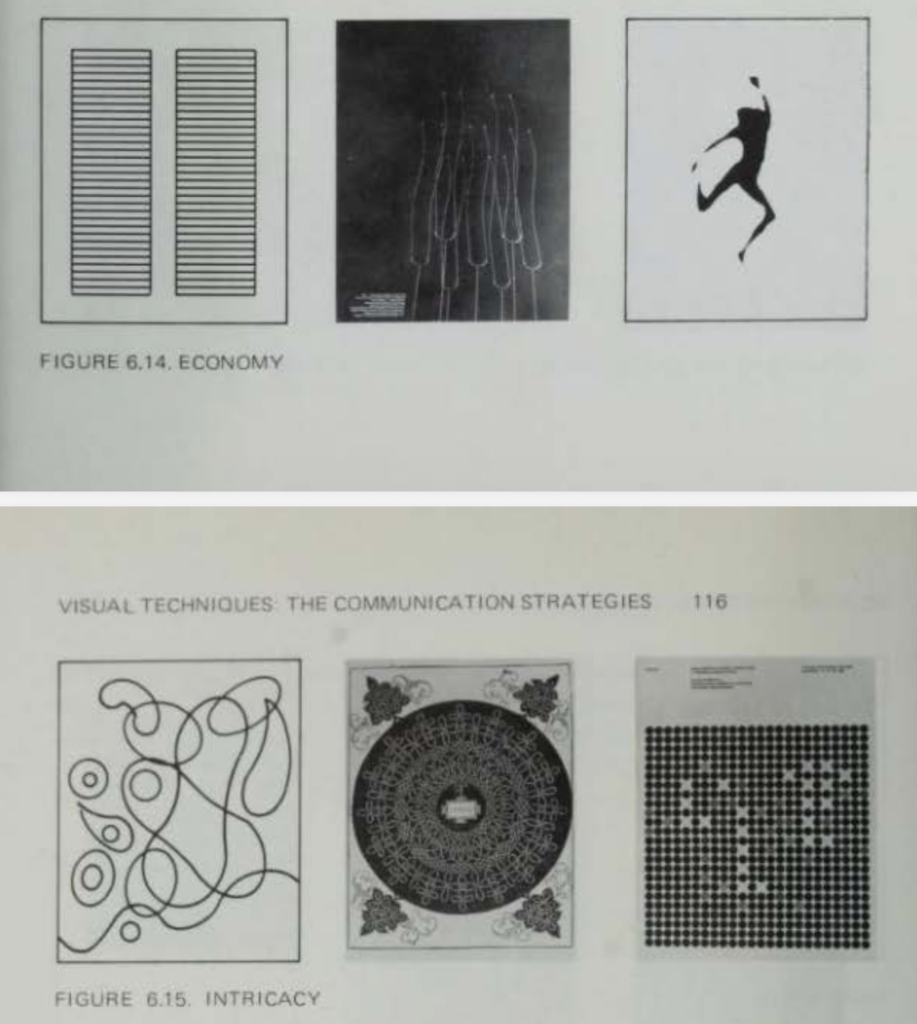
Economy & Intricacy
Mit Economy beschreibt Dondis die bewusste Reduktion visueller Mittel: wenige Formen, klare Strukturen, minimale Variation. Economy steht für Effizienz und Bedeutung wird mit möglichst wenig gestalterischem Aufwand transportiert.
Intricacy ist das Gegenstück: visuelle Komplexität durch Detailreichtum, ornamentale Strukturen und vielschichtige Beziehungen zwischen Elementen. Intricacy lädt zum längeren Betrachten ein, verlangt aber mehr kognitive Verarbeitung. Economy kommuniziert direkt und nüchtern, Intricacy erzählt reichhaltig und atmosphärisch. (Vgl. Dondis, 1973, pp. 115–116).
Quelle: Dondis, 1973, pp. 115–116
Für Brand Identity:
hohe Economy → wirkt modern, klar, selbstsicher, funktional hohe Intricacy → wirkt handwerklich, emotional, kulturell aufgeladen
Economy unterstützt schnelle Erfassbarkeit im beschleunigten Kommunikationsraum Intricacy erzeugt Tiefe, Charakter und narrative Qualität
Ich glaube es gibt beides in jeder Marke und die Tendenz hängt vom Medium ab!
Für Motion:
Economy in Motion → wenige Bewegungen, klare Übergänge, reduzierte Effekte Intricacy in Motion → komplexe Animationen, Layering, ornamentale Bewegungsmuster
Economy begünstigt Lesbarkeit in kurzen Attention-Windows Intricacy eignet sich für immersive oder erzählerische Markenmomente
Skala: 1. stark ökonomisch (minimal, reduziert) 2. ausgewogen 3. stark intrikat (detailreich, ornamental)
Oder codierbar: Gestaltungsdichte: minimal/moderat/hoch Motion-Dichte: reduziert/gestaffelt/komplex geschichtet
Understatement & Exaggeration
Understatement ist bewusste Zurückhaltung: visuelle Mittel werden reduziert eingesetzt, Aussagen bleiben subtil, Wirkung entsteht durch Sparsamkeit und Kontrolle. Bedeutung wird nicht „herausgeschrien“, sondern leise vermittelt. Exaggeration: Formen, Farben, Größen oder Bewegungen werden überzeichnet, um maximale Aufmerksamkeit, Emotionalität oder Dramatik zu erzeugen. Exaggeration verstärkt visuelle Aussagen durch Überhöhung. Understatement erzeugt Eleganz und Autorität, Exaggeration erzeugt Energie und unmittelbare Präsenz. (Vgl. Dondis, 1973, pp. 116–117).
Understatement in Motion: kleine Bewegungen, reduzierte Dynamik, sanfte Transitions
Exaggeration in Motion: große Amplituden, starkes Easing, überzeichnete Timing-Kurven, dramatische Beschleunigungen
Im beschleunigten Kommunikationskontext gewinnt Exaggeration schneller Aufmerksamkeit. Understatement funktioniert eher über Wiederholung, Konsistenz und Markenautorität.
Möglicher Analyse-Parameter: “Expressiveness Scale“ Skala: 1. stark understated 2. moderat expressiv 3. stark exaggerated
Oder codierbar: Ausdrucksgrad: subtil/betont/überzeichnet Motion-Amplitude: minimal/mittel/hoch
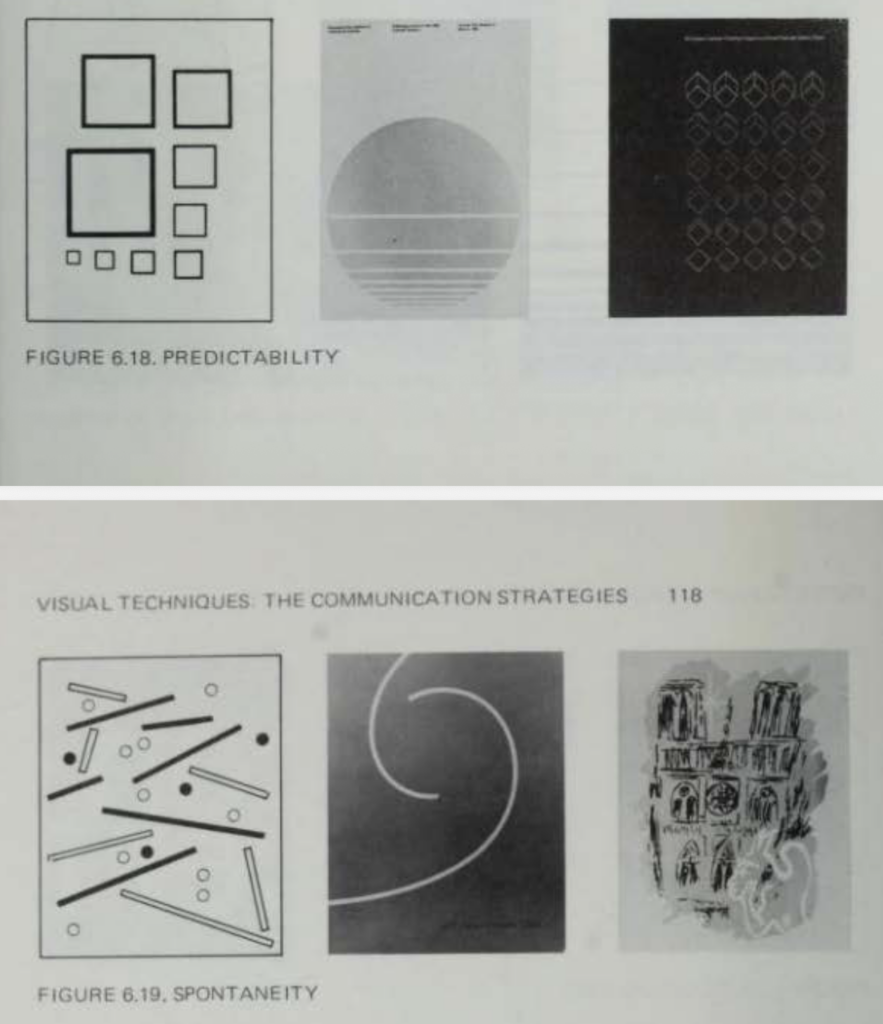
Vorhersehbarkeit und Spontanität
Mit Predictability/Vorhersehbarkeit beschreibt Dondis visuelle Strukturen, deren Verlauf leicht vorhersehbar ist: klare Muster, wiederkehrende Formen, konsistente Rhythmen und vertraute Gestaltungslogiken erzeugen Sicherheit und Orientierung. Das Auge „weiß“, was als Nächstes kommt. Spontaneity: Unerwartete Platzierungen, abrupte Richtungswechsel oder unregelmäßige Rhythmen erzeugen Überraschung und visuelle Energie.(Vgl. Dondis, 1973, pp. 117–118). Kontrolle versus Offenheit: Predictability stabilisiert Wahrnehmung, Spontaneity aktiviert Aufmerksamkeit. (Vgl. Dondis, 1973, pp. 117–118).
Quelle: Dondis, 1973, pp. 117–118
Für Brand Identity:
hohe Predictability → wirkt verlässlich, professionell, strukturiert hohe Spontaneity → wirkt kreativ, lebendig, experimentell
Predictability stärkt Wiedererkennbarkeit und Markenvertrauen Spontaneity erzeugt emotionale Aktivierung und zeitgenössische Frische
Im beschleunigten Kommunikationsraum erzeugt Spontaneity kurzfristige Aufmerksamkeit, während Predictability langfristige Markenbindung unterstützt.
Möglicher Analyse-Parameter: “Predictability Scale“ Skala: 1. stark vorhersehbar 2. moderat variierend 3. stark spontan
Oder codierbar: Erwartungsgrad: stabil/hybrid/disruptiv Motion-Logik: konsistent/teil-variabel/unvorhersehbar
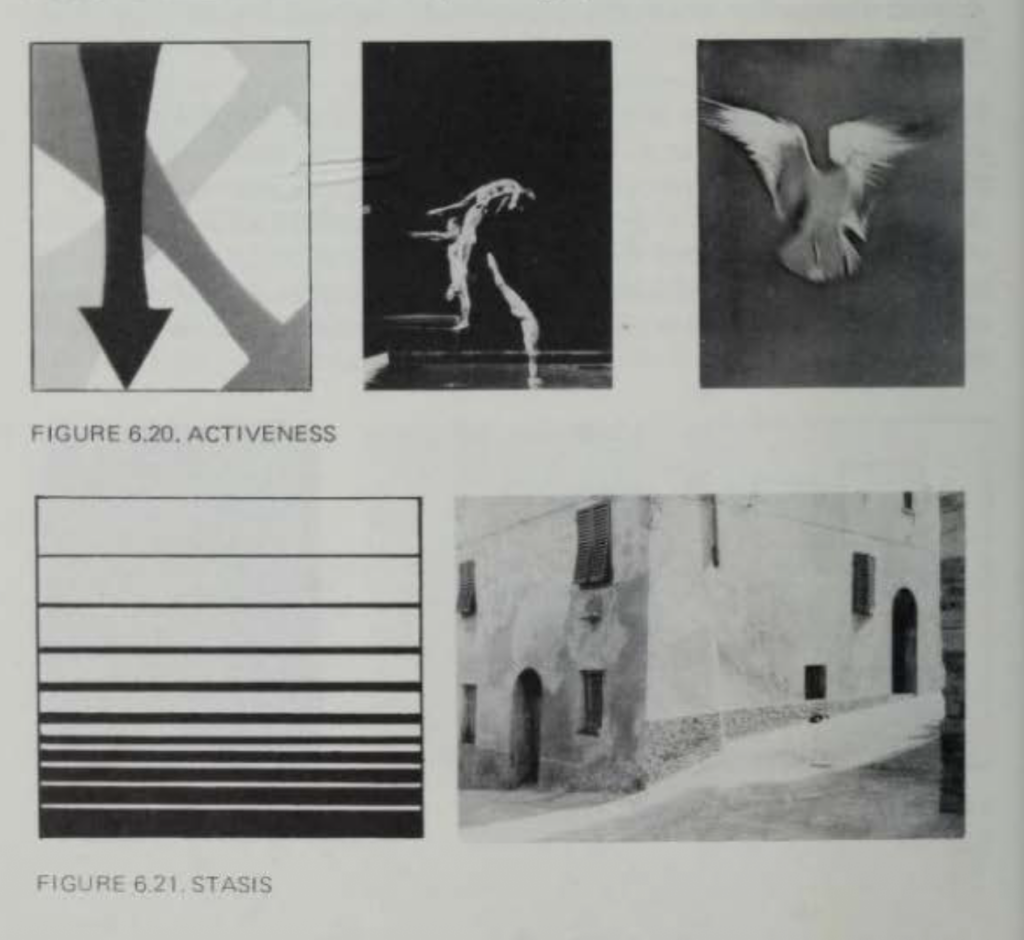
Activeness / Stasis
Activeness ist visuelle Dynamik: Richtungen, Diagonalen, Spannungsachsen und asymmetrische Kompositionen erzeugen den Eindruck von Bewegung, selbst in statischen Bildern. Formen scheinen „in Aktion“, der Blick wird geführt, Energie entsteht. Stasis steht für visuelle Ruhe: horizontale und vertikale Ausrichtungen, symmetrische Anordnungen und stabile Proportionen erzeugen Stillstand, Ordnung und Gelassenheit. (Vgl. Dondis, 1973, pp. 118–119).
Quelle: Dondis, 1973, pp. 118–119
Für Brand Identity:
hohe Activeness → wirkt progressiv, energiegeladen, disruptiv hohe Stasis/Ruhe → wirkt souverän, stabil, vertrauenswürdig
Activeness vermittelt Wandel, Innovation, Tempo Stasis vermittelt Beständigkeit, Kontrolle, Autorität
Für Motion / zeitbasierte Systeme:
Activeness in Motion: schnelle Richtungswechsel, diagonale Bewegungen, starkes Easing, hohe Bewegungsfrequenz
Stasis in Motion: langsame Transitions, reduzierte Bewegung, lange Haltemomente, klare horizontale/vertikale Abläufe
Im beschleunigten Kommunikationskontext wird Activeness oft genutzt, um Aufmerksamkeit zu triggern – Stasis kann hingegen bewusst als Kontrastmittel eingesetzt werden, um Markenautorität zu stärken.
Möglicher Analyse-Parameter: “Activity Level“
Skala: stark statisch/moderat aktiv/stark aktiv
Oder codierbar: Dynamikgrad: ruhig/bewegt/hochenergetisch Motion-Intensität: minimal/mittel/intensiv
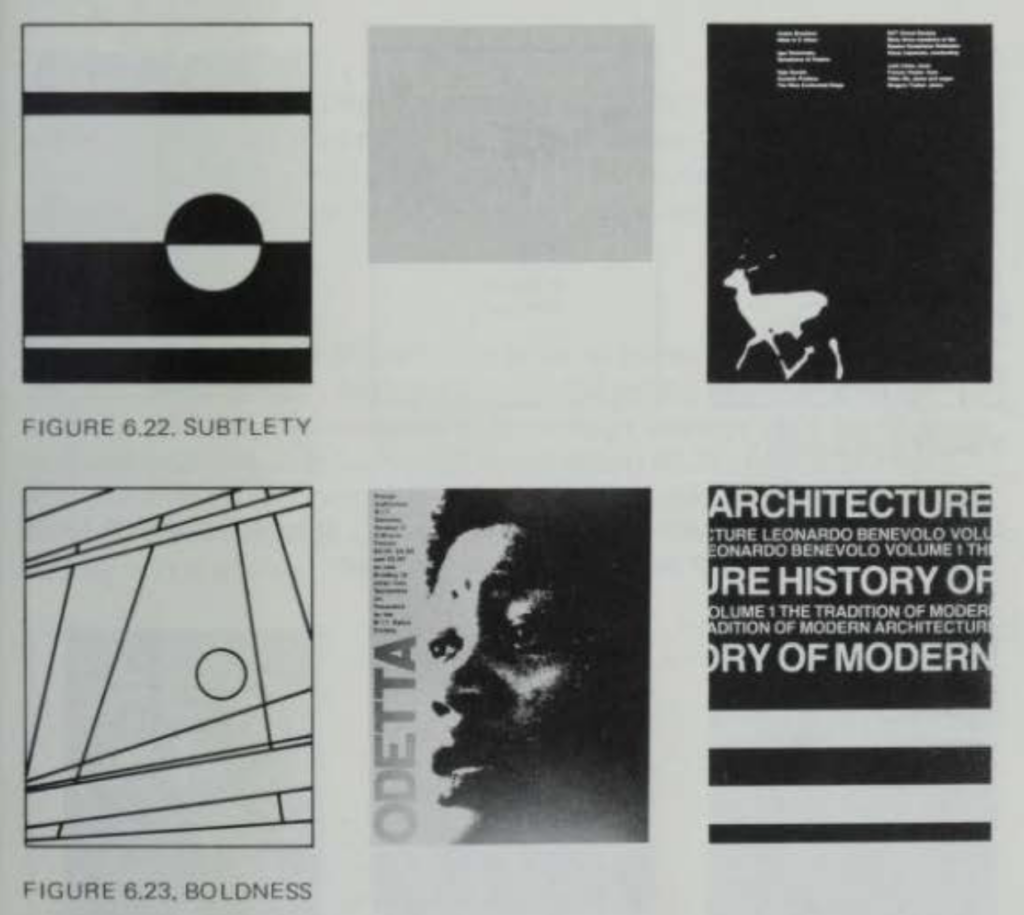
Subtlety / Boldness
Subtlety: feine, zurückhaltende visuelle Kommunikation: kleine Kontraste, leise Farbnuancen, minimale Unterschiede in Form oder Rhythmus. Bedeutung entsteht hier über Andeutung statt über klare Signale. Boldness: starke Kontraste, dominante Formen, klare Hierarchien und visuelle Lautstärke erzeugen unmittelbare Wirkung. Boldness macht Aussagen explizit und zwingt Aufmerksamkeit. (Vgl. Dondis, 1973, pp. 119).
Subtle Motion: kleine Bewegungsradien, sanftes Easing, minimale Übergänge, lange Ruhephasen
Bold Motion: große Bewegungsamplituden, harte Beschleunigungen, starke Kontraste im Timing, dominante Transitions
In beschleunigten Medienräumen erzeugt Boldness schnelle Aktivierung, während Subtlety eher über Konsistenz und Markenreife wirkt.
Möglicher Analyse-Parameter: “Expressive Intensity“ Skala: 1. stark subtil 2. moderat expressiv 3. stark bold
Oder codierbar: Ausdrucksstärke: leise/betont/dominant Motion-Visibility: zurückhaltend/sichtbar/plakativ
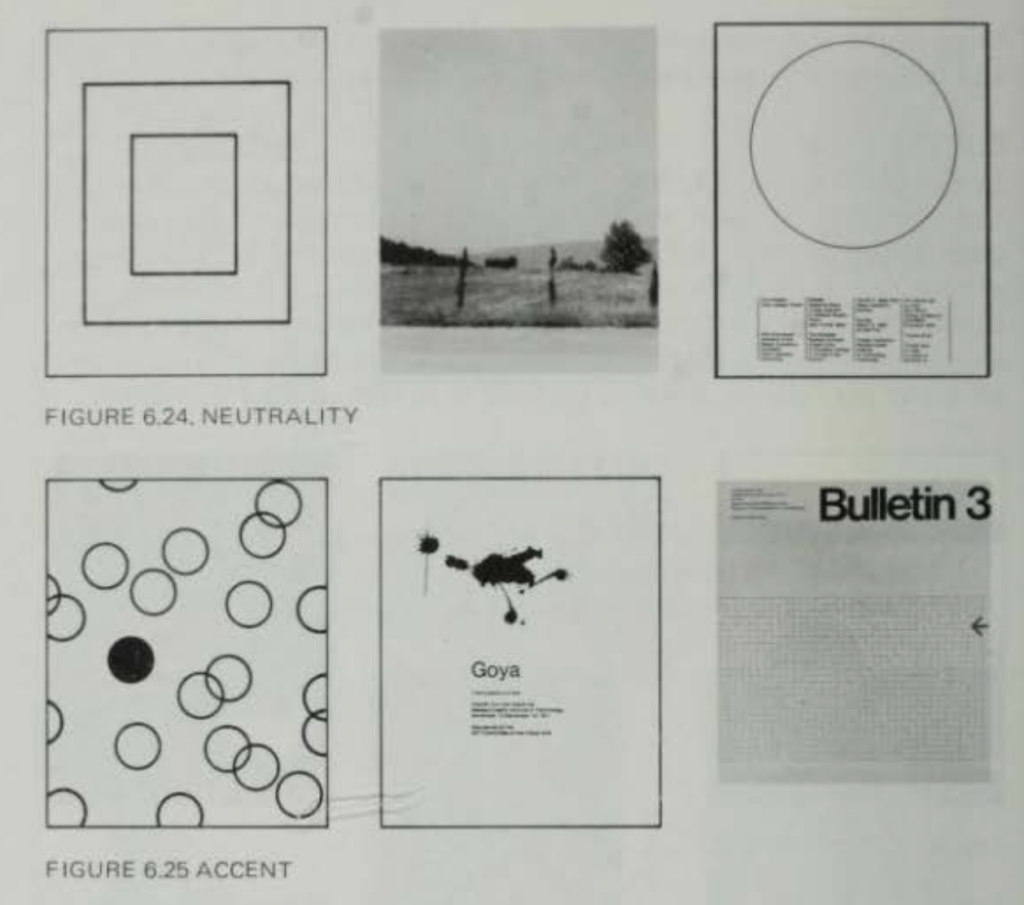
Neutrality / Accent
Bei Neutrality sind visuelle Elemente gleichmäßig zurückgenommen: Farben, Formen und Kontraste halten sich im Hintergrund, sodass kein einzelnes Element dominiert. Das Bild wirkt ruhig, sachlich und ausgeglichen. Accent bezeichnet dagegen das gezielte Hervorheben einzelner Elemente innerhalb eines neutralen Feldes – durch Farbe, Größe, Position oder Kontrast. Erst die neutrale Fläche ermöglicht es dem Akzent, wahrgenommen zu werden. Accent ist damit kein Selbstzweck, sondern funktioniert nur im Verhältnis zum Visuellen Grundrauschen. (Vgl. Dondis, 1973, pp. 119-120).
Marken können Persönlichkeit darüber ausdrücken, wo und wie sparsam Akzente gesetzt werden. Zu viele Akzente führen zu visuellem Lärm (keine Hierarchie mehr) Gut gesetzte Akzente schaffen Orientierung im beschleunigten Kommunikationsraum
Accent Motion: gezielte Peaks (Scale, Speed, Opacity, Direction), Hervorhebung von Key Moments, Motion als Marker für Bedeutung (nicht permanent, sondern punktuell)
Gerade in Social-Media-Kontexten ist diese Logik entscheidend: Bewegung sollte nicht überall stattfinden, sondern dort, wo Aufmerksamkeit intentional gelenkt werden soll.
Oder codierbar: Akzentstrategie: none/selective/pervasive Motion Accentuation: background motion/focal motion/overload
TRANSPARENCY & OPACITY
Transparency: Ebenen bleiben lesbar, Formen überlagern sich, ohne einander vollständig zu verdecken, und Beziehungen zwischen Elementen sind nachvollziehbar. Bedeutung entsteht durch Durchlässigkeit, Tiefe und das gleichzeitige Sichtbarsein mehrerer Informationsebenen. Opacity: Flächen sind geschlossen, Formen überdecken einander, Hierarchien werden klar getrennt. Information wird sequenziell statt simultan vermittelt. (Vgl. Dondis, 1973, pp. 120-121).
Quelle: Dondis, 1973, pp. 120-121
Für Brand Identity:
Transparency → wirkt offen, zugänglich, dialogisch, modern Transparente Systeme zeigen Beziehungen zwischen Elementen
Opacity → wirkt klar, autoritär, kontrolliert, abgeschlossen Opake Systeme setzen auf starke Trennung und klare Dominanz
transparente Markenästhetik → „wir zeigen, wie wir funktionieren“ opake Markenästhetik → „wir setzen klare Statements“
Ich finde das kann gestalterisch als auch in der Kommunikation bewertet werden…
Opaque Motion: harte Szenenwechsel/ klare Vorder- & Hintergrundtrennung/ vollständiges Ein- und Ausblenden/ sequenzielle Animation (eins nach dem anderen)
In beschleunigten Kommunikationsräumen kann Transparency Orientierung durch Kontinuität schaffen, während Opacity schnelle Klarheit durch visuelle Abschottung erzeugt.
Möglicher Analyse-Parameter: “Information Accessibility“ Skala: 1. stark opak 2. teilweise transparent 3. stark transparent
Oder codierbar: Layer Logic: closed/semi-open/open Transition Type: cut-based/crossfade/layered motion
Consistency & Variation
Consistency bezeichnet die visuelle Wiederholung stabiler Gestaltungselemente: gleiche Formen, Farben, Rhythmen oder Kompositionslogiken erzeugen Vorhersagbarkeit und Zusammenhalt. Gestaltung wirkt geschlossen, kohärent und leicht wiedererkennbar. Variation bricht diese Wiederholung bewusst auf: Elemente verändern sich, Muster werden moduliert, Rhythmen verschoben. Variation bringt Dynamik, Aufmerksamkeit und Entwicklung ins Bild. Reine Konsistenz führt zu Monotonie, reine Variation zu Chaos. Kommunikation wird dann wirksam, wenn ein stabiles visuelles System existiert, innerhalb dessen gezielt variiert wird. (Vgl. Dondis, 1973, pp. 121-122).
Starke Marken haben konstante Grundparameter (Form, Farbe, Tonalität), aber variable Ausprägungen
Zu wenig Variation → Marke wirkt starr Zu wenig Konsistenz → Marke wirkt beliebig
Das ist zentral für deine Arbeit: Persönlichkeit entsteht nicht durch starre Gleichförmigkeit, sondern durch kontrollierte Variation innerhalb eines Systems.
Variable Motion: adaptive Timings je Kontext, modulare Bewegungsparameter, flexible Skalierung der Intensität
In beschleunigten Kommunikationsräumen ist genau das entscheidend: Motion muss konsistent genug sein, um Identität zu tragen — und variabel genug, um auf Plattformlogiken, Formate und Tempi reagieren zu können.
Oder codierbar: Variation Level: rigid/controlled/fluid Motion Modularity: fixed patterns/parameter-based/generative
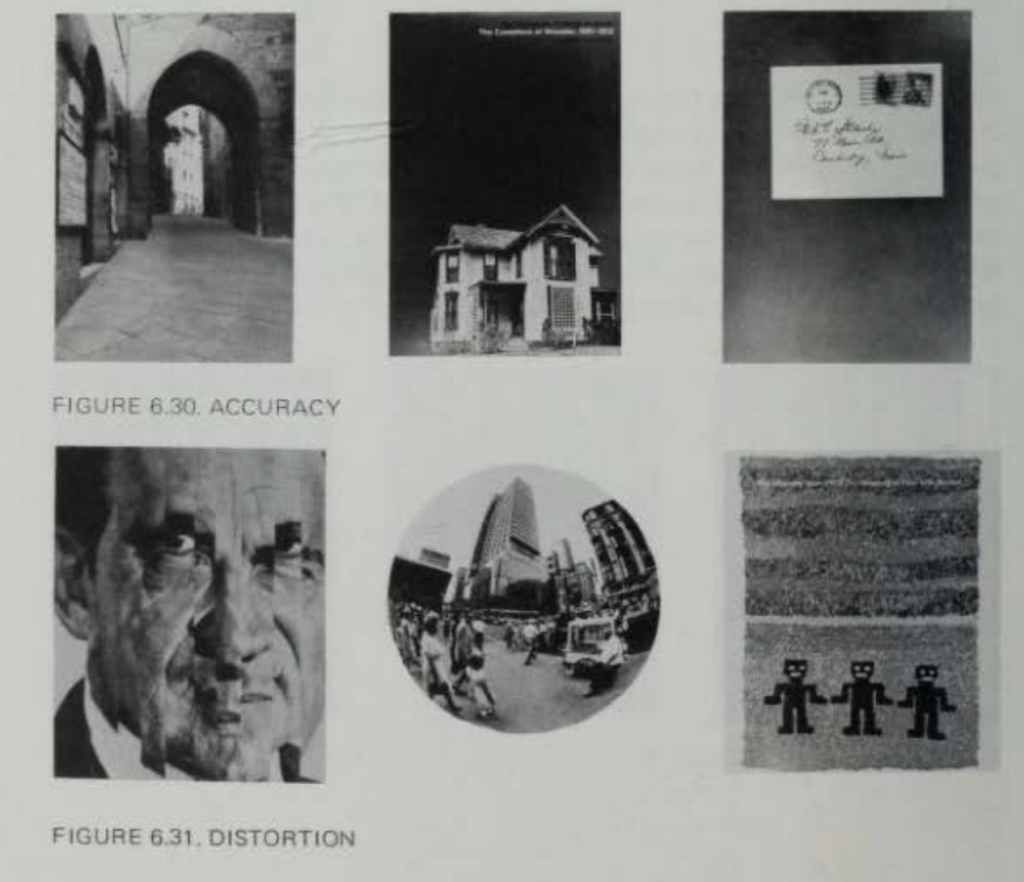
Accuracy & Distortion
Accuracy beschreibt eine visuelle Darstellung, die sich eng an Realität, Proportion, Lesbarkeit und formale Klarheit hält. Formen sind eindeutig, Beziehungen logisch, Bedeutungen möglichst direkt nachvollziehbar. Gestaltung wirkt präzise, rational und kontrolliert. Distortion ist die bewusste Abweichung davon: Formen werden verzerrt, Perspektiven gebrochen, Proportionen übertrieben oder Regeln verletzt. Dadurch entsteht expressive Spannung, emotionale Intensität oder Irritation. (Vgl. Dondis, 1973, pp. 122-123).
Skala: stark akkurat – moderat abstrahiert – stark verzerrt
Oder codierbar: Logic: realistic/stylized/expressive Physical Plausibility: high/medium/low
Flatness & Depth
Flatness beschreibt eine Gestaltung ohne räumliche Tiefe: Formen liegen auf einer Ebene, es gibt kaum Überlagerung, keine Perspektive, wenig Licht-Schatten-Modellierung. Das Bild wirkt grafisch, reduziert und unmittelbar lesbar. Depth hingegen erzeugt Raumillusion: durch Überlagerung, Größenstaffelung, Perspektive oder Tonwertabstufungen entsteht ein Eindruck von Vorder-, Mittel- und Hintergrund. Gestaltung wird räumlich erfahrbar. (Vgl. Dondis, 1973, pp. 123).
Ich finde hier hatten Designtrends aber großen Einfluss (flat design; jetzt 3d und glass design usw) Hier finde ich macht’s im Motion-Denken aber Sinn das zu analysieren…
Für Motion Identity:
Flat Motion: Ebenen bewegen sich parallel, keine Z-Achse, lineare Übergänge, UI-artige Animation
Deep Motion: Kamera-Fahrten, Parallax-Effekte, Zooms, räumliche Inszenierung
In beschleunigten Kommunikationskontexten ist Flatness oft effizienter (schnelle Decodierung), während Depth stärker emotionalisiert, aber mehr Aufmerksamkeit benötigt.
Möglicher Analyse-ParameterSpatial Complexity
Skala: stark flach–semi-räumlich–stark tief
Oder codierbar: Spatial Logic: 2D/layered/immersive Motion, Z-Axis Usage: none/implied/explicit
Singularity & Juxtaposition
Singularity beschreibt eine visuelle Komposition, die auf ein dominantes Element fokussiert ist. Alle Aufmerksamkeit wird auf einen klaren visuellen Mittelpunkt gelenkt; Nebeninformationen treten stark zurück. Die Botschaft ist eindeutig, geschlossen und leicht erfassbar. Juxtaposition ist das Gegenprinzip: Mehrere unterschiedliche (oft kontrastierende) Elemente werden nebeneinandergestellt. Bedeutung entsteht nicht durch ein einzelnes Zentrum, sondern durch Beziehungen, Spannungen und Vergleiche zwischen Elementen. Juxtaposition erzeugt Komplexität, Mehrdeutigkeit und interpretative Tiefe. (Vgl. Dondis, 1973, pp. 124). Ich finde das macht vorallem in der Kommunikation mehr sinn das zu betrachten… (siehe: ein Leitmotiv usw.)
Skala: stark singular – moderat kombiniert – stark juxtapositioniert
Oder codierbar: Structure Type:single-focus/clustered/multi-focus Motion-Narrative Structure:linear/layered/parallel
Ähnliche ist…
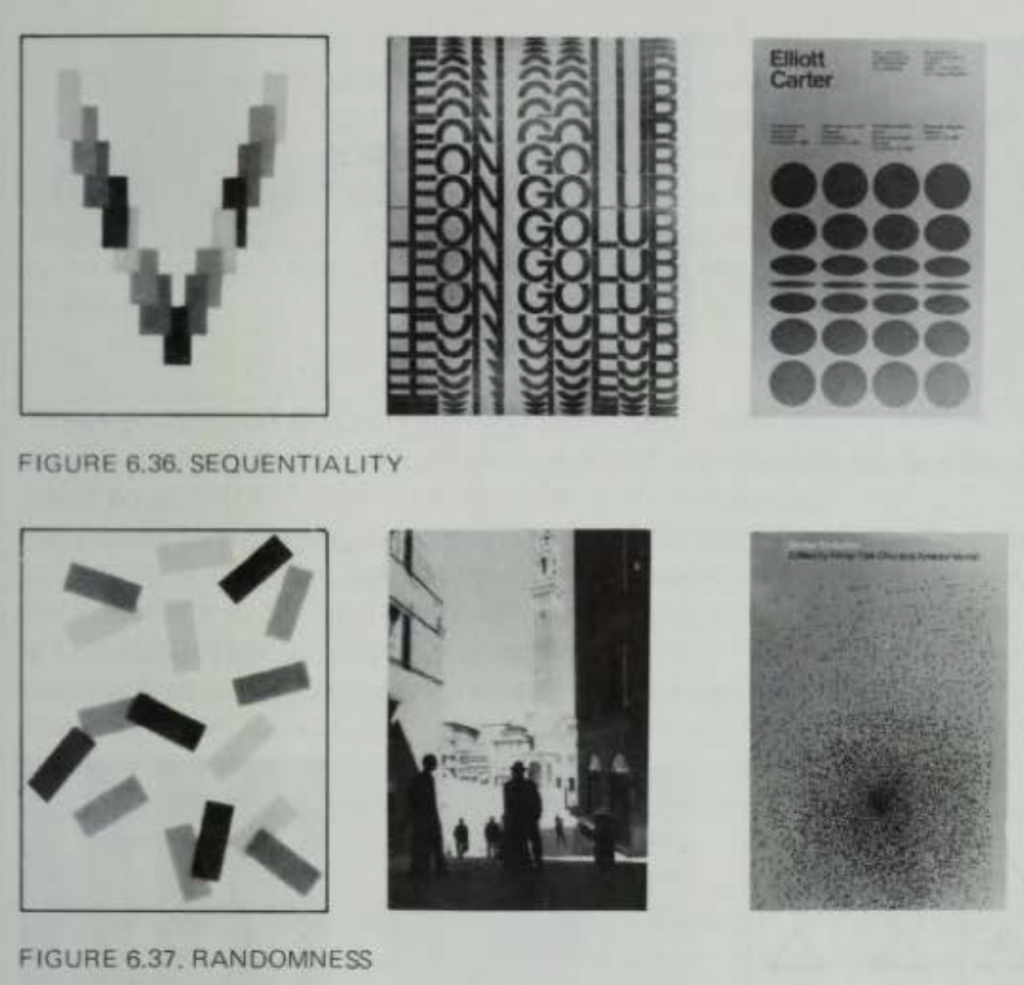
Sequentiality & Randomness
Sequentiality beschreibt eine geordnete visuelle Abfolge: Elemente erscheinen in einer klaren Reihenfolge, Bedeutung entfaltet sich Schritt für Schritt. Wahrnehmung wird geführt — es gibt Anfang, Verlauf und Ende. Die visuelle Information ist logisch strukturiert und erleichtert Orientierung.
Randomness steht für das Gegenteil: Elemente erscheinen ohne erkennbare Ordnung oder vorhersehbare Abfolge. Bedeutung entsteht fragmentiert, assoziativ oder situativ. Randomness erzeugt Spontaneität, Energie und Offenheit, aber auch Unsicherheit.
Für Dondis repräsentiert dieses Gegensatzpaar die Frage, ob visuelle Kommunikation linear organisiert oder dispers verteilt ist. (Vgl. Dondis, 1973, pp. 124-125).
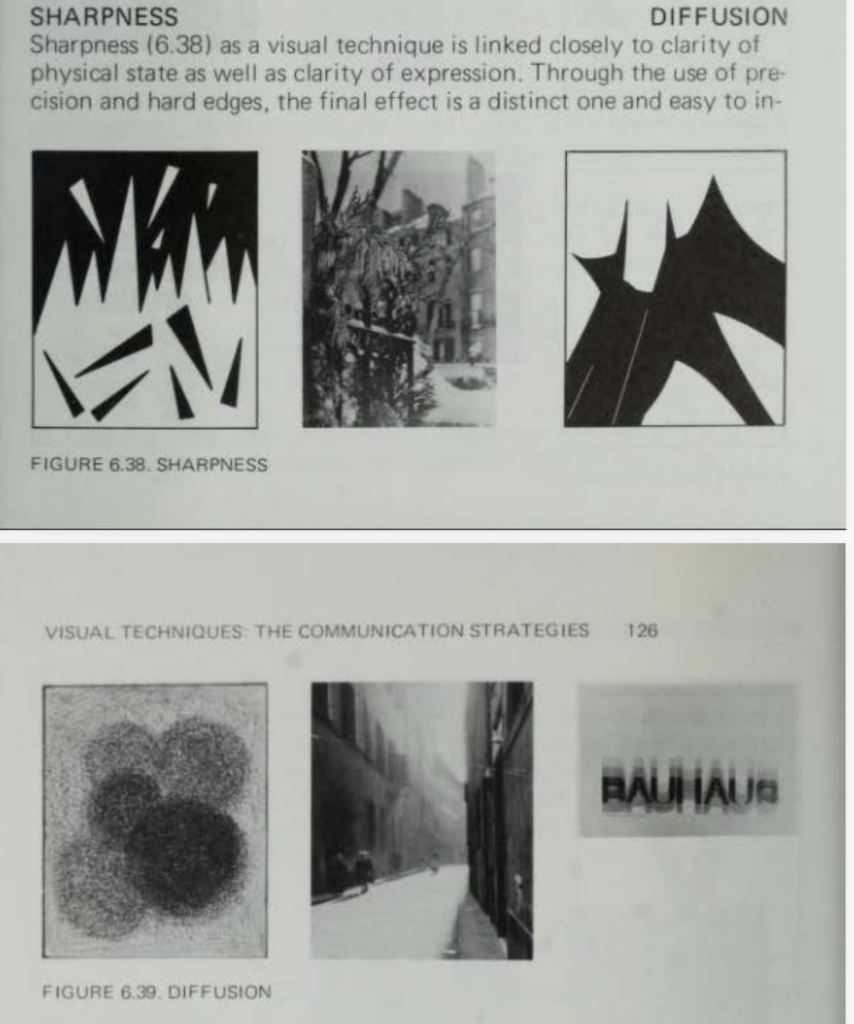
Sharpness steht für visuelle Klarheit: harte Kanten, deutliche Konturen, hohe Kontraste und präzise Formen. Informationen sind klar voneinander getrennt, Objekte leicht identifizierbar. Wahrnehmung wird fokussiert und gelenkt. Diffusion beschreibt das Gegenteil: weiche Übergänge, unscharfe Konturen, geringe Kontraste, verschwimmende Formen. Visuelle Grenzen lösen sich auf, Bedeutung wird atmosphärisch statt explizit vermittelt. (Vgl. Dondis, 1973, pp. 125-126).
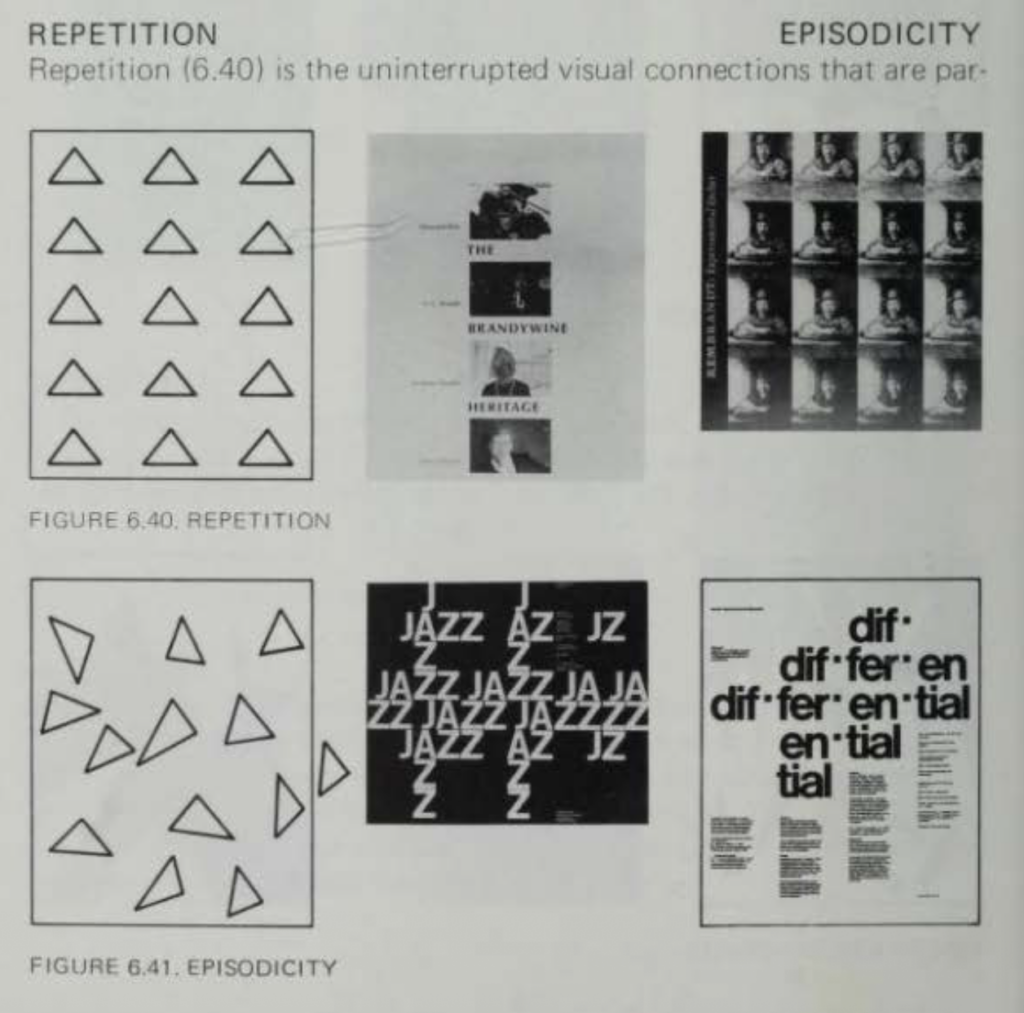
Repetition bezeichnet die wiederholte Verwendung gleicher oder ähnlicher visueller Elemente – Formen, Farben, Motive oder Bewegungen. Durch Wiederholung entsteht Rhythmus, Zusammenhalt und Vorhersagbarkeit. Das visuelle System wirkt stabil, kohärent und leicht wiedererkennbar. Episodicity steht für das Gegenteil: visuelle Ereignisse treten vereinzelt oder sprunghaft auf, ohne klare Wiederholungslogik. Die Wahrnehmung ist fragmentiert, jedes Element wirkt wie ein einzelnes „Ereignis“. Bedeutung entsteht punktuell statt systemisch. (Vgl. Dondis, 1973, pp. 126-127).
Donis Dondis beschreibt visuelle Gestaltung nicht als Stilfrage, sondern als System aus Gegensätzen. Bedeutung entsteht immer relational, durch Spannungsfelder zwischen Polen. Diese Polaritäten lassen sich als Parameter lesen, mit denen visuelle Persönlichkeit konstruiert wird und die ich in meiner Analyse nutzen kann.
Das alles echt mal zu recherchieren und sich reinzulesen war super hilfreich.
Das war’s mit Blogpost (wir freuen uns) aber mit der Recherche gehts ja gerade erst los?! Juhu
Dondis, D. A. (1973). A primer of visual literacy. MIT Press.
Aaker, J. L. (1997). Dimensions of brand personality. Journal of Marketing Research, 34(3), 347–356.
KI-Hinweis: Die in diesem Beitrag entwickelten Kategorien und Achsen entstanden im Rahmen einer iterativen, dialogischen Auseinandersetzung zwischen eigener Literaturrecherche, analytischer Reflexion und KI-gestützter Strukturierung. Die theoretischen Grundlagen (u. a. Rosa, Davenport & Beck, Dondis, Malamed, Aaker) wurden von mir selbst gelesen, ausgewählt und inhaltlich eingeordnet. Auf dieser Basis habe ich mithilfe eines KI-gestützten Arbeitsprozesses zentrale Konzepte verdichtet, vergleichbar gemacht und in ein systematisches Raster überführt. Die KI diente dabei nicht als Quelle neuer Inhalte, sondern als Werkzeug zur sprachlichen Präzisierung, zur Strukturierung komplexer Zusammenhänge und zur Ableitung analytischer Parameter aus bestehenden Theorien. Die hier formulierten Motion- und Visual-Personality-Achsen basieren somit auf meiner inhaltlichen Vorarbeit sowie auf den zuvor entwickelten Blogbeiträgen und stellen eine eigenständige Synthese dar, die aus der Kombination von theoretischem Material und designforschungsbasierter Reflexion entstanden ist.
Abbildungen:
Dondis, D. A. (1973). A primer of visual literacy. MIT Press.
(Vorwort, oder so) Ich wollte in diesem Blogpost herausfinden, wie tief ich im Rahmen meiner Masterarbeit in das Thema Branding und dessen einzelne Elemente eintauchen muss um den Bogen zur Motion Identity spannen zu können.
Ich wollte dafür folgende Bücher (zusätzlich zu den Quellen aus den bisherigen Blogposts) heranziehen: Dondis, Donis. A. (1973). A primer of visual literacy. MIT Press. Itten, Johannes (1963). Design and form: The basic course at the Bauhaus and later. Reinhold. Itten, Johannes (1970). The elements of color. Wiley.
Zuerst ging ich das Buch von Donis A. Dondis durch, weil ich beim Überfliegend dachte, dass ich durch Dondis ständigen Vergleich der verschiedenen Attribute ev. gut Parameter ableiten kann, anhand welcher ich Gestaltung späzer analysieren kann…
Mit Johannes Itten kann ich diese dann Gegenchecken, ev qualitativ bewerten, das Ganze erweitern oder ergänzen. Vor allem zum Thema Farben kann ich bei Itten nochmal tief eintauchen (da hab ich das Buch und wollte es eh schon immer mal durchackern (durch ackerln) :))
Ich bin aber völlig in Donis A. Dondis Buch verloren gegangen und bin in Details versunken, die mir aber schon viele Infos für meine Masterarbeit geliefert haben! Deshalb ist dieser Post geteilt in zwei Blogbeiträge. Ein Allgemeiner (dieser) der eine etwas schwammige überleitung von der Identität zu den visuellen Parametern ist, und ein weiterer, sehr langer und detaillierter Beitrag, über die Design- & Motion Parameter (Blogpost 10)
———
Warum muss ich auf Designelemente eingehen? -> Sie konstruieren die Bedeutung
Ich möchte im Rahmen der Masterarbeit untersuchen wie Markenpersönlichkeiten in zeitgenössischen beschleunigten Kommunikationskontexten (z.B. Social Media) gezeigt werden und die Rolle von Motion Design (/Motion Identity) darin analysieren. Ich möchte dafür verschiedene Prozesse der Konstruktion von Markenpersönlichkeit und Case Studies bestehender Marken analysieren. Ich denke sowohl für die Analyse als auch für meinen „exemplarischen Gegenprozess“ ist es wichtig die verschiedenen Elemente und Ansätze zu verstehen, die Marken ihre Bedeutung geben (visuell vorallem)
———
Marken existieren visuell – Bedeutung ist konstruiert
Wie im vorhergehenden Blogpost beschrieben, existieren Marken nicht als unabhängig Einheiten, sondern werden durch die Konsument:innen geformt. (Vgl. Aaker, 1997)
Aspekte wie Farben, Formen, Typografie, Bildwelten und die mediale Inszenierungen sind die zentralen Träger der Bedeutung einer Brand. Im Sammelband Brand Culture wird deshalb betont, dass Marken auf mehrere Arten gelesen und interpretiert werden (sie sind ein Zusammenspiel von visueller Kommunikation, gesellschaftlichen Codes und individueller Interpretation). Der Fokus meiner Recherche bevor es ans Designen geht soll also auf der Frage liegen wie Branding überhaupt Bedeutung erzeugt/bekommt. (Vgl. Schroeder & Salzer-Mörling, 2006, pp. 7–8)
Die Bedeutung einer Marke ist nicht automatisch im Produkt oder im Logo enthalten, sondern entsteht eben erst durch die kulturelle Codes, Hintergrundwissen und den rhetorische Prozesse beim Betrachtenden. (Vgl.Aaker, 1997).
Weder das Unternehmen selbst noch doe Konsument:innen kontrollieren die Bedeutung zu 100%, denn es formen viele verschiedene Aspekte(eben z.B. kulturelle Codes) wie eine Marken überhaupt funktioniert. (Vgl. Schroeder & Salzer-Mörling, 2006, p. 8) Diese Sichtweise passt zu Jennifer Aakers Verständnis von Markenpersönlichkeit, denn sie sagt Marken haben keine Persönlichkeit sondern werden nur als solche erlebt. Und eben diese Zuschreibung von Eigenschaften (wie „kompetent“, „authentisch“ oder „modern“) entsteht durch wiederholte visuelle Erfahrungen und deren Einbettung in bestehende mentale und kulturelle Schemata (Vgl. Aaker, 1997), die eben uf gelernten kulturellen Codes und der Wahrnehmungspsychologie basieren (Wir wiederholen uns…)
Hier können Designer:innen einhacken! Designer:innen müssen die kulturellen Codes kennen und nutzen: Die gewählten Bilder, Designsysteme und die mediale Repräsentationen aktivieren bestehende kulturelle Vorstellungen, Emotionen und Werte und ermöglichen es Nutzer:innen, Marken in den ihnen bekannten Bedeutungsmustern einzuordnen (Vgl. Aaker, 1997, Schroeder & Salzer-Mörling, 2006).
Design in Branding-Kontexten wird immer wieder als reine „ästhetische Oberfläche“ vereinfacht, obwohl es wesentlich zur Bedeutungsproduktion beiträgt. (Vgl. Johansson & Svengren Holm, 2006, p. 136) Eine Markenidentität soll man also als Bedeutungssystem verstehen, anstatt als Sammlung “einzelner Assets“. Nach Csaba und Bengtsson geht es im Branding und Brand-Management nicht mehr nur um die Identifizierung von Produkten sondern um das Managen einer Markenbedeutung durch ein Brand-Identity-System! (Vgl. Csaba & Bengtsson, 2006, p. 118) Und dieses System gilt es zu entwickeln. Das Ziel ist ein Brand-System bzw. eine Brand-Identität!
Es ist wichtig eine Marke nicht als „statische Identität“ zu sehen, sondern zu beachten dass sich die Identität je nach Gebrauch und Medium an die verschiedenen Kontexte anpassen können muss.
Visuelle Gestaltung als Sprache: Form, Farbe und Rhythmus als Teil der Markenpersönlichkeit
Wir haben bereits festgehakten, Makrenpersönlichkeit ist nicht nur dekorativ. Die visuelle Gestaltung ist nicht zufällig, sondern eine Sprache, de von den Konsument:innen gelesen werden kann.
Donis A. Dondis beschreibt im Buch „A primer of visual literacy“, dass Design als eine eigenständige visuelle Sprache gesehen werden kann. Wie auch eine verbale Sprache, hat die visuelle Sprache grundlegenden Elementen und Strukturen, wie Worte und Grammatik, die Bedeutung transportieren und damit die Interpretation der Marke steuern. Diese Sprache gilt es so zu nutzen, dass auch jene die sie nicht aktiv gestalten (wie Designer) lesen und verstehen können. So wie jemand Worte und Texte lesen kann, auch wenn sie selbst keine Autorin ist, so soll auch visuelle Gestaltung verstanden werdend auch ohne dass man die zugrundeliegenden Theorien kennt.(Vgl. Dondis, 1973, pp. x).
Für Designer gilt es deshalb als wichtig, eben diese Sprach-Systeme zu lernen, um dann klar kommunizieren zu können! Wir wollen die Dinge die Aaker als Dimensionen der Persönlichkeit definiert visuell darstellen!
Nach Dondis haben visuelle Informationen 3 Ebenen:
Symbolische Ebene (Symbolism / Symbolik): Das ist die höchste Ebene, auf der visuelle Zeichen eine spezifische, kulturell vereinbarte Bedeutung haben. All diese Symbole sind abstrakt und müssen erlernt werden, um ihre Bedeutung zu entschlüsseln (z. B. Verkehrszeichen, Buchstaben, Firmenlogos). (Vgl. Dondis, 1973, pp. 13).
Repräsentationale Ebene (Representation / Darstellung): Dies ist die Ebene des Wiedererkennens. Wir sehen ein Bild und identifizieren sofort die Objekte, Menschen oder Szenen aus unserer Erfahrung und Umwelt. Es ist das, was wir „erkennen“ (z. B. ein Foto eines Hundes). (Vgl. Dondis, 1973, pp. 14).
Abstrakte Ebene (Abstraction / Abstraktion): Auf dieser Ebene werden die visuellen Informationen auf ihre grundlegenden Elemente reduziert. Es geht um die Formen, Linien, Farben, Kontraste und Texturen, aus denen das Bild besteht, unabhängig von ihrer inhaltlichen Bedeutung. (Vgl. Dondis, 1973, pp. 14).
Marken bewegen sich (sofern sie noch keine Symbolwirkung haben) primär auf der abstrakten Ebene, vor allem beim Erstkontakt mit Betrachter:innen. Die Persönlichkeit der Marke entsteht beim ersten Blick weniger durch das Was (Inhalt) als durch das Wie (visuelle Parameter).
Während Markenstrategien Persönlichkeit häufig über Begriffe wie „modern“, „authentisch“ oder „kompetent“ definieren (Vgl. Aaker, 1997,), entsteht diese Wirkung in der Wahrnehmung primär auf der abstrakten Ebene – durch formale Parameter wie Farbe, Kontrast, Rhythmus, Komposition und Bewegung. Klassische Brandingprozesse arbeiten stark mit symbolischen Zuschreibungen (Werte, Claims, Narrative), man braucht aber schon einiges an Aufmerksamkeit von Kund:innen, bis man diese Inhalte zu kommunizieren kann! In beschleunigten Kommunikationskontexten wird deshalb die abstrakte Ebene besonders wichtig, da die abstrakte visuelle Eigenschaften am schnellsten wahrgenommen werden und unmittelbar Stimmung, Charakter und Haltung vermitteln. Die Markenpersönlichkeit entsteht also im ersten Moment weniger durch das was kommuniziert wird, sondern viel eher durch das, wie kommuniziert wird.
Wie kommunizieren wir unsere Markenpersönlichkeit also deutlich und schnell?
Dondis schreibt, dass visuelle Kommunikation im Kern immer auf den selben Grundelemente basiert (Punkt, Linie, Form, Richtung, Ton, Farbe, Textur, Proportion, Dimension und Bewegung), die unsere Wahrnehmung strukturieren und dass es Techniken gibt um die Bedeutung und Aufmerksamkeit dieser Grundelemente zu lenken. (Kontrast und Balance versch. Eigenschaften) (Vgl. Dondis, 1973, pp. 15) Diese Parameter formen nicht nur ästhetische Oberflächen, sondern lenken aktiv, wie Inhalte gelesen, bewertet und emotional eingeordnet werden.
Dondis’ Beitrag ist dabei kein ästhetisches Regelwerk (es gibt kein gut/schlecht), abe man bekommt ein analytisches System! Durch die Polaritäten die Dondis definiert (z. B. Balance/Instability, Sharpness/Diffusion, Repetition/Episodicity) werden die verschiedenen visuelle Entscheidungen vergleichbarer und beschreibbar. Dondis bietet so die Basis eines parametrisches Rasters, mit dem sich visuelle Kommunikation strukturell analysieren lässt. Für meine Masterarbeit ist das zentral, da ich Markenästhetik so nicht nur subjektiv beschreiben, sondern systematisch erfassen kann.
Rückschlüssig kann man aus den Parametern die Basis eines Brand-Systems bzw. einer Markenidentität ableiten: Man kann durch ein gezieltes definieren dieser Parameter ein visuelles System entwickeln, das über formale Entscheidungen hinweg eine konsistente Bedeutungen erzeugt. Das ist also der Kern der Brand Identity und Motion Identity. Eine Markenpersönlichkeit entsteht nicht durch einzelne visuelle Assets, sondern durch konsistente Positionierungen innerhalb formaler Parameter (und einer konsistenten Anwendung dieser in allen Medien) Hier spielt auch Motion eine wichtige rolle, denn vor allem in beschleunigten Kommunikationskontexten kann hier über die abstrakte Ebene der Informatiosnvermittlung zusätzlich Bedeutung kommuniziert werden.
Im nächsten Blogpost gehe ich deshalb detailliert auf diese einzelnen Parameter ein und leite daraus ein Raster ab, mit dem sich Motion Identity als Persönlichkeits-Träger analysieren lässt.
Quellen
Dondis, D. A. (1973). A primer of visual literacy. MIT Press.
Aaker, J. L. (1997). Dimensions of brand personality. Journal of Marketing Research, 34(3), 347–356.
Csaba, F. F., & Bengtsson, A. (2006). Rethinking identity in brand management. In J. E. Schroeder & M. Salzer-Mörling (Eds.), Brand culture (pp. 118–135). Routledge.
Johansson, U., & Svengren Holm, L. (2006). Brand management and design management: A nice couple or false friends? In J. E. Schroeder & M. Salzer-Mörling (Eds.), Brand culture (pp. 136–152). Routledge.
Schroeder, J. E., & Salzer-Mörling, M. (2006). Introduction: The cultural codes of branding. In J. E. Schroeder & M. Salzer-Mörling (Eds.), Brand culture (pp. 7–12). Routledge.
*Zuhilfenahme von ChatGPT: Die KI wurde zur Übersetzung, Korrektur und Formulierungshilfe von Texten verwendet. Alle Inhalte wurden anschließend eigenständig ausgewertet, überarbeitet und in den hier präsentierten Beitrag integriert.
Notiz: Dondis hat in seinem Buch immer wieder Exercises, die dabei helfen sollen das System zu verstehen. Ich denke diese Exercises könnten bei der Analyse der Prozesse oder Case Studys nützlich sein!
As this semester drew to an end I (barely) survived one of the most stressful periods of my life; exhibition preparations. But in all seriousness, as if the final exhibition alone wouldn’t have been stressful enough on its own, I also conveniently decided to move to a whole different part of Austria, plan my master’s project in Lapland and pack for a holiday in Morocco at the same time. In hindsight I do realise that just because things would theoretically fit into my calendar one after the other, each one aligning perfectly, it does not mean that I should squeeze them like that. Each important life event needs some space for preparation, reflection and, most importantly, unexpected problems.
However, even with all of these things in the back of my mind, I still really enjoyed working towards the exhibition together as a team and I am really proud of what we have accomplished. In this blogpost I want to reflect on what worked really well and what didn’t, as well as what I enjoyed and what I just couldn’t wrap my head around.
My main task was being head of the construction and transportation team. This meant working together closely with the architecture team who planned everything that we needed to build later on. The real brains behind the whole operation were the members of the overall exhibition planning team. They did an incredible job of coordinating and organising everyone else. I also found it good to be in close contact with the other teams and being able to coordinate every step with the others. Unfortunately, I believe this is also where some of the issues arose, because a lot of the time, if a whole team was addressed via the group chat for example, 9 out of 10 people didn’t react and the one person that did was probably overworked already. So I believe, in projects like these there will always be people that need a bit more of a push to do their share of work instead of acting proactively.
This is also something where I realised one of my weaknesses lies; bossing people around. Because half of the time, I was being too nice and just asking if anyone could maybe help with some task and the other half of the time, I felt incredibly mean, telling people to do something because I let my annoyance get the better of me and dished it out to someone who isn’t at fault. Also I have noticed that my brain isn’t made for coordinating large groups, large amounts of projects or items, or anything of the sorts. The plans I told people concerning transportation kept changing because I talked to others about who all had a different opinion on things and let their opinions influence me and the decisions I had already made instead of sticking with them.
I think in the area of project management, I am just lacking the knowledge and confidence to stand in front of people and act like I know what I am doing. I constantly needed a second person to share my responsibilities with or share the burden of decision-making with. I really hope that in future projects I will be able to take responsibility for my own actions without having to hide behind somebody else. Maybe once I have gained some more experience, or maybe I just have to fail once and take the full blame for it, in order to find out that it will most likely not be the end of the world, but instead just human.
In diesem Blogpost möchte ich mich mit Quellen zum Thema Marke/Brand/Branding und Markenidentität beschäftigen (möglicherweise sind die Quellen relevant für meine Masterarbeit)
———-
Markenpersönlichkeit? Brand-Identity?
Wenn es um Markenpersönlichkeit, als „Brand Personality“ geht, stößt man bei Web Recherche schnell auf das System von Jennifer Aaker, denn sie definierte 1997 die „Dimension of Brand Personality“.
Ich betrachte das Thema „Markenpersönlichkeit“ nun als zuerst aus ihrer Sicht:
Was ist Markenpersönlichkeit?
Aaker schreibt, dass „Brand personality“ in ihrem Ansatz als ein seit von menschlichen Eigenschaften betrachtet wird, die Konsument:innen einer Marke zuschreiben. (Vgl. Aaker, 1997).
Sie schreibt aber auch, dass Marken selbst aber keine Persönlichkeit im eigentlichen Sinne haben und man nur von der „wahrgenommene Persönlichkeit“ sprechen kann, die mit der Marke assoziiert wird. Markenpersönlichkeit entsteht ganz subjektiv im Kopf der Rezipient:innen, durch die Eindrücke die von der Brand wahrgenommen werden. Beispielsweise werden oft die Charaktereigenschaften der Personen, die man mit der Marke verbindet (wie Influencer:innen, Verkäufer:innen, Mitarbeiter:innen usw.) auf die Marke umgelegt. (Vgl.Aaker, 1997).
Dieser Prozess ist also eng mit den grundlegenden Wahrnehmungsmechanismen der Menschen verbunden. Die Reize werden parallel und extrem schnell verarbeitet, man ordnet die Eindrücke der Brand einem bestehenden Schemata zu und konstruieren so eine Bedeutung bzw Persönlichkeit auf Basis des vorhandenen Wissens (Vgl. Malamed, 2015).
Aaker zeigt in ihrer Forschung, dass Menschen Marken ähnlich wahrnehmen und bewerten, wie andere Menschen. Es werden Charaktereigenschaften zugeordnet, man entwickelt Sympathien oder Ablehnungen und baut eine emotionale Beziehung auf. Das macht Marken zu mehr als nur „Anbieter:innen von Produkten/Dienstelistungen“, sie werden „soziale Akteure“ in den jeweiligen Bedeutungen. (Vgl. Aaker, 1997).
Aaker entwickelte in einem langen Prozess – auf den ich im Rahmen dieser Arbeit nicht näher eingehen werden – einen Modell mit fünf zentralen Dimensionen, die eine Markenpersönlichkeit haben kann. Häufig wird es auch als die „Big Five der Marken“ bezeichnet.
Bei den Dimensionen geht es nicht um objektive Produkteigenschaften, sondern die emotionale und charakterliche Bedeutung, die die Brands durch visuelle Gestaltung, Tonalität, Kommunikation usw. entwickeln. (Vgl. Aaker, 1997). Heißt beispielsweise, selbst wenn GoPro eine super technische, durchdachte und komplexe Entwicklung ist/wäre, kann der gewonnene Eindruck dennoch ein ganz anderer sein, zb Abenteuerlust, recklessness, Risiko und Mut. Oder kritisch betrachtet, auch wenn eine große Marke nicht fair, bodenständig und freundlich produziert, kann die charakterliche Bedeutung bei den Nutzer:innen (aus Unwissenheit oder anderen Gründen) ein super freundliches, familiäres, ehrliches Bild sein.
Die 5 Dimensionen die Aaker definiert sind folgende:
– Sincerity (z. B. ehrlich, bodenständig, freundlich) – Excitement (z. B. dynamisch, jung, mutig) – Competence (z. B. zuverlässig, intelligent, erfolgreich) – Sophistication (z. b. elegant, luxuriös, prestigeträchtig) – Ruggedness (z. B. robust, maskulin, abenteuerlich) (Aaker, 1997)
Im nächsten Abschnitt möchte ich mich kurz den verschiedenen Dimensionen widmen
1. Sincerity (Aufrichtigkeit)
Marken mit “hoher Sincerity“ wirken ehrlich, warmherzig, bodenständig und vertrauenswürdig.
Sie vermitteln Nähe, Authentizität und Verlässlichkeit und bauen häufig langfristige emotionale Beziehungen zu ihren Zielgruppen auf (Vgl. Aaker, 1997; Bolder Agency, 2025).
Beispiele: Slack: Slack ist nahbar in seiner Tonality, hat ein „straightforward interface“ und legt viel Wert auf Teamwork und Kollaboration. Man nimmt Slack als vertrauenswürdige, verlässliche und nutzerfreundliche brand wahr. (Vgl. Bolder Agency, 2025). Coca-Cola: Die Marke ist bekannt für den super freundlichen, authentischen vibe; Man verbindet die Mare mit „geteilten, glücklichen Momenten! (Vgl. Bolder Agency, 2025).
2. Excitement (Begeisterung)
Excitement steht für Dynamik, Kreativität und Innovationsgeist. Diese Marken wirken jung, mutig und inspirierend und sprechen oft Zielgruppen an, die Offenheit für Neues und Selbstentfaltung schätzen (Aaker, 1997; Bolder Agency, 2025).
Beispiel RedBull: Ein Paradebeispiel für eine „exciting“ Brand. Das Marketing ist bold, die sponsorships sind Adrenalingeladen, exist emotional und aufregend.
3. Competence (Kompetenz)
Marken dieser Kategorie werden als zuverlässig, intelligent und leistungsstark wahrgenommen. Sie kommunizieren Stabilität, Expertise und Professionalität. Eigenschaften, die besonders in technologie- oder serviceorientierten Bereichen wichtig sind. (Vgl. Aaker, 1997).
Ein Beispiel ist Microsoft: Die Marke hat einen langjährigen Ruf als Pionier für Software- und Cloud-Lösungen, was ihre Kompetenz unterstreicht. (Vgl. Bolder Agency, 2025)..
4. Sophistication (Raffinesse)
Sophistication beschreibt elegante, luxuriöse und prestigeträchtige Markenpersönlichkeiten. Diese Marken inszenieren Exklusivität, Stil und „kulturelles Kapital“ und werden häufig mit Premium- oder Luxussegmenten verbunden (Vgl. Aaker, 1997; Bolder Agency, 2025).
Ein Beispiel ist Chanel, denn man verbindet sie weltweit mit Luxury-Fashion und einem gehobenen Style und sie zielen damit auf die „upper-class“ ab. Auch Apple, definiert sich mit minimalistischem Design und Premium Preisen als prestige Brand
5. Ruggedness (Robustheit)
Diese Dimension steht für Stärke, Widerstandsfähigkeit und Abenteuerlust. Marken mit hoher Ruggedness wirken naturverbunden, körperlich oder gar maskulin geprägt und werden oft im Outdoor-, Sport- oder Utility-Kontext eingesetzt (Vgl. Aaker, 1997; Bolder Agency, 2025).
Ein extremes Beispiel ist Harley-Davidson, denn sie symbolisieren „rugged independence“ und einen aufregenden unabhängigen Lifestyle. Aber auch Dell (XPS), indem sie Langlebigkeit und Leistung in den Vordergrund stellen und damit auf Kunden abzielen, die auf der Suche nach robusten High-End-Laptops sind.
——
Aaker schreibt, dass diese Persönlichkeitsdimensionen als mentale Kategorien fungieren, mit deren Hilfe Konsument:innen Marken schnell einordnen und emotional bewerten (Vgl.Aaker, 1997), was zum Verarbeiten mit „Schemata“ und „Mental Models“ von Connie Malamed passt. (Vgl. Malamed, 2015).
Markenpersönlichkeit entsteht über wiederholte Wahrnehmung und Interaktion und sie ist kein statisches Merkmal, sondern das Ergebnis eines kontinuierlichen Prozesses.
Diese Dimensionen beschreiben keine messbaren Produkteigenschaften, sondern wahrgenommene Persönlichkeitsmerkmale. Konsument:innen projizieren diese Eigenschaften auf Marken, basierend auf visueller Gestaltung, Tonalität der Kommunikation, Produktästhetik, Nutzer:innenerfahrungen sowie kulturellen Kontexten (Vgl. Aaker, 1997).
Für Gestaltung bedeutet das: Visuelle Systeme kommunizieren nicht nur Informationen, sondern aktivieren auch Persönlichkeitszuschreibungen. Farbe, Typografie, Bildsprache und Bewegung – wirken als Träger dieser 5 Dimensionen.
Markenpersönlichkeit hängt außerdem stark mit dem Selbstbild der Konsument:innen zusammen, denn Menschen bevorzugen Marken, deren wahrgenommene Persönlichkeit mit ihrer eigenen Identität oder mit ihrem idealen Selbstbild übereinstimmt (Vgl. Aaker, 1997). Man kann also sagend ass Marken zu Identifikationsflächen werden und nicht nur praktischen Zwecken dienen, sondern auch der Selbstdarstellung und sozialen Positionierung.
Die Markenpersönlichkeit beeinflusst laut Aaker unter anderem: – Markenpräferenz – Vertrauen – emotionale Bindung – Loyalität – Kaufentscheidungen (Aaker, 1997)
Damit wird deutlich, dass eine Markenpersönlichkeit kein oberflächliches Marketingkonzept ist, sondern der Kern einer langfristig guten Markenbeziehungen. Die Persönlichkeit einer Brand ist das emotionales Bindeglied zwischen Marke und Mensch.
Aaker sieht eine Markenpersönlichkeit nicht als isoliertes Merkmal, sondern als Ergebnis eines immer weiter laufenden Prozesses. Diese Persönlichkeit entsteht über alle „Touchpoints“ hinweg, durch z.B. die visuelle Identität, Werbekommunikation, Produktgestaltung, User Experience, Tonalität, Serviceerlebnisse und kulturelle Einbettung (Vgl. Aaker, 1997). Jede Interaktion trägt zur Konstruktion dieses Persönlichkeitsbildes bei. In digitalen Medien geschieht diese Wahrnehmung häufig in extrem kurzer Zeit (Vgl. eye square GmbH, 2020).
Für das Design einer Marke bedeutet das, dass eine Markenpersönlichkeit nicht durch ein einzelnes Logo oder eine Farbpalette definiert wird, sondern durch ein Zusammenspiel vieler visueller und kommunikativer Signale über eine längere Zeit. Persönlichkeit in einer Brand entsteht durch das Zusammenspiel von visuellen Reizen, individuellen Interpretationen der Kund:innen und emotionalen Erfahrungen mit der Marke. Diese Persönlichkeitsausprägungen müssen jedoch konsistent über alle Berührungspunkte hinweg vermittelt werden, um glaubwürdig zu bleiben (Aaker, 1997). In beschleunigten Medienumgebungen verstärkt sich diese Dynamik zusätzlich: Inhalte verlieren schnell an Aktualität, Wahrnehmung wird fragmentierter, und Nutzer:innen müssen permanent selektieren, worauf sie ihre begrenzte Aufmerksamkeit richten (Vgl. Rosa, 2005, pp. 243–255; Davenport & Beck, 2001, p. 3).
Markenpersönlichkeit entsteht dort, wo visuelle Reize auf kognitive Prozesse treffen. Menschen interpretieren Marken mithilfe bestehender mentaler Modelle und Schemata, ordnen ihnen Bedeutungen zu und speichern diese Erfahrungen im Gedächtnis ab. Persönlichkeit wird also wahrgenommen, erinnert und emotional bewertet.
Wenn Markenpersönlichkeit ein wahrgenommenes Konstrukt ist, dann muss Design gezielt darauf ausgerichtet sein, diese Wahrnehmung zu steuern. Visuelle Identität ist ein Instrument der Persönlichkeitskommunikation und nicht nur ein ästhetischer Rahmen. Wenn Marken heute primär in bewegten, digitalen Kontexten wahrgenommen werden, muss Persönlichkeit in Sekundenbruchteilen lesbar sein. Da Aufmerksamkeit häufig nur kurzzeitig zur Verfügung steht (Vgl. eye square GmbH, 2020), wird visuelle Gestaltung zum entscheidenden Aktivierungsmechanismus für Aufmerksamkeit und eine Verbindung zur Brand.
Markenpersönlichkeit ist kein dekoratives Zusatzmerkmal, sondern der Kern von moderner Markenkommunikation. Marken werden wie Charaktere erlebt und ihre Persönlichkeit entsteht durch wiederholte visuelle und emotionale Erfahrungen und bildet die Basis für Vertrauen, Identifikation und langfristige Bindung (Vgl. Aaker, 1997).
Quellen
Aaker, J. L. (1997). Dimensions of brand personality. Journal of Marketing Research, 34(3), 347–356.
Rosa, H. (2005). Beschleunigung: Die Veränderung der Zeitstrukturen in der Moderne. Suhrkamp.
Davenport, T. H., & Beck, J. C. (2001). The attention economy: Understanding the new currency of business. Harvard Business School Press.
eye square GmbH. (2020). Die magischen 2,5 Sekunden: Media attention benchmark.
Malamed, C. (2015). Visual language for designers (E-book ed.). Rockport.
*Zuhilfenahme von ChatGPT: Die KI wurde zur Übersetzung, Korrektur und Formulierungshilfe von Texten verwendet. Alle Inhalte wurden anschließend eigenständig ausgewertet, überarbeitet und in den hier präsentierten Beitrag integriert.
Notiz für Masterarbeit: Wie tief muss man in das Branding/Brand-Identity Thema rein? + bzgl Recherche: Wie ist das mit Übersetzungen? (chatgpt/gemini) + Apa Richtlinien nochmal checken