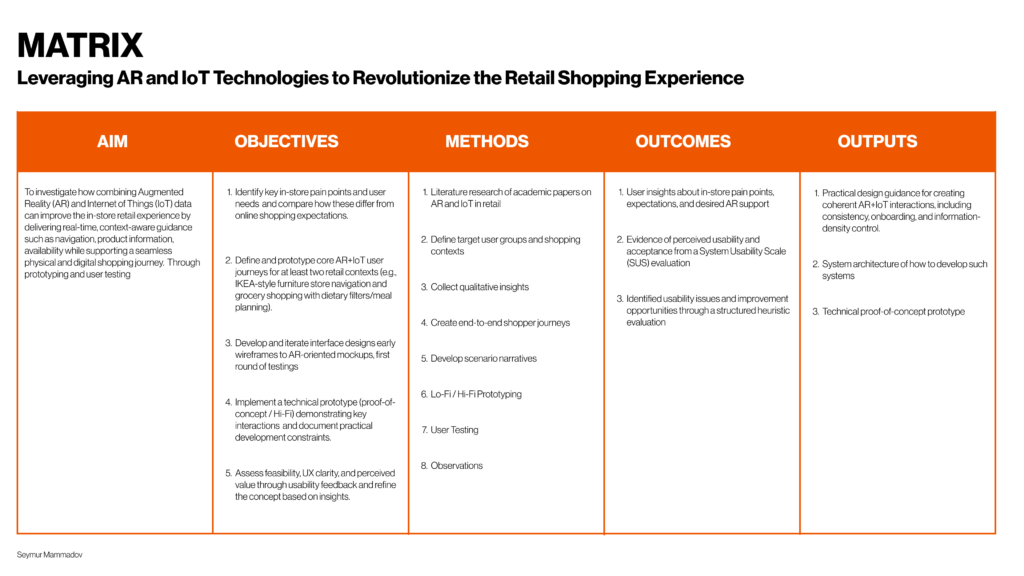
IMPULSE #4: World Usability Congress 2025

Spending two days at the World Usability Congress in Graz made me focus on UX aspect of my thesis. The talks I followed were mostly about UX KPIs, usability testing and accessibility, and I kept translating everything into my own topic: AR and IoT in retail. Instead of just thinking about how my future system could look, I started to think in a much more concrete way about how to measure it, test it and make sure it works for real people, not only in prototypes.

KPIs – Learning To Define What “Better” Means

One of the clearest lessons was how seriously UX teams treat KPIs. In my notes I wrote that valuable improvements are often only 10 to 15 percent per quarter, and that this is already considered success. That sounds small, but the important part is that these improvements are defined and measured. The typical UX KPIs that kept coming up were conversion rate, task completion time, System Usability Scale score, Net Promoter Score and error rate.

For my thesis this means I cannot just write “AR wayfinding will improve the shopping experience”. I need to specify what that improvement looks like. For example: people find a product faster, they ask staff for help less often, they feel more confident about their choices. The practical action I took from the congress is: for each feature I design, I will write down one or two concrete metrics and how I would measure them in a real store test. That turns my concepts into something that can be evaluated instead of just admired.

Accessibility As A Built In Check, Not An Extra

The accessibility track was also directly relevant. In my notes I wrote down a “quick checklist” that one speaker shared: check page layout and content, contrast and colours, zoom, alerts and error messages, images and icons, videos, no flashing animation and audio only content. It is simple, but exactly because it is simple it is realistic to apply often.

For my AR and IoT ideas, this becomes a routine step. Whenever I sketch a screen or overlay, I can quickly run through that checklist. Also thinking how my work could also have an impact on the accessibility for the end users. Are colours readable on top of a busy store background. Can text be enlarged. Is there a non visual way to access key information. Combined with talks about accessibility on a corporate level and inclusive design for neurodivergent people, it pushed me to treat accessibility as a default requirement. The concrete action is to document accessibility considerations in my thesis for every main feature, instead of adding a separate chapter at the end.

What I Take Back Into My Thesis

After World Usability Congress, my AR and IoT retail project feels less like a collection of futuristic ideas and more like something that could be developed and tested step by step. The congress gave me three practical habits. First, always define UX KPIs before I design a solution, so “better” is not vague. Second, run an accessibility quick check on every main screen or interaction and think about different types of users from the start.

This fits nicely with my other blog reflections. The museum visit gave me ideas about where AR and IoT could be applied. The festival made me think about wayfinding and smart environments. World Usability Congress added the missing layer: methods to prove that these ideas actually help people and do not silently exclude anyone.

Links
Official conference homepage
World Usability Congress – Home World Usability Congress

2025 agenda with talks and speakers
World Usability Congress 2025 – Agenda World Usability Congress
AI Disclaimer
This blog post was polished with the assistance of AI.

IMPULSE #3: Meta Connect 2025 AR Moving From Headsets To Everyday Life

Watching Meta Connect 2025 felt like seeing my thesis topic walk on stage. The focus was not on big VR helmets anymore but on glasses that look close to normal and are meant to be worn in everyday life. The main highlight was the new Meta Ray-Ban Display, a pair of smart glasses with a small full color display in one lens and a lot of AI power built in. They are controlled with a neural wristband that reads tiny finger movements, so you can click or scroll with almost invisible gestures.

When starting this topic I have theorized how technology going to look and have had my hopes and assumptions. A few years ago AR meant heavy hardware that you would never wear into a supermarket or furniture store. Now the vision is a pair of sunglasses that weigh about as much as regular glasses, can show simple overlays in your field of view and are designed to be worn on the street, in a shop or on the couch. The technology is still expensive and early, but watching the keynote made it very clear that the direction is: smaller, lighter, more normal looking, and more tightly connected with AI.

It could be compared to evolution of the phones and technology in general how our everyday devices moved from being heavy and bulky to light and portable and also with having speculations such as it’s not needed we can come to vision that everyday said we do not need phones because we have laptops but technology advances and we find new ways where we interact with the world.

What I Learned About AR From The Event

The first learning is about form factor. The Ray-Ban Display does not try to turn your whole field of view into a digital world. It uses a compact display area to show only what is necessary: navigation hints, messages, short answers from Meta AI or the title of a song that is playing. Instead of replacing reality, it adds a thin layer on top of it.

The second learning is about interaction. The neural wristband is a good reminder that people do not want to wave their arms in public to control AR. In real environments like a festival, a museum or a supermarket, subtle gestures or simple taps are much more realistic.

The third learning is the merge of AI and AR. The glasses are clearly designed as AI first devices. They can answer questions, translate speech, caption what you hear and see, and then present this information visually inside the lens.

Technology Getting Smaller And More Accessible

Another strong theme in Meta Connect is how quickly the hardware is trying to become socially acceptable. Earlier devices were clearly gadgets. These glasses try to be fashion first, tech second. They look like familiar Ray-Ban frames instead of a prototype. The same is true for battery life and comfort. The promise is that you can wear them for several hours without feeling like you are in a lab experiment.

Why Meta Connect Matters For My Thesis

Meta Connect 2025 confirmed that my scenarios for AR in retail are not just science fiction. The building blocks are emerging in real products: lightweight glasses, AI assistants, subtle input methods and simple overlays instead of full virtual worlds. For my master’s thesis this is both motivating and grounding. It tells me that the interesting design work is no longer about asking if AR will be possible in stores, but about shaping how it should behave so that it actually helps people shop, learn and navigate without stealing the spotlight.

Technology should become smaller, calmer and closer to everyday objects, so it can quietly support what people already want to do in physical spaces. Not to replace those spaces, but to make moving through them a little clearer, smarter and more human.

Links

Official Meta recap of the Connect 2025 keynote (Ray-Ban Display, Neural Band etc.)
Meta Connect 2025 – AI Glasses And Ray-Ban Display Meta

Meta product page for Ray-Ban Meta smart glasses (for specs and positioning)
Ray-Ban Meta Smart Glasses – Meta Meta

General info / news listing around Meta smart glasses and AI wearables
Meta – Newsroom / Ray-Ban Meta Announcements

AI Disclaimer
This blog post was polished with the assistance of AI.

IMPULSE #2: A Night of Techno Losing Yourself And Finding Your Way Experience

The night I saw Charlotte de Witte at Signal Festival was pure overload. Heavy bass, dense crowd, strobing lights, smoke, multiple bars and stages, lockers, queues, a constant flow of people in every direction. As an experience it was amazing, I am a designer and one thing I love to do and always do is to see how I can optimize the whole event and how I can apply it to my thesis because I am also a workaholic.

Observations: Immersion Versus Orientation

One of my strongest observations was how different immersion and orientation felt. Immersion was perfect. When I was in front of the main stage, I did not need any interface. The sound and visuals were enough. Orientation was a different story. Moving away from the stage meant guessing, especially if you got drunk a bit. Where is the nearest bar that is not overcrowded. Which corridor leads to the toilets. How do I get back to my locker without opening the venue map again and again. The more time passed, the more people were intoxicated, and the weaker everyone’s internal navigation became.

At some point I lost my friends in the crowd and we had the usual routine: messages that did not go through, vague descriptions like “I am near the left bar” that are useless in a dark hall, and the classic feeling of spending twenty minutes trying to reconnect. When you are sober this is still slightly annoying. Once you are drunk, it becomes hard work.

Understanding: How AR And IoT Could Be A Soft Safety Net

This is where I started to imagine an IoT based guidance system with AR as the interface. Where IoT beacons or other positioning technology could be distributed across the venue. Every bar, locker zone, toilet block and entrance could have its own tiny digital footprint. If visitors opt in, AR glasses could use this network to understand three basic things in real time: where they are, where their friends are, and where key services are located.

In practice, that could look very simple. An AR arrow could hover in my view and gently lead me to my locker, even if I barely remember which area I used. A small indicator could show me which direction my friends are in and roughly how far and also notify in case my friends need help as sometimes you can face safety issues other people approaching and annoying. If I want a drink, the system could show the nearest bar plus tell where I can go to smoke. If there is an emergency or I need to leave quickly, the AR layer could highlight the closest safe exit instead of forcing me to rely on my memory in a confused state.

Main Concept: Festivals As Prototypes For Smart Guidance

The main concept that came out of Signal Festival for me is the idea of a soft, ambient guidance system built on AR and IoT. The festival does not need more screens. It needs invisible structure that supports people at the right moment. A network of small, low power devices in the space can give the system awareness of positions and states. Which will elevate user experience nd AR then becomes a thin, context aware layer on top of that awareness. It answers very simple questions: where am I, where is what I need, and how do I get back.

This is closely related to my retail research. A music festival is like an extreme version of a shopping mall. Both are large, noisy, crowded environments where people try to reach specific goals while managing limited energy and attention. If a guidance system can help a drunk visitor find the right bar, locker or friend in a dark venue, it can certainly help a tired shopper find the right aisle or click and collect point in a busy store.

Links
Event page for Signal Festival Weekend 2 at Pyramide
Signal Festival – PYRAMIDE TAKEOVER WE2 (O-Klub) O-Klub

Techno event listing with headliners and description
Signal Festival Pyramide WE2 – Event Overview technomusicworld.com

Local article about Signal Festival in the glass pyramid
Signal Festival in der Pyramide Vösendorf – Heute.at

AI Disclaimer
This blog post was polished with the assistance of AI.

IMPULSE #1 Kunsthistorisches Museum Wien: Analog Space, Digital Ideas

Visiting the Kunsthistorisches Museum Wien felt almost the opposite of my thesis topic. It’s a very “analog” space: heavy architecture, old masters, quiet rooms, and almost no visible technology. Apart from the optional audio guide device, there are no screens, no projections, no interactive installations. You move from room to room, read the small wall texts and simply look.

That contrast is exactly what made the visit so valuable for me as an interaction design student. I wasn’t impressed by high-tech features. I was impressed by how much potential there is for technology to quietly support the experience without taking attention away from the art itself. The museum became a kind of mental sandbox where I could imagine how AR and IoT might be implemented in a very delicate context: history, culture, and learning.

Observations: A Classical Museum with a Small Digital Layer

My main observation was how traditional the user journey still is. You enter, pick a wing, and mostly navigate by room numbers, map and intuition. The only digital touchpoint I used was the handheld audio guide. Even that already shows the basics of what I work with in my thesis: an extra information layer on top of the physical space. You enter a painting number, press play, and suddenly you get context, story and meaning instead of just title, date and artist.

But the interaction is linear and passive. You always get the same story, no matter who you are, how much you already know, or what caught your eye. There is no way for the system to “notice” that you are fascinated by one detail and want to go deeper, or that you are in a hurry and only want a short summary. It made me see very clearly where today’s museum tech stops and where AR and IoT could start.

Understanding: Technology Should Support the Artwork, Not Compete with It

Standing in front of paintings, I tried to imagine AR in the room. The danger is obvious: if we fill the space with too many digital elements, the painting becomes a background for the interface. That’s exactly what I do not want, and it connects strongly to my thesis: technology must serve the human and the content, not distract from it.

So my understanding is that any AR or IoT system in a museum like this would have to be extremely calm, subtle and respectful. The artwork stays the main actor. AR is just a transparent layer that appears only when the visitor asks for it. IoT devices like small beacons near the frame could be completely invisible, only there to let the system know where you are and what you’re looking at. The goal is not to “modernise” the museum for its own sake, but to deepen the connection between visitor and artwork.

Main Concept: A Future AR & IoT Guidance Layer for Museums

The main concept that came out of this visit is to treat the museum as a potential case study for the same principles I explore in smart retail: guided navigation, contextual information, and personalised journeys, all powered by AR and IoT.

I imagined wearing AR glasses instead of holding an audio guide. When I look at a painting for more than a few seconds, a small icon could appear next to it in my field of view. If I confirm, the system overlays very minimal hints: a highlight around a specific detail, a short caption, or the option to see a brief animation explaining the story behind the scene. If I want more, I can dig deeper maybe see a reconstruction of how the painting originally looked, or how it was restored. If I don’t, nothing changes; I just keep looking with my own eyes.

The same system could also redesign the wayfinding experience. Instead of a fixed predefined tour, AR could show me a route that matches my interests and time: “Show me five highlights from the Renaissance in 45 minutes,” or “Guide me only to works that relate to mythology.” IoT sensors in rooms could provide live information about crowding, so the path avoids the most packed galleries and keeps the experience more relaxed.

What mattered most for me in this museum visit was not what technology was already installed, but the mental exercise of placing my thesis ideas into this setting. It helped me see that the principles I am developing for AR and IoT could have wider use case from the intended one and give a perspective for a retail subtle guidance, context-aware information, and respect for the physical environment also make sense in a cultural space.

Links

Official museum site
Kunsthistorisches Museum Wien – Official Website KHM.at

Visitor overview and highlights in English
Kunsthistorisches Museum – Overview & Highlights (visitingvienna.com) Visiting Vienna

Background and history of the building
Kunsthistorisches Museum Wien – Wikipedia

AI Disclaimer
This blog post was polished with the assistance of AI.

AUGMENTING SHOPPING REALITIES: STUDIES ON AUGMENTED REALITY (AR) IN RETAIL: Review

Thesis: Augmenting Shopping Realities: Studies on Augmented Reality (AR) in Retail

Author: Camen Teh

Degree/Institution/Date: PhD, University of Nottingham, February 2023.

How is the artifact documented?

There are basically two “work pieces.” First, the hierarchical value map from Study 1, which connects AR attributes, consequences, and values. It’s documented with an implication matrix, centrality and abstractness indices, and a final map; you can see which items ranked most important, like product evaluation, amplified product information, and product knowledge. 

Second, the web-based AR product presentation was used in the field experiment. The design varies the visual style (cartoonised vs realistic) and whether simple control buttons are present. When students scan a code on the product, one of the versions plays. The figures make the manipulations and trigger flow clear. 

Where and how can it be accessed?

I discovered the research while I was scrolling through research of various universities on HCI and AR technology, and stumbled upon this research. So research is accessible at the university of nottingham web-page. I was not able to find it on other platforms.

Do theory and implementation align?

Yes. Study 1 shows that shoppers care about information that builds knowledge and supports evaluation; Study 2 then tries concrete design moves (visual style + simple controls) that could nudge curiosity and controllability, and checks whether that helps people make sense of a “weird” product and move toward buying. The pipeline is coherent.

Is the documentation clear and comprehensible?

Yes. The thesis shows step-by-step procedures, visuals for manipulations, and full instrument lists; reliability/validity and manipulation checks are reported, enabling reproducibility and critique.  

Does the artifact meet master’s level quality standards?

This is a PHD research. Nevertheless, Research constitutes substantive work pieces with clear research aims, implementation details, and evaluation, meeting and in places exceeding typical master’s expectations. The absence of a public build/repo is a practical limitation rather than a quality flaw.  


Systematic Evaluation (CMS Criteria)

  • Overall presentation quality: Clean structure, figures and tables used purposefully. Reads polished.
  • Degree of innovation: Neat combo: means-end mapping of retail AR, then a live store test of visual style and simple controls. The finding that a stylized look can help sense-making for unfamiliar products is genuinely interesting.
  • Independence: The author builds or modifies stimuli, runs a campus-store experiment with random assignment, and reports checks and stats. Feels hands-on.
      
  • Organization and structure: The thesis is easy to follow: it opens with an introduction and an overarching AR literature review, then presents Study 1, a short bridge chapter that links Study 1 to Study 2, and a full chapter on the field experiment, before closing with implications and limitations. The table of contents and chapter headers make this flow clear.  
  • Communication: The author explains the manipulations plainly and even shows them with simple figures, and the measurement section reports reliability and validity in a straightforward way. 
  • Scope: Study 1 goes deep with 45 interviews, which is plenty to build the value map, and Study 2 is sizable for a field setting with 197 student participants. It tracks both purchase intention and an objective purchase measure via pre-orders, so the behavioral side isn’t just hypothetical.
        
  • Accuracy and attention to detail: The author explains what was tested and shows that the setup worked as intended. Most of the questionnaires feel solid, and while one of them is a bit shaky, it doesn’t break the study. Overall, the write-up is careful, tidy, and easy to follow.
  • Literature: The work includes a focused AR-in-retail review in Appendix A with a transparent selection funnel that narrows to 53 journal papers, and the measurements used in the experiment are adapted from prior validated scales and documented in the item tables. It reads grounded rather than hand-wavy.  

Overall Assessment (strengths & weaknesses)

Overall, this is a well put together thesis that treats AR in retail as a tool for better decisions rather than a flashy add-on. It moves cleanly from ideas to practice: first mapping what shoppers actually need from AR, then testing simple design choices in a real store. The write-up is clear, the artifacts are documented inside the thesis, and the practical message is easy to use: give people decision & useful information, let them control the presentation a little, and don’t assume photorealism is always the best choice for unfamiliar products.

There are a few issues. The live AR build isn’t shared as a public demo, and the field test sits in a single, student-heavy setting, so we should be careful about claiming it works everywhere. Still, the work is coherent, transparent, and genuinely helpful for anyone designing AR in shops. For a PHD, it comfortably meets the standard and, in places, goes beyond it.

Blog Post 5: Reality of Developing in AR and struggles

With my designs and architecture complete, I dived into Unity, eager to bring my vision to life. The first step was to implement the core QR code scanning feature. My initial research led me to Meta’s developer documentation and some promising open-source projects on GitHub, like the QuestCameraKit, which gave me a solid conceptual starting point. I found a QR scanning script that seemed perfect and began integrating it.

What followed wasn’t a straight line to success. It was a multi-week battle against a ghost in the machine—a frustrating cycle of failures that taught me a crucial lesson about AR development.

Things never work out your way

My initial prototype worked flawlessly within the Unity editor on my laptop. I could scan QR codes, trigger events—everything seemed perfect. But the moment I deployed it to the actual AR device, the Quest headset, it fell apart.

This is where I hit the wall. The symptoms were maddening: controller tracking was erratic and unpredictable, user input would get lost entirely, and the UI was completely unresponsive. After weeks of frustrating trials, debugging scripts line-by-line, and questioning my own code, I finally diagnosed the root cause. It wasn’t a simple bug; it was a foundational incompatibility.

The QR scanning asset I had chosen was built on the legacy Oculus XR Plugin. However, my project was built using the modern XR Interaction Toolkit (XRI), which is designed from the ground up to work with Unity’s new, standardized OpenXR backend. I was trying to force two different eras of XR development to communicate, and they simply refused to speak the same language.

The Turning Point: A Foundational Pivot

The “aha!” moment came with a tough realization: no amount of clever scripting or patchwork could fix a broken foundation. I had to make a difficult but necessary decision: stop trying to patch the old system and re-architect the project onto the modern standard.

This architectural pivot was the most significant step in the entire development process. It involved three major updates:

  1. Embracing the Modern Standard: OpenXR My first move was to completely migrate the project’s foundation from the legacy Oculus plugin to OpenXR. This involved enabling the Meta Quest Feature Group within Unity’s XR Plug-in Management settings. This single, critical step ensures all of Meta’s specific hardware features (like the Passthrough camera) are accessed through the modern, standardized API that the rest of my project was using.
  2. Rebuilding the Eyes: The OVRCameraRig With the OpenXR foundation in place, the old camera rig that the QR scanner depended on immediately broke. I replaced it entirely with the modern OVRCameraRig prefab. This new rig is designed specifically for the OpenXR pipeline. It correctly handles the passthrough camera feed, and a key component of my project—the QR scanner—instantly came back to life.
  3. Restoring the Hands: The XRI Controller Prefab Finally, to solve the erratic tracking and broken input, I replaced my manually configured controllers with the official Controller Prefab from the XR Interaction Toolkit’s starter assets. This prefab is guaranteed to work with the XRI and OpenXR systems, which immediately restored precise, stable hand tracking.

The Result: A Seamless Prototype

With the new foundation firmly in place, the chaos subsided. The final pieces fell into place with a central UIManager to manage the UI pages and a persistent DataManager to carry scanned information between scenes. The application was no longer a broken, unusable mess on the headset; it was stable, responsive, and worked perfectly.

This journey was a powerful reminder that in the fast-moving world of XR development, sometimes the most important skill is knowing when to stop patching a problem and instead take a brave step back to rebuild the foundation correctly. Here is few images from me trying to make it work.

This stable, working prototype is the culmination of that effort. In addition, I realize how these concepts can be complex and not make sense but I hope may be in can help someone in the future. In my final post, I’ll stop telling you about it and finally show you. Get ready for the full video demonstration.

Blog Post 4: From Blueprint to Visuals: Wireframing and Designing the UI

After defining the complex architecture and data flows in my previous posts, it was time to shift focus from the backend logic to the user’s reality. I needed to answer the most important question: What will this experience actually look and feellike for Alex, our shopper? This is where the design process begins. It’s a journey of translating abstract ideas into tangible, interactive screens. For this project, I followed a three-stage methodology, moving from low-commitment sketches to a fully realized high-fidelity vision.

Stage 1: The Spark of an Idea – Paper Wireframes Every complex digital product begins with the simplest of tools: a pen and paper. Before getting down to pixels and software, I sketched out the core user flow. This stage is all about speed and ideation—capturing the main steps of the journey without worrying about details.As you can see from my initial drawings, I focused on the key moments: entering the store, viewing a product, and the “wow” moment of 3D visualization in the user’s own home. This raw format allowed me to establish the foundational structure of the application.

Stage 2: Building the Blueprint – Low-Fidelity (Lo-Fi) Digital Wireframes With the basic flow mapped out, the next step was to give it a more formal structure. I created low-fidelity digital wireframes. The goal here is not beauty; it’s clarity. By using simple grayscale boxes, placeholder images, and basic text, I could focus entirely on information hierarchy and layout. These Lo-Fi designs helped me answer critical questions: Where should the search bar go ? How should a product’s details be organized? What does the checkout process look like? At this stage, I focused on a mobile form factor to solidify the core components in a familiar layout before adapting them for a more complex AR view.

Stage 3: Bringing the Vision to Life – High-Fidelity (Hi-Fi) AR Mockups This is the leap from a 2D blueprint into a 3D, immersive world. Designing for Augmented Reality, especially for the main target of smart glasses, required a complete shift in thinking. The user interface can’t just be a flat screen; it needs to live within the user’s space, providing information without obstructing their view.Here are some of the key design principles I implemented in the high-fidelity mockups:

Spatial & Contextual UI: The interface appears as a series of floating panels, or “holograms.” A navigation prompt appears at the top left, while the main interactive panel is on the right, keeping the central field of view clear. This UI is also contextual—it changes based on what the user is doing, whether they are navigating, inspecting an item, or making a purchase.

  • Glassmorphism: I used a translucent, blurred background effect for the UI panels. This modern aesthetic, known as glassmorphism, allows the user to maintain a sense of the environment behind the interface, making it feel integrated and less obtrusive.

  • Seamless AR Integration: The core feature—visualizing furniture—is seamlessly integrated. As seen below, when Alex wants to check how a sofa looks in his apartment, the app displays the 3D scan of his room directly within the interface. This feature provides immediate, powerful value and solves a key customer pain point.

    • An End-to-End Flow: From Browse the wishlist to making a secure payment with Apple Pay and seeing the order status, the entire purchase journey is designed to be fluid and intuitive, requiring minimal interaction from the user this. This actually concludes my idea of the technology us human moving from interacting with the objects by typing or other means now we have our devices to do so.

    This iterative journey from a simple sketch to a polished AR interface was crucial for refining the concept and ensuring the final design is not only beautiful but also intuitive and genuinely useful.

    With the architecture defined and the user interface designed, the final step is to merge them. In my next post, I’ll discuss the technical prototyping process—bringing these designs to life with code and seeing them work on a real device.

    Blog Post 3: A Shopper’s Journey: Tracing the Data Flow Step-by-Step

    In my last post, I unveiled the blueprint for my smart retail system—the three core pillars of the AR Application, the Cloud Platform, and the In-Store IoT Network. Today, I’m putting that blueprint into motion. I’ll follow my case study shopper, Alex, through the IKEA store and analyze the precise sequence of data “handshakes” that make his journey possible. Additionally this blog post is super technical due to my personal interest and it’s help to be able to further develop the technology

    While this experience is designed to be accessible on any modern smartphone, it is primarily envisioned for the next generation of consumer Smart AR Glasses. The goal is a truly heads-up, hands-free experience where digital information is seamlessly woven into the user’s field of view.

    Let’s dive into the technical specifics that happen on Alex’s chosen AR device.

    1. The Task: High-Precision In-Store Navigation

    The Scenario: Alex arrives at the store, puts on his smart glasses, and wants to find the “BILLY bookshelf.” He needs a clear, stable AR path to appear in front of him.

    The Data Flow: The immediate challenge is knowing Alex’s precise location, as GPS is notoriously unreliable indoors. To solve this, I’ve designed a hybrid indoor positioning system:

    • Bluetooth Low Energy (BLE) Beacons: These are placed throughout the store. The AR device detects the signal strength (RSSI) from multiple beacons to triangulate a coarse position—getting Alex into the correct aisle.
    • Visual Positioning System (VPS): This provides the critical high-precision lock. A pre-built 3D “feature map” of the store is hosted on my cloud platform. The software on the AR device matches what its camera sees in real-time against this map. By recognizing unique features—the corner of a shelf, a specific sign—it can determine its position and orientation with centimeter-level accuracy.

    Here’s how they work together:

    1. The AR device uses BLE Beacons to get a general location.
    2. This coarse location is used to efficiently load the relevant section of the VPS feature map from the cloud.
    3. The device’s computer vision module then gets a high-precision coordinate from the VPS.
    4. Now, the application makes its API call: a GET request to /api/v1/products/find. The request payloadincludes the high-precision VPS data, like {"productName": "BILLY", "location": {"x": 22.4, "y": 45.1, "orientation": {...}}}.
    5. Backend calculates a route and returns a JSON response with the path coordinates.
    6. The application parses this response and, using the continuous stream of data from the VPS, anchors the AR navigation path firmly onto the real-world floor, making it appear as a stable hologram in Alex’s field of view.

    2. The Task: Real-Time Inventory Check

    The Scenario: Alex arrives at the BILLY bookshelf. A subtle icon hovers over the shelf in his vision, indicating he can get more information.

    The Data Flow:

    1. The IoT Push: A smart shelf maintains a persistent connection to my cloud’s MQTT broker. When stock changes, it publishes a data packet to an MQTT topic with a payload like {"stock": 2}.
    2. The App Pull: When Alex’s device confirms he is looking at the shelf (via VPS and object recognition), the app makes a GET request to /api/v1/inventory/shelf_B3.
    3. My Cloud backend retrieves the latest stock value from its Redis cache.
    4. The app receives the JSON response and displays “2 In Stock” as a clean, non-intrusive overlay in Alex’s glasses.

    3. The Task: AR Product Visualization in Alex’s Room

    The Scenario: Alex sees a POÄNG armchair he likes. With a simple gesture or voice command, he wants to see if it will fit in his living room at home.

    The Data Flow:

    1. Alex looks at the armchair’s tag. The device recognizes the product ID and calls the GET /api/v1/products/poang_armchair endpoint.
    2. My Cloud Platform responds with metadata, including a URL to its 3D model hosted on a CDN (Content Delivery Network).
    3. The AR device asynchronously downloads the 3D model (.glb or .usdz format) and loads Alex’s saved 3D room scan.
    4. Using the device’s specialized hardware, the application renders the 3D armchair model as a stable, full-scale hologram in his physical space, allowing him to walk around it as if it were really there.

    This intricate dance of data is what enables a truly seamless and futuristic retail experience.

    In my next post, I will finally move from the backend blueprint to the user-facing design. I’ll explore the prototyping and UI/UX Design and the design process for the interface that Alex would see and interact with through his AR device.

    Blog Post 2: The Blueprint: Architecting the Smart IKEA Experience

    In my last post, I introduced the concept of transforming the retail journey using Augmented Reality and the Internet of Things. To move from a concept to a reality, however, we need more than just a good idea. We need a blueprint.

    Remember Alex, our first-time homeowner navigating the vast IKEA maze? His journey from feeling overwhelmed to confidently furnishing his space is powered by a seamless blend of technologies. But for that “magic” to work, a robust and well-thought-out system must operate behind the scenes. Before we design a single button or write a line of code, we first have to design the architecture.

    Think of it like building a house. You wouldn’t start laying bricks without a detailed blueprint. Our system architecture is exactly that: a master plan that defines all the moving parts and how they communicate with each other.

    For our smart retail experience, the system is built on three core pillars:

    1. The AR Application (The Guide)

    This is the component Alex interacts with directly on his smartphone/Smart Glasses. It’s his window into this enhanced version of the store. It’s not just an app; it’s his personal guide, interior designer, and shopping assistant all in one.

    Key Responsibilities:

    • Reading the QR code to understand the location and connect to correct server
    • Rendering the AR navigation path that guides Alex through the store.
    • Displaying interactive information cards for products.
    • Capturing the 3D scan of Alex’s room and allowing him to virtually place furniture.

    2. The Cloud Platform (The Central Brain)

    If the app is the guide, the cloud is the all-knowing brain that directs it. This powerful backend system is where all the critical information is stored, processed, and managed in real-time. It’s the single source of truth that ensures the information Alex sees is always accurate and up-to-date.

    Key Responsibilities:

    • Storing the entire IKEA product catalog, including 3D models, dimensions, and prices.
    • Managing the digital map of the store.
    • Processing real-time inventory data and user account information (like Alex’s saved room scan).

    3. The In-Store IoT Network (The Nervous System)

    This is the network of smart devices embedded within the physical store. These devices act as the store’s nervous system, sensing the environment and sending crucial updates to the central brain. This is what connects the digital world of the app to the physical reality of the store.

    Key Responsibilities:

    • Using smart shelves or sensors to monitor stock levels for products like the BILLY bookshelf.
    • Using beacons to help the app pinpoint Alex’s precise location for accurate navigation.
    • Triggering location-based offers or suggestions.

    How It All Connects

    So, how do these three pillars work together? They are in constant communication, passing information back and forth to create the seamless experience Alex enjoys. This diagram shows a high-level view of our architecture:

    As you can see, the AR Application on Alex’s device is constantly talking to the Cloud Platform, requesting data like product locations and sending data like user requests. Simultaneously, the In-Store IoT Network is feeding live data to the Cloud, ensuring the entire system is synchronized with the real world.

    With this blueprint in place, It creates a clear path forward for development.