**Design Diary** Timeless Craftsmanship of Maltese Artisans

It does not directly has to do with my Design Research but I want to share what I learned on my travel to Malta and Gozo from an design perspective.

In Malta there is a rich culture of Craftsmanship in Malta, especially Maltese Artisans at Ta’ Qali and the Ta’ Dbieġi Artisan Village. Lastly is the oldest Artisan Village on the sister island of Gozo. From pottery, watercoloring to jewelery and embroidery. These villages boasts some of the finest local craftmanship, which can be enjoyed daily by anyone seeking to buy products of high quality, created on-site.

The Malta Crafts Foundation is also collaborating with the Directorate for Lifelong Learning & Employability within the Ministry for Education, Youth, Sport, Research and Innovation in order to develop more artisanal courses, thereby enhancing the variety of artisanal courses being offered through Lifelong Learning.

A variety of workshops is offered to anyone interested in learning Maltese crafts. For example traditional Maltese hand-painted lettering and sign writing, known in Maltese as tberfil.

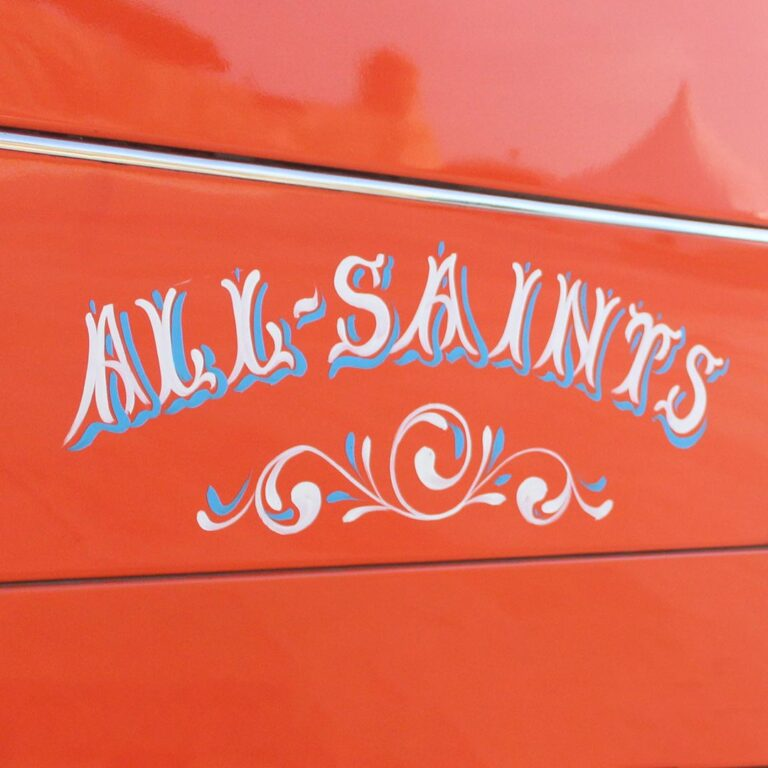
Traditional Maltese lettering is a distinctive art form of hand-painted lettering and signwriting commonly found on Maltese buses, boats, and other forms of transport.

Ganutell is also something very local and traditional. Students will learn the intricate art of combining fine wires, thread, and sequins to form delicate and unique floral decorations. Materials used include cotton, satin, and silk thread, different types of fine wire, bouillon, beads, and pearls.

I also want to feature a few local artists, that inspired me:
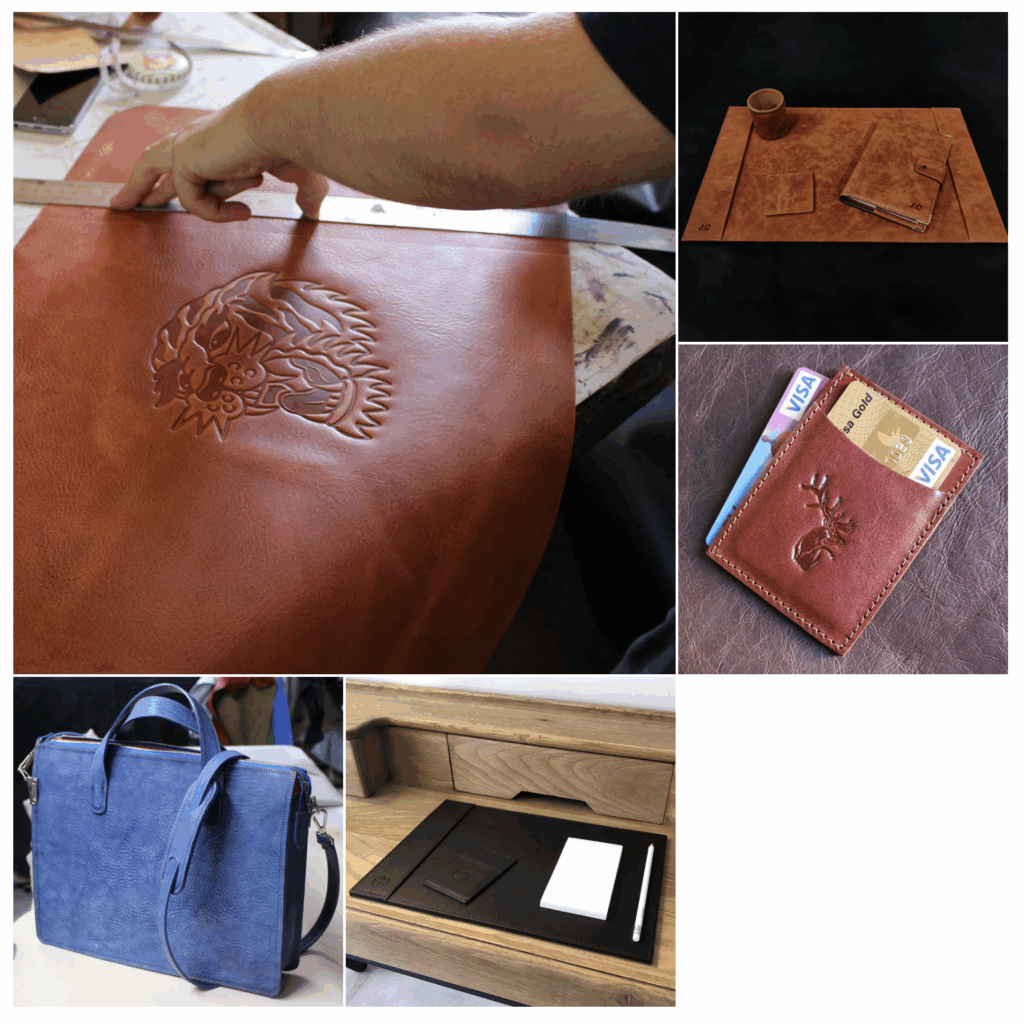
The Leather House

Established in 1965 by Mary Debono and her mother Carmela Vella, The Leather House started as an exporter of fine leather gloves to the United Kingdom and Scandinavia. Together with their Gozitan handcraft workforce, they have supplied various high street shops, movies, and Broadway shows, including the movie Titanic and the play Cats.

Today the business is in the hands of the third generation, Mary’s sons Rodney and David. Under the guidance of their mother, they have expanded their business of leather products both locally and in new territories – such as North America, UAE, Africa, and Japan – taking their business to all the continents of the world. They produce bespoke restaurant menus, hotel accessories, high fashion bags, belts, and much more with the client’s label or logo. All leather used by The Leather House is imported from top European leather tanneries to keep a high standard in both quality and, most importantly, sustainability.

Workshop: TBG 025, Ta’ Dbieġi Artisan Village, Triq Franġisku Portelli, Għarb, Gozo

Katrin Formosa

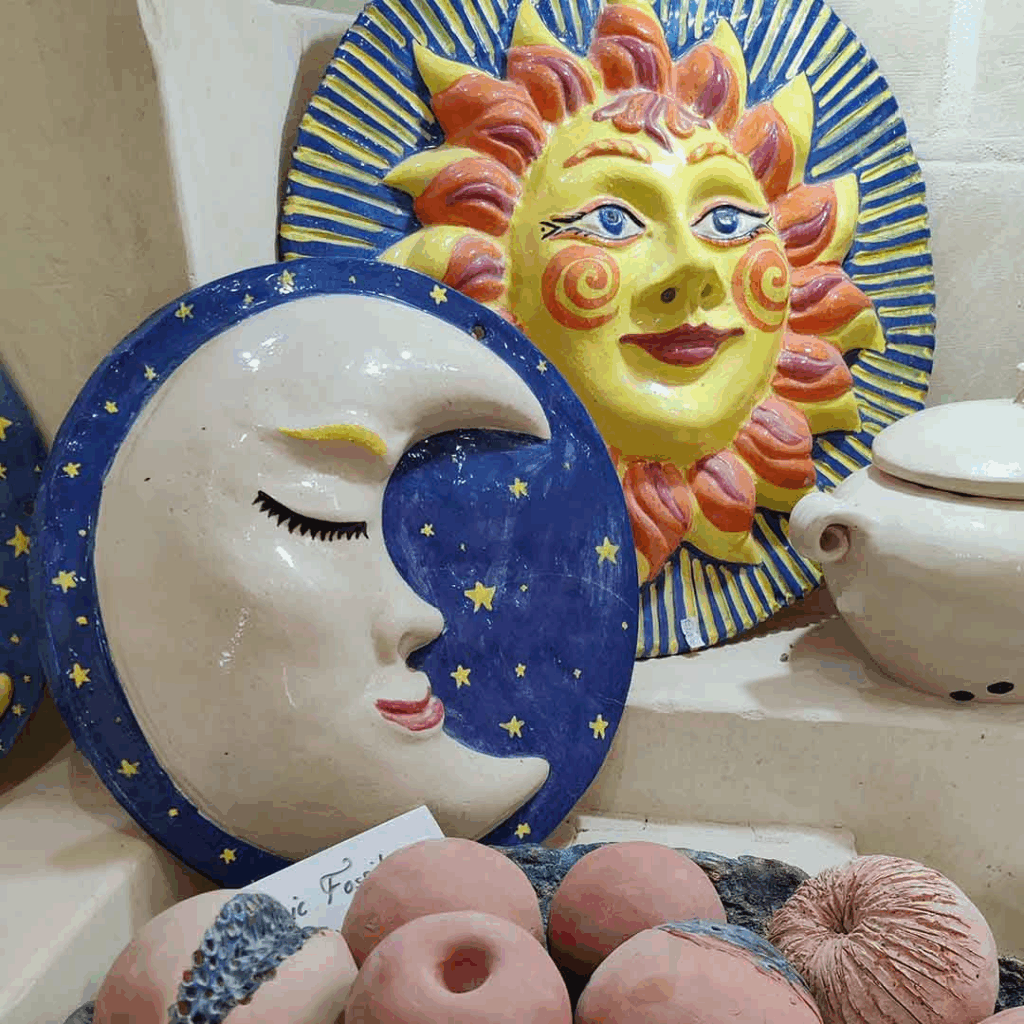
She started ceramics and mosaic as a hobby in 1983, whilst living in New York, where she lived until 1988. She moved back to Gozo and set up the Gozo Pottery Barn at the Ta’ Dbiegi Artisan Village in 1989, which she still operates today. Nowadays, she has a sustainable business, producing locally handmade products.

Katrin is very creative and innovative in her designs and creates items which bear a local and folkloristic mark. She also creates artistic, abstract, one offs and gallery items which are exhibited at her studio within the Artisan Village. Her clientele includes both locals, as well as tourists. She also teaches pottery and mosaic at the Lifelong Learning Education Centre in Gozo and organises short ceramics and mosaic appreciation sessions for tourists at her studio, as well as pottery sessions for kids in summer.

Workshop
TBG 007 and 018, Ta’ Dbieġi Artisan Village, Triq Franġisku Portelli, Għarb, Gozo

Abel and Adrienn Bartolich

At Lace of the Fields Cactus Jewellery, they create unique colourful botanical custom jewellery from a unique material: the dried lace-like fibre pieces of Malta’s iconic plant, the prickly pear cactus.

Their cactus creations are absolutely one-of-a-kind, thanks to the amazingly detailed and intricate patterns of the cactus fibre, as well as the full manual procedure of the preparation which they worked out themselves based on their experiences in different crafts and arts.

For the colourful finishes they draw their inspiration from the beautiful nature of the Maltese islands: the fresh ripe pomegranates, the magical-looking ancient saltpans, and first of all, the majestic and awe-inspiring Mediterranean Sea.
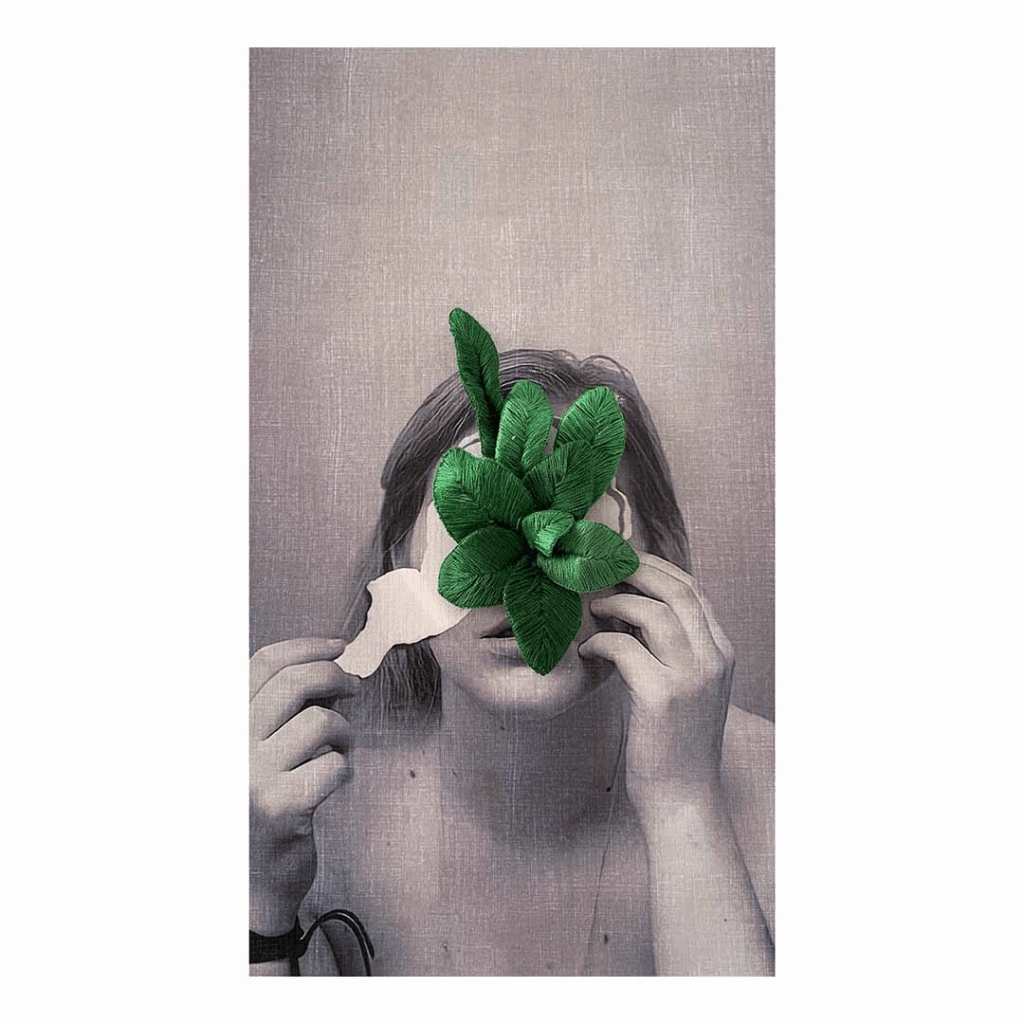
Ebru Cinar

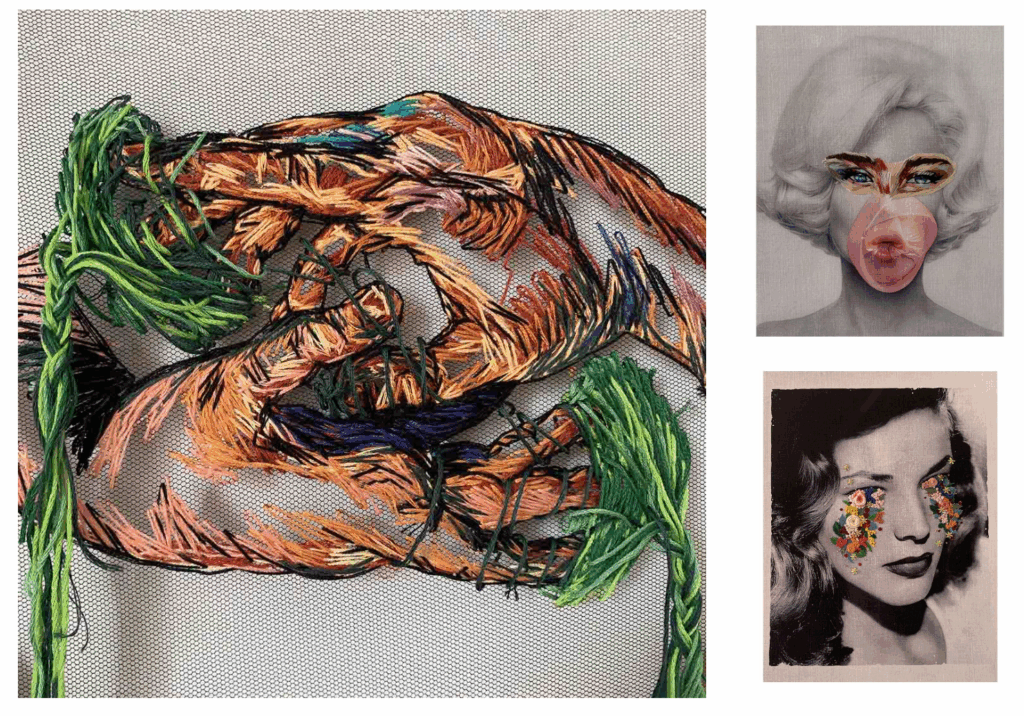
She was born in 1988 in Turkey and spent a lot of time of her childhood in a village named Karacabey. Before moving to Malta, she also lived for two years in Poland, which had a lot of effect on her perception.

She created her brand byebrucinar in 2016. She has been reflecting her inside world on framed fabric using the inspiration from modern world topics. Artifacts of her toil are represented on fabrics and canvases with a mixture of embroidery, textile printing, acrylic paint, and other materials.

Christopher Saliba

After qualifying as an art educator in 1996, Christopher Saliba was awarded a four-year scholarship at the Accademia di Belle Arti in Perugia, where he focused on contemporary art. He put up several solo exhibitions in local exhibition venues, among which the National Museum of Fine Arts, St James’ Cavalier Centre for Creativity, and Auberge d’Italie in Valletta.

Christopher also displayed his works abroad in solo and collective exhibitions, namely in Perugia, London, Paris, Palermo, Manama, Brussels and Milan. Christopher’s works are found in numerous private and public collections in Malta and across Europe, Japan, Australia, Canada, and the US.
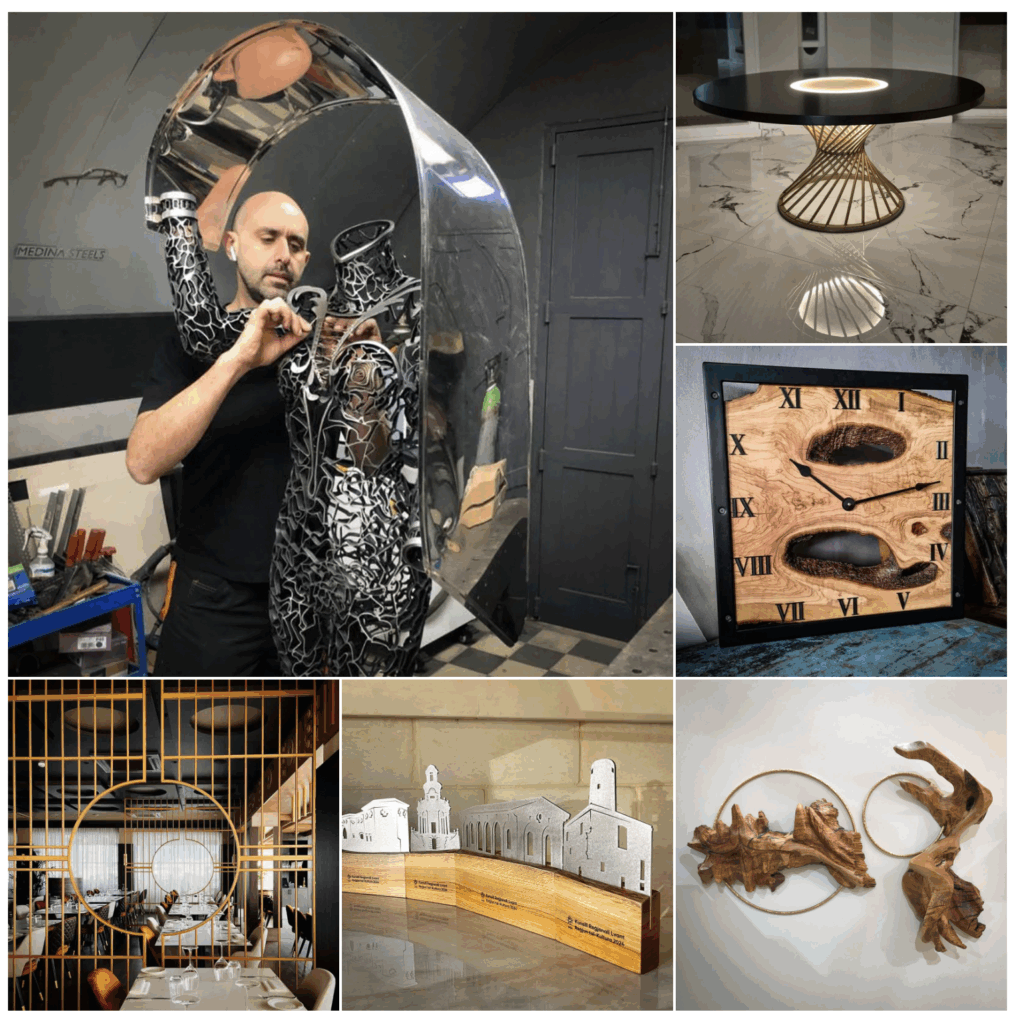
Christian Bezzina

Christian Bezzina’s work at Medina Steels epitomises luxury craftsmanship by blending artistic vision with engineering precision. With over 20 years of expertise in steel fabrication, he has mastered the creation of bespoke high-end metalwork and specialises in luxury tailor-made designs, from intricate metal art to grand statement pieces.

Each piece is a unique personalised masterpiece crafted to the highest standards. With meticulous attention to detail and an unwavering commitment to excellence, Christian transforms visionary concepts into stunning enduring works of art setting the benchmark for bespoke metalwork in exclusive residential and commercial spaces. Despite his creative career he has a Mechanical and Electrical Engineering Diploma.

Resources:

Preparing for the Interviews

Being that I also want to include interviews in my documentary, but have never conducted a proper interview before, I knew that I needed to do some research on the topic as to not end up with dull and uninteresting questions leading to answers of the same kind. That is why for this blog post I read through the chapter “Conducting an Interview” in the book “Making Documentary Films and Videos” by Barry Hampe (Hampe, 2007) and I will try to sum up what I took from it and what could prove to be helpful for my own project.

As with every aspect of shooting a documentary, preparation is key for conducting interviews which drive your story forward and intrigue your viewers. You should find out as much as you can on the subject beforehand, also try to find out what you don’t know or what can’t be found that easily by just doing research. Those will be the questions you want to ask the experts on the topic.
Nonetheless, when actually conducting the interview, don’t forget who you are recording the answers for. The viewers of your film will most likely be much less informed on the topic than you will be after months of research. So ask the questions in a way that the answers will be understandable to listeners of any knowledge level. Also don’t shy away from saying things like “I don’t know about that” or “I don’t understand” even if it’s not true. It will help your viewers understand the full picture and follow the story more easily.
You can also ask the interviewees beforehand if they have any suggestions for questions you should ask, but always make it clear that you will also be asking other questions.

For filming the actual interview make sure you choose a location which is interesting and helps the story along, but also one where the interviewee will feel comfortable. Always make sure to arrive earlier than your interviewee in order to set up everything for the interview without them there. Hampe also suggests to shoot interviews first before getting any other footage of your interview partners where you might have to direct them to act in a certain way, as that might also bias them for the answers they give you during the interview. Moreover, shooting the interview first will give you an idea of what footage you will need to support what is being said.

Also always keep the edit in mind when shooting an interview. You only want to change your settings or camera whilst asking questions (if they’re going to be left out of the final film) in order to be able to use the answers cohesively. There is nothing worse than getting the perfect statement on audio but not having the visual to go with it.

Concerning the questions you want to ask, always make sure to avoid “yes or no” questions, instead aim for more open ended questions which prompt your interviewee to tell a full story from beginning to end. But maybe even more important than what questions to ask is to actually listen to the answers. Show the speaker that you are interested in what they have to say and don’t limit yourself to just your list of questions, they are more like a checklist of things you want to ask and suggestions for when the interview slows down. Questions that come up naturally in the flow of the conversation can lead to much more authentic and interesting answers in the end. Also don’t be afraid of silence, let them breathe for a bit after their answer to see if there might be something else they want to add. Often times silence will prompt more answers than more questions.

In the end, Hampe states that after every interview there are still two more questions to ask “Is there anything I should have asked you that I just didn’t know enough to ask?” and “Is there anything you’d like to say that you haven’t had the chance to?”. These two questions give the interviewee the opportunity to give answers they might have prepared but that they didn’t think fit any of the questions and might lead to some very interesting content.

With all of that said, conducting great interviews takes practice, and lots of it. Hempe suggests including that practice into your daily life by not just having conversations with the people you meet but to actually interview them.

Literature

  • Making Documentary Films and Videos – Barry Hampe

NIME Review – Juggling for Beginners by Zeynep Özcan, and Anıl Çamcı

I recently read a paper presented at NIME 2024 called “Juggling for Beginners: Embracing and Fabricating Failure as Musical Expression”. It immediately caught my attention, not only because of its playful title, but because it challenges some of the deepest assumptions we have about performance, skill, and music-making.

What the paper is about

The paper I read introduces a musical interface that is unlike anything I’ve seen before. Instead of rewarding precision or control, it creates music from failure. The authors designed a system that turns unsuccessful attempts at juggling into expressive sound.

The concept is as charming as it is deep. A person begins juggling (or trying to), and the system tracks their movements. Instead of focusing on how well the person juggles, the software listens for the irregularities—the clumsy throws, the missed catches, the awkward flailing—and those gestures are what drive the music. The worse you are at juggling, the more interesting and expressive the sound becomes.

This flips the usual narrative of performance entirely on its head. Instead of needing years of practice to produce something worth hearing, this instrument invites beginners to make music from the get-go. It doesn’t ask you to be good—it asks you to be honest and in motion.

A beautiful rethinking of performance

What I found most powerful in this work is the idea of embracing mistakes not just as accidents, but as an essential part of the musical expression. In so many areas of life—especially in music, dance, and design—we are taught to rehearse, refine, and perfect. Only when we’ve eliminated our errors do we feel ready to perform. But this project suggests the opposite. What if mistakes are the very thing that makes a performance meaningful?

This feels incredibly precious and unusual. It invites a kind of vulnerability that we don’t often associate with technology-based interfaces. There is something beautifully human about using failure as a medium. And more than that, it opens the door to people who might never have considered themselves performers. You don’t need skill to play this instrument. You just need to show up and try.

The paradox of getting better

One interesting point the authors raise is that, over time, players naturally begin to improve at juggling—even without trying. Our bodies quietly refine our motor skills in the background. As a result, the spontaneous mistakes that originally made the music expressive start to disappear, and the performance begins to feel more controlled and less surprising.

To counteract this, the authors suggest modifying the sound engine itself to subtly provoke mistakes. By introducing stochastic elements—randomized or unpredictable changes to how juggling movements are translated into sound—they can gently “distract” the performer. The idea is that the sonic feedback becomes less stable, less predictable, and this in turn prompts more slips and errors. I found this approach really elegant because it keeps the performer in that beautiful, vulnerable space of not quite knowing what’s going to happen next.

My thoughts

Personally, I find the idea of making music from failure deeply moving. It’s not just a technical innovation—it’s a philosophical one. It makes space for the unpolished, the nervous, the beginner. It reminds me that expression doesn’t have to come from mastery. It can come from trying, from stumbling, from not quite knowing what you’re doing.

In a culture that constantly pushes us toward perfection, this work feels like a breath of fresh air. It reminds me that technology doesn’t have to make us faster, better, or more precise. Sometimes, the most poetic thing it can do is reflect our imperfections back to us in a way that feels like music.

Shotlist

Der erste Instinkt beim Dokumentieren eines einmaligen Events oder realer Ereignisse wäre vermutlich, das Ganze einfach auf sich zukommen zu lassen und darauf zu vertrauen, dass man die “richtigen” Shots schon erkennen und einfangen wird. Dass man ja nicht planen kann was passieren wird und dass die Authentizität des Filmes leiden würde wenn man schon im Vorhinein planen würde, was passieren wird. Denn wie sollte man denn wissen, was passiert, was die Personen sagen oder tun werden?

Natürlich kann man beim Filmen von Dokumentationen nie genau vorhersagen, wie sich die Szenen und die Geschichte entwickeln werden, jedoch ist es deshalb umso wichtiger, gute Vorarbeit zu leisten und sich entsprechend vorzubereiten. Gerade weil man nicht wissen kann was genau passieren wird, sollte man auf viele unterschiedliche Situationen vorbereitet sein. Also ist das erstellen einer umfangreichen Shotlist unumgänglich. Hier können alle Shots gesammelt werden, auf die beim Filmen besonders geachtet werden soll und die essentiell sind um die Geschichte voran zu treiben. Damit erleichtert man sich auch die Arbeit im Schnittprozess erheblich und schafft eine klare, konzise Geschichte zu erzählen (studiobinder, 2025).

Im Folgenden werde ich deshalb eine erste Version meiner Shotlist erstellen mit den wichtigsten Schlüsselszenen die ich für meine Kurzdokumentation brauchen werde. Im weiteren Verlauf wird diese Shotlist vermutlich noch erweitert, angepasst und verändert werden, nichtsdestotrotz ist es immer gut ein gewisses Grundgerüst zu haben anhand dessen man weiter arbeiten kann.

Shotlist Auto:Frei:Tag

Shot 1: wide shot von übervollen, dreckigen Straßen, vielleicht Uhrturm im Hintergrund
Shot 2: close up eines rauchenden Auspuffes oder von toten Pflanzen
Shot 3: schnelle Zwischenschnitte von einer Straße ohne Autos, mit vielen Menschen, gute Stimmung
Shot 4: wide shot vom Auto:Frei:Tag, etwas entfernt
Shot 5: top down shot vom Geschehen (vielleicht aus einer Wohnung?)
Shot 6: Einblendungen von Grafiken über Shot 5, eventuell zoom out zu Karte von Graz
Shot 7: top down shot vom Auto:Frei:Tag
Shot 8: medium/close shot eines bestimmten Aspekts (Banner, Stand, Straßenkreide…) von oben
Shot 9: close up desselben Aspektes aber dieses mal von der Straße aus
Shot 10: medium shot von Menschen am Event
Shot 11: close ups von interessanten Szenen
Shot 12: wide shot des Events
Shot 13: medium shot interview mit Personen am Event, mitten im Geschehen
Shot 14: zweite Kamera Interview, medium
Shot 15: andere Person in der gleichen? Location
Shot 16: medium shot von Person aus der Organisation die am Auto:Frei:Tag arbeitet
Shot 17: Interview mit derselben Person, etwas abseits, man sieht das Event noch im Hintergrund
Shot 18: zweite Interview Kamera, close up
Shot 19: B-Roll vom Event aber auch von negativen Szenen über die sie vielleicht sprechen werden
Shot 20: eventuell noch andere Interview Partner
Shot 21: positiv enden mit Frage zu optimistischen Zukunftsvisionen
Shot 22: wide shot des Auto:Frei:Tages

weitere Shot Ideen als B-Roll / Füller

  • close up beim Straßenkreiden malen
  • Timelapse von oben
  • Hyperlapse beim hineingehen in die Straße
  • slow shutter shot von einem Auto:Frei:Tag Schild/Banner an dem Personen vorbeigehen
  • shot von unten, eine Person die von hinten über die Kamera steigt
  • direkter Übergang von Straße mit Autos zu leerer Straße
  • am Ende nochmal die leere Straße, ohne Autos, ohne Menschen (wide)

Wie bereits zuvor erwähnt ist diese Shotlist eine erste Version, die noch verändert und überarbeitet werden wird und auch während des Drehs wird sich sicher noch einiges ändern weil sich neue, unerwartete Situationen ergeben und einige der erwähnten Shots sich vielleicht als unmöglich zu realisieren herausstellen werden. Jedoch bietet es sich trotzdem an eine große Sammlung an möglichen Shots vorab zu erstellen, um sichergehen zu können dass im Nachhinein nichts Wichtiges fehlt.

Für die finale Shotlist fehlen hier natürlich noch einige wichtige Angaben so wie das zu verwendende Equipment, die genaue und detaillierte Beschreibung des Shots und der Perspektive sowie die genaue Location und andere essentielle Details. Das alles kann zum Beispiel mit Software wie der von Studiobinder (studiobinder, 2025) für die Erstellung von Shotlists genauestens dokumentiert und geordnet werden um den Überblick zu behalten und Änderungen einfach und schnell durchführen zu können.

Literatur:

Vector vs. Bitmap – What’s the More Sustainable Choice in Design?

Introduction

In digital design, the choice between vector and bitmap graphics significantly affects file size, scalability, and energy usage. While the decision is often aesthetic or technical, it also has environmental implications. This blog entry explores the sustainability potential of vector graphics compared to bitmap (raster) formats and provides a practical example to measure the difference.


Understanding the Basics

Bitmap (Raster) Graphics

Bitmap images are made up of pixels. Common formats include JPEG, PNG, and GIF. They are resolution-dependent and can become pixelated when scaled. Bitmaps are suitable for photographs and detailed imagery but often result in large file sizes.

Vector Graphics

Vectors are made from paths defined by mathematical equations. Common formats include SVG, PDF, and EPS. They are resolution-independent, lightweight, and ideal for logos, icons, and flat illustrations.


Sustainability Aspects

FactorBitmapVector
ScalabilityResolution-dependentInfinite scalability
File SizeOften largeTypically smaller
Energy UsageHigher (more data transfer)Lower (simpler rendering)
Reuse PotentialLimited (often recreated)High (easy to modify & reuse)

According to Dougherty (2008), every kilobyte counts in sustainable design. Since vectors can achieve comparable visual results at a fraction of the file size, they are a clear choice for low-impact assets.


Practical Exercise: Circle Export Test

To test the impact in practice, I exported a simple red circle in Adobe Illustrator (vector) and Adobe Photoshop (bitmap) with similar dimensions (400×400 px).

Step 1: Creating the Circle

  • Illustrator: Created using vector shapes
  • Photoshop: Created using raster layers, then exported to PNG
Circle created using vector shapes/using raster layers

Step 2: Export & Comparison

FormatSoftwareFile SizeFormat Type
SVGIllustrator3 KBVector
PNGPhotoshop128 KBBitmap

Despite displaying visually the same circle, the bitmap version was more than 40 times larger than the vector file.

Step 3: Load & Carbon Impact

Using a performance analysis in the browser dev tools and carbon calculator, the SVG loaded instantly, with minimal data transfer. The PNG added weight, requiring more energy to display.


Key Insights

  • Vectors are significantly more sustainable for UI elements, logos, icons, and flat illustrations.
  • Raster formats are only necessary when dealing with complex photographic detail.
  • Designers should consider the carbon footprint of every exported asset, especially when creating large libraries for web or mobile.

Conclusion

While both formats have their place in design, sustainability favors vectors, especially in web and interface contexts. Designers can reduce environmental impact by defaulting to vector formats and only using bitmaps when truly necessary. It’s a small change in workflow with long-term benefits for energy efficiency and faster performance.


References

  • Dougherty, B. (2008). Green Graphic Design. Allworth Press.

Green Hosting – Does It Really Matter?

Introduction

While much attention in sustainable design focuses on visual and technical optimization, the underlying infrastructure, specifically web hosting, plays a crucial role in a website’s environmental footprint. This entry investigates how green hosting compares to conventional hosting and explores practical steps for making more sustainable decisions.


Practical Exercise

Objective: Comparing the impact of traditional vs. eco-friendly web hosting providers.

Step 1: Research & Selection

I compared three hosting services:

ProviderGreen Energy UsageCertificationNotes
GreenGeeks300% wind energy offsetEPA Green Power PartnerActively carbon negative
Kualo100% renewableGreen Web FoundationBased in the UK
GoDaddy (Baseline)Unknown / minimalNoneCommon, not sustainable
GreenGeeks hosting
Kualo hosting
GoDaddy(Baseline) hosting

Step 2: Mini Website Deployment

I deployed a basic HTML landing page on both a traditional host and a green host (GreenGeeks) to compare performance and carbon footprint using Website Carbon Calculator.

Step 3: Comparison Results

MetricTraditional HostGreen Host
CO₂ per visit~1.76g~0.21g
Renewable Energy UsageLow100%
Load Time (average)0.9s0.7s

Key Insights

  • Hosting with green providers can reduce CO₂ emissions by up to 85–90% per visit.
  • Load times remained equal or improved slightly on green servers.
  • The environmental impact of hosting is often invisible to designers, but it significantly contributes to a project’s carbon footprint over time.

#2 Experiment: Studies

The following blog posts will focus on finding my own illustration style. Since I hope to work as an illustrator one day, I’m currently exploring ways to develop a personal and recognizable style. To do that, I’ll try out different methods and experiments to test new techniques and evaluate the results. I want to document this journey in my blog and share my experiences along the way.

To begin, I’m focusing on doing studies. Improving at drawing takes time, patience, and a lot of practice – mastery comes with repetition. That’s why I’ve decided to dedicate one week at a time to studying a specific subject, such as animals, objects, or body parts. Ideally, I’ll choose subjects I struggle with or want to improve in. During that week, I’ll dive deep into the topic.

The goal is to explore different ways of depicting the subject, try out new techniques, and find out which approaches feel most natural to me.
For the first week, I chose the raven – birds are especially difficult for me to draw. Over the course of the week, I plan to draw the raven in a variety of styles and techniques, from quick sketches to detailed studies and even abstract interpretations.

At the end of the week, I’ll reflect on the process with a short review:
• Which methods did I enjoy the most?
• Where did I learn the most?
• Which approaches do I want to continue using in future studies?

For me, the most important part isn’t a perfect final result, but what I learn during the process: understanding how I approach a subject, which techniques suit me, and where there’s still room to grow.

Reflection
Now that I’ve completed the first study, I’ve taken some time to reflect on the results. Overall, I really liked the approach and found it very helpful. After spending a full week focused on the raven, I can now draw it from memory, and understanding its proportions has become much easier.

I realized that you need to draw a subject at least once to really grasp how its proportions relate to one another, this became especially clear during the study. I also found the step-by-step approach, from rough sketch to detailed drawing, very effective and logical.

What I found least helpful was the geometric breakdown. It didn’t offer me any real insight, so I’ll skip it in the future. Instead, I’d like to add a color study next time to improve my understanding of light, shadow, and mood.

Das Grundgerüst

As a quick introduction I have to mention that from here on out I will most likely write the blog posts that are directly connected to my semester project in German, given the fact that the video will be in German and thus writing out all of the planning and story ideas in English would just mean twice the work. Therefore I must sincerely apologise to my many English speaking readers who have followed my posts with great interest and enthralment thus far.

Für eine erste Idee, wie ich die Kurzdoku zum Thema Auto:Frei:Tag aufbauen könnte, habe ich – gemeinsam mit ChatGPT – eine erste Struktur ausgearbeitet, die ich im Folgenden kurz zusammenfassen und beschreiben werde.
Vorab noch zum Stil und zur Stimmung des Filmes; der dokumentarische Charakter soll zwar nicht verloren gehen, ich will mich aber trotzdem eher darauf fokussieren, die Stimmungen und Meinungen der teilnehmenden Personen zu dokumentieren, anstatt rein harte Fakten zu präsentieren. Ich hoffe, dass es mir gelingen wird eine gute Mischung zu finden.

Der grundsätzliche Aufbau

  1. Der Einstieg (ca 1min):
    Das Problem wird aufgezeigt, volle Straßen, lärmende Autos und dazwischen kein Platz zum leben. Im VoiceOver wird hier auch direkt angesprochen, wo das Problem liegt und es wird angedeutet bzw in Aussicht gestellt, wie es wohl anders gehen könnte. Hier kann sehr deutlich der Kontrast aufgezeigt werden zwischen der Stadt voller Autos und der Idylle am Auto:Frei:Tag mit schnellen Schnitten zwischen den beiden Szenarien.
  2. Einführung ins Thema (ca 1,5min):
    Es wird erklärt und präsentiert, was Auto:Frei:Tag überhaupt ist, entweder mit Hilfe des VoiceOvers oder mittels O-Tönen aus Interviews mit Organisator:Innen des Auto:Frei:Tags. Hier kann außerdem mit Grafiken und Diagrammen gearbeitet werden, die helfen können einige Fakten zu visualisieren. Beispielsweise kann hier anhand einer Karte gezeigt werden, wo und wann bisher überall Auto:Frei:Tage stattgefunden haben. In diesem Abschnitt geht es zwar darum, zu erläutern worum es bei der Aktion geht, trotzdem sollten aber die Emotionen und Überzeugungen der Organisator:Innen im Vordergrund stehen und nicht die Fakten.
  3. Das Event an sich (3min):
    In diesem Hauptteil des Videos wird ein Auto:Frei:Tag begleitet und dokumentiert. Hier soll die Stimmung der Veranstaltung eingefangen werden, sowie die Emotionen und Meinungen der Besucher zu der Organisation und zu autofreien Zonen im Allgemeinen. Diese Szenen können einen starken Kontrast zu der Straße voller Autos zu Beginn des Videos darstellen.
  4. Stimmen aus der Organisation (ca 2,5min):
    Hier kann mittels der zuvor verwendeten O-Töne eine Verbindung zum Anfang des Videos hergestellt werden. Mitglieder der Organisation werden interviewt und dazu befragt, warum sie sich so für die Sache einsetzen und welche Probleme ihrer Meinung nach behoben werden müssen. Hier kann auch der Bogen zur möglichen Zukunftsvision gespannt werden, indem die Personen nach ihrer Vorstellung der Zukunft gefragt werden.
  5. Zukunftsvisionen (ca 2,5min):
    Für einen positiven Abschluss der Kurzdokumentation kann ein Bild einer besseren Zukunft gemalt werden. Zum Einen indem man Besucher:Innen sowie Organisator:Innen des Auto:Frei:Tages zu ihren Wünschen für die Zukunft befragt und zum Anderen könnte man auch zeigen, wo das Prinzip “autofrei” schon heute erfolgreich gelebt wird, wie zum Beispiel in der autofreien Siedlung in Wien.

Ton und Stil

Wie bereits zu Beginn erwähnt soll diese Kurzdokumentation zwar informieren und den Zuseher:Innen erklären, was der Auto:Frei:Tag ist und welche Probleme er zu lösen versucht, aber gleichzeitig soll sie auch nicht zu Fakten-lastig oder belehrend werden, sondern stattdessen an die Emotionen der Zuseher:Innen appellieren. Ziel des Videos soll es sein, ein Bewusstsein dafür zu schaffen, welche Probleme die vollen Straßen in unseren Städten auslösen und wie eine Stadt der Zukunft möglicherweise aussehen könnte. Außerdem soll gezeigt werden, dass es Aktionen wie den Auto:Frei:Tag gibt und auch wie man daran teilnehmen oder selbst aktiv werden kann indem man selbst Events organisiert beziehungsweise anfragt oder einfach indem man an ihnen teilnimmt und Bekannten und Freund:Innen davon erzählt, um das Bewusstsein in der Bevölkerung zu steigern.

AI Disclaimer: Für die Erarbeitung der Struktur für das Video wurde ChatGPT genutzt.

12 First Steps with Arduino

It’s not knowing that drives you mad. ~ Jenny Valentine

I read this quote somewhere on the internet and thought, this would be a great start to a new blog post, since it describes my struggles to start doing prototypes. I had no idea, where I should start or what I should do. With no clear direction in mind, I just started doing something. Since the start of this semester I have gotten really interested in Arduino. After the Arduino was introduced to us during class, I took one home and I have been wanting to create/ do something with it.

Developing a first Idea

Being a scout for over a decade, I have encountered multiple ways of encoding a message, mainly as riddles though. So the first idea I had was to create a device, that lets you encode a message. And the easiest one I thought of was morse code. I started, by attaching Modulino modules, pre-built circuit components like sensors or displays, to an Arduino. I used a three button module and the “pixel”, a board housing eight LEDs, one at first.

The idea was simple, by pressing the first button, the Arduino would receive a dot. Pressing the last one would send a dash and the middle one would be used to stand a slash, which is used in written morse code to communicate a break between letters, words and sentences. The first part was very simple, I created a sketch, that wrote the received button pushes as symbols into a string. I created this very easy and very fast.

Since I could write messages now, I needed a way to actually send the message and clear the message, so people could send a new one. First I tested if the Arduino would recognise multiple buttons being pressed at the same time, but it doesn’t. So I came up with the idea of incorporating an end signal, in my case, sending four consecutive pauses would result in the message being “send” or for now displayed and cleared.

Next, I wanted to be able to also display the message, at first I tried to attach the pixel Modulino and use its LEDs to display the message. This would make it easy to decipher between dots, dashes and breaks since each sign could be displayed clearly. Sadly, I couldn’t figure out, how to make the LEDs light up in the way I wanted them to. During most of the tests, they wouldn’t turn on at all or all of them would show the same color, with no difference between dot and dash. So I turned to a different solution, the buzzer, a Modulino that makes buzzing sound, with varying frequencies. Using the buzzer to output the message was much easier and I didn’t have any problems implementing it.

Current State

This was a lot of text now, since I forgot to take pictures I could attach here, but to showcase the first prototype, her is a short video showing the functionality of the current model. The video is in german but I think it will help illustrate, what I did and what the prototype does.

What’s next?

Developing this simple concept further I would want to make use of the wifi capabilities that the Arduino board I am using provides. This way a wireless connection between two Arduinos could be used to send and receive message. As an extra the LED Matrix of the Arduino could display the received letters in clear text so the person receiving doesn’t even have to know morse code, to decipher it.

A setup like this could be used in an escape room, in which two teams of kids have to work together, to open the door, but their only way of communication is to use morse code and send it using the two Arduinos. That way they could share information and complete the next riddle.

Instructions

For this first version, you don’t need a lot, for hardware you would need:

  • an Arduino (capable of using Modulinos)
  • the three button Modulino
  • the buzzer Modulino

After attaching the Modulinos tho the Arduino, you would just have to plug it into a computer and upload this sketch:

#include <Modulino.h>

ModulinoButtons buttons;
ModulinoBuzzer buzzer;

int frequency = 1000;
int duration = 1000;

int countB = 0;

bool button_a = false;
bool button_b = false;
bool button_c = false;

String message = String("Saved Message:");

void setup() {
  Serial.begin(9600);
  Modulino.begin();
  buttons.begin();
  buzzer.begin();
  pinMode(LED_BUILTIN, OUTPUT);
}

void loop() {
  if (buttons.update()) {

    if (buttons.isPressed(0)) {
      message = String(message + ". ");
      Serial.println(message);
      countB = 0;
    } else if (buttons.isPressed(1)) {
      message = String(message + "/ ");
      Serial.println(message);
      countB++;
    } else if (buttons.isPressed(2)) {
      message = String(message + "- ");
      Serial.println(message);
      countB = 0;
    }
  }

  if (countB >= 4) {
    pushMessage();
    message = String("Saved Message:");
    countB = 0;
    Serial.println("Message cleared!");
  }
}

void pushMessage() {
  for (int i = 0; i < message.length(); i++) {
    if (message[i] == '.') {
      digitalWrite(LED_BUILTIN, HIGH);
      buzzer.tone(frequency, duration);
      delay(150);
      digitalWrite(LED_BUILTIN, LOW);
      buzzer.tone(0, duration);
      delay(250);
    } else if (message[i] == '-') {
      digitalWrite(LED_BUILTIN, HIGH);
      buzzer.tone(frequency, duration);
      delay(500);
      digitalWrite(LED_BUILTIN, LOW);
      buzzer.tone(0, duration);
      delay(250);
    } else if (message[i] == '/') {
      delay(1000);
    }
  }
}

Lastly, I wanted to share some takeaways from my first “prototype”. Just starting to do something, with no clear goal in mind at first really sparked my motivation, to develop other little projects using the Arduino. Furthermore, I made small “prototypes” of code, that I test before incorporating them into the real thing. Aiming to understand how something works first, before using it. Lastly, I really need to take more pictures, so future blogposts are more interesting. ;D

NIME Review – “Sound Kitchen”

The paper “Sound Kitchen: Designing a Chemically Controlled Musical Performance” presents a project in which chemical reactions were created and used to trigger different sounds. The reactions were sampled and mapped into a “sound recipe” and showcased as a live performance. Different chemical processes and substances were carefully selected based on certain criteria like availability, safety, controllability, and range. The creation of sound was the main focus; however, since it was meant to be a live performance, visual appeal was also considered (colorful liquids like red wine and orange juice were chosen over clear vinegar). Chemical reactions are used not just as metaphors (or visuals) in performance, but as literal sound generators. Through the manipulation of chemical properties—like electrolyte mixtures and their reactive behaviors—electrical signals are generated and fed into computer systems, where they are shaped and sonified.

The project was created as part of a course called “Human Computer Interaction Theory and Practice: Designing New Devices.” It is an interesting study of the process of creation—drawing parallels between the art of cooking and the art of music: creating a carefully crafted dish and composing a piece of music. Different ingredients and processes alter the final outcome, directed by a composer or chef who controls the composition and final product.

Personally, this new angle of looking at music and approaching composition in such a tangible way was very interesting. Especially as someone who doesn’t know a lot about music and sonification, but is very interested in cooking and baking, I found this experiment gave me a new perspective on the composition of music.

What’s especially interesting about this idea for me as an interaction designer are the implications for almost every interdisciplinary design field and place for interaction. It is a powerful reminder to look beyond the obvious tools. It encourages us to rethink the boundaries of materiality, data, and performance, and expands our definition of what can be an interface or generate usable data (or how something seemingly unrelated can be made usable). I am thinking especially about how this can reshape how we engage with technology, nature, and art. Invisible processes, for example (in nature, cooking, our surroundings, etc.), can be uncovered—not just (as usual) via visuals, but perhaps through sound. This is a channel I, and many other installations, projects, or products, often overlook. However, in terms of ambience or even accessibility, this should be considered and explored much more.

Another thought that is more closely related to artistic aspects of the project would be the visual components of the “instrument.” I feel like it has great potential, and while already considered in some parts, I see a lot of room for improvement, since chemical reactions offer a huge amount of visually appealing options to work with. Phenomena like synesthesia come to mind, and it would be very interesting to see a close relation between the visual reactions and the generated sounds. Moving away from performance art and more into immersive, interactive, and participatory projects, this could, for example, mean an entirely new dining experience that engages all senses in a new and enhanced way.

In conclusion, this paper serves as a strong starting point for rethinking how we design—by considering and combining different sensory experiences in innovative and unexpected ways to create new experiences.


Sound Kitchen: Designing a Chemically Controlled Musical Performance: https://www.nime.org/proceedings/2003/nime2003_083.pdf