The process of creating scene-referred negative emulations requires a meticulous approach, combining traditional film stocks, digital cinematography, precise lighting conditions, and advanced post-processing techniques. This post outlines the essential tools, film stocks, and preparation steps necessary for accurate film profiling, which serves as the foundation for creating high-quality emulations. The aim is to develop LUTs (Look-Up Tables) that emulate the characteristics of film negatives, preserving their unique response to color and light.
1. Film Stocks
To establish a reliable baseline for negative emulations, it is essential to test and profile various film stocks. Luckily a few people already did all the Preparation Parts. I will use scanned film from Nico Fink, an Austrian colourist. He uses the following film stocks for profiling:
- Kodak 200T (5213) 35mm Motion Picture Film
- Kodak 500T (5219) 35mm Motion Picture Film
- Kodak Porta 400 35mm Photo Film
- Fuji Superia X-Tra 400
- Silbersalz35 Kodak 50D, 250D, 500T & 200T Motion Picture Film (respooled for stills)
- Silbersalz35 Fujifilm Vivid 500T Motion Picture Film (respooled for stills)
- Rollei VarioChrome (Special Edition)
- Agfa (expired 1979)
Some additional Stocks are tested as well, including Kodak 250D (5203), Kodak 50D (5207), Cinestill 800T, Fuji Provia 100, Fuji Velvia 100, Kodak Ektachrome E100, and Kodak Gold 200.
2. Digital Cameras for Profiling
He achieved comprehensive digital profiling, through a selection of high-end cinema cameras. These cameras are chosen based on their sensor characteristics, color science, and dynamic range:
- ARRI Alexa Mini
- RED Helium (initial test camera)
- SONY FX9
- Blackmagic Design Pocket 4K or 6K
Additional cameras, such as the RED Komodo, SONY VENICE, and Blackmagic Design URSAmini 4.6K G2, are also included depending on the project requirements.
3. Test Charts
Accurate scene-referred profiling requires precise test charts. These where used to calibrate color response and exposure latitude.
- X-Rite Digital SG
- Kodak Grey & White Card R-27
- Kodak Color Separation Guide & Gray Scale
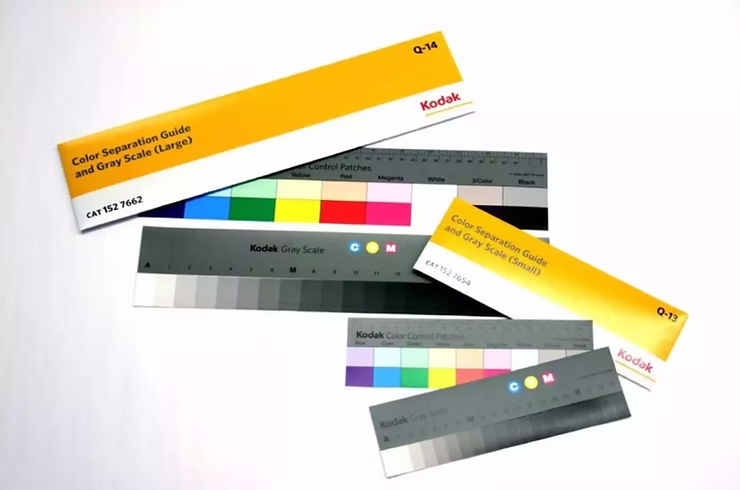
Test Charts ©https://www.kodak.com/en/motion/page/color-separation-guides-and-gray-scales
4. Lighting & Grip Equipment
Lighting consistency is crucial to ensure reproducibility across tests. An LED light source with accurate color rendition was used:
- Litepanels Gemini 2×1 RGBWW (chosen for its precision and ability to produce a wide color gamut)
- Sekonic L758-Cine Light Meter (to ensure precise exposure control)
- Photo table covered with 18% grey paper (for controlled reflections)
- Film slate with exposure and white balance information (for accurate documentation)
5. Scanning & Film Lab Processing
Scanning is a critical step in film profiling, ensuring high-fidelity digital captures of negatives.
- Foto Leutner, Vienna (stills scanning)
- Focus Film Lab, Stockholm (motion picture film processing)
- Silbersalz35 (providing film processing and scanning using a Cintel Scanner)
- Scanity 4K Scanner (for high-quality motion picture film scans)

Scanity 4K Scanner (Pic Credit: ©https://www.focusfilm.se/about)
6. Software Tools
To achieve accurate film emulation, a combination of software tools was used for color matching and LUT generation:
- Blackmagic Design DaVinci Resolve (primary color grading and LUT application)
- The Foundry Nuke (for precise curve creation and LUT extraction)
- Adobe Camera RAW (for stills conversion)
7. Workflow Overview
The workflow for scene-referred negative emulation consists of multiple controlled steps:
Conclusion
- Capture test charts under controlled lighting conditions at 5600K and 3200K with a digital camera, exposing from -5 to +5 EV in 1-stop increments.
- Expose the same test charts under identical conditions using film stocks.
- Develop and scan negatives, ensuring high consistency in digital files.
- Align digital and scanned film images in Nuke, adjusting for white balance and exposure.
- Create a 1D LUT using grayscale steps for R, G, and B channels.
- Use Resolve for color matching, refining the LUT with its built-in tools.
- Alternative: Implement Tetrahedral 3D Interpolation via Blink Script for improved color accuracy.
- Apply additional filmic effects, such as halation, grain, and gate weave, to enhance realism.
These Are the steps one one would have to make, to get an accurate result. It is very expensive and time consuming and there are so many complicated steps that can alter the result in a good and bad way. Luckily Nico Fink provides his scans for little price on his website. This saves a lot of time and the preparations are done by a professional. Now the digital Part starts. Embark with me on a technical journey on how to profile filmstock. We will try and Profile the EastmanEXR100T and 200T Filmstock.
DeMystify Colorgrading. (n.d.). Film Profile Journey: 02 – Tools, Films & (first) Preparations. DeMystify Colorgrading. Abgerufen am 20. März 2025, von https://www.demystify-color.com/post/film-profile-journey-02-tools-films-first-preparations