Intelligent Balancing – progress of automated mixing
This development phase introduces a sophisticated dual-layer audio processing system that addresses both proactive and reactive sound masking, creating mixes that are not only visually faithful but also acoustically optimal. Where previous systems focused on semantic accuracy and visual hierarchy, we now ensure perceptual clarity and natural soundscape balance through scientific audio principles.
The Challenge: High-Energy Sounds Dominating the Mix
During testing, we identified a critical issue: certain sounds with naturally high spectral energy (motorcycles, engines, impacts) would dominate the audio mix despite appropriate importance-based volume scaling. Even with our masking analysis and EQ correction, these sounds created an unbalanced listening experience where the mix felt “crowded” by certain elements.
Dual-Layer Solution Architecture
Layer 1: Proactive Energy-Based Gain Reduction
This new function analyzes each sound’s spectral energy across Bark bands (psychoacoustic frequency scale) and applies additional gain reduction to naturally loud sounds. The system:
Measures average and peak energy across 24 Bark bands
Calculates perceived loudness based on spectral distribution
Applies up to -6dB additional reduction to high-energy sounds
Modulates reduction based on visual importance (high importance = less reduction)
Example Application:
Motorcycle sound: -4.5dB additional reduction (high energy in 1-4kHz range)
This represents an evolution from reactive correction to intelligent anticipation, creating audio mixes that are both visually faithful and acoustically balanced. The system now understands not just what sounds should be present, but how they should coexist in the acoustic space, resulting in professional-quality soundscapes that feel natural and well-balanced to the human ear.
Dynamic Audio Balancing Through Visual Importance Mapping
This development phase introduces sophisticated volume control based on visual importance analysis, creating audio mixes that dynamically reflect the compositional hierarchy of the original image. Where previous systems ensured semantic accuracy, we now ensure proportional acoustic representation.
The core advancement lies in importance-based volume scaling. Each detected object’s importance value (0-1 scale from visual analysis) now directly determines its loudness level within a configurable range (-30 dBFS to -20 dBFS). Visually dominant elements receive higher volume placement, while background objects maintain subtle presence.
Key enhancements include:
– Linear importance-to-volume mapping creating natural acoustic hierarchies
The system now distinguishes between foreground emphasis and background ambiance, producing mixes where a visually central “car” (importance 0.9) sounds appropriately prominent compared to a distant “tree” (importance 0.2), while “urban street atmo” provides unwavering environmental foundation.
This represents a significant evolution from flat audio layering to dynamically balanced soundscapes that respect visual composition through intelligent volume distribution.
Semantic Sound Validation & Ensuring Acoustic Relevance Through AI-Powered Verification
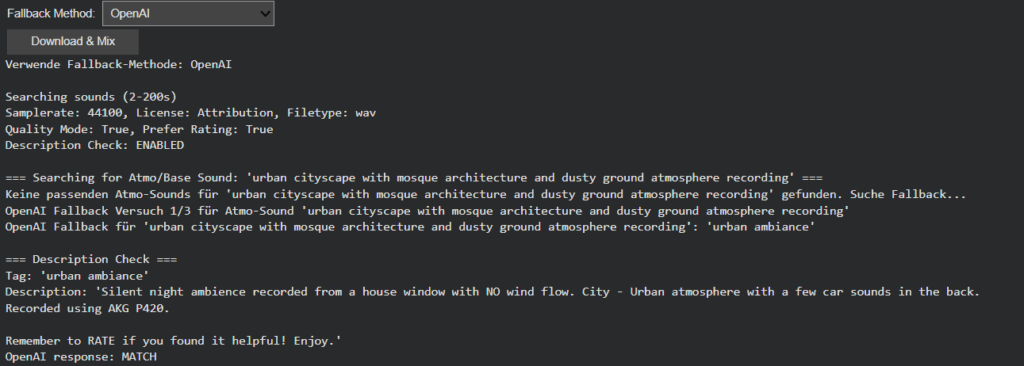
Building upon the intelligent fallback systems developed in Phase III, this week’s development addressed a more subtle yet critical challenge in audio generation: ensuring that retrieved sounds semantically match their visual counterparts. While the fallback system successfully handled missing sounds, I discovered that even when sounds were technically available, they didn’t always represent the intended objects accurately. This phase introduces a sophisticated description verification layer and flexible filtering system that transforms sound retrieval from a mechanical matching process to a semantically intelligent selection.
The newly implemented description verification system addresses this through OpenAI-powered semantic analysis. Each retrieved sound’s description is now evaluated against the original visual tag to determine if it represents the actual object or just references it contextually. This ensures that when Image Extender layers “car” sounds into a mix, they’re authentic engine recordings rather than musical tributes.
Intelligent Filter Architecture: Balancing Precision and Flexibility
Recognizing that overly restrictive filtering could eliminate viable sounds, we redesigned the filtering system with adaptive “any” options across all parameters. The Bit-Depth filter got removed because it resulted in search errors which is also mentioned in the documentation of the freesound.org api.
Scene-Aware Audio Composition: Atmo Sounds as Acoustic Foundation
A significant architectural improvement involves intelligent base track selection. The system now distinguishes between foreground objects and background atmosphere:
Atmo-First Composition: Background sounds are prioritized as the foundational layer
Stereo Preservation: Atmo/ambience sounds retain their stereo imaging for immersive soundscapes
Object Layering: Foreground sounds are positioned spatially based on visual detection coordinates
This creates mixes where environmental sounds form a coherent base while individual objects occupy their proper spatial positions, resulting in professionally layered audio compositions.
Dual-Mode Object Detection with Scene Understanding
OpenAI GPT-4.1 Vision: Provides comprehensive scene analysis including:
Object identification with spatial positioning
Environmental context extraction
Mood and atmosphere assessment
Structured semantic output for precise sound matching
The fallback system evolved into a sophisticated multi-stage process:
Atmo Sound Prioritization: Scene_and_location tags are searched first as base layer
Object Search: query with user-configured filters
Description Verification: AI-powered semantic validation of each result
Quality Tiering: Progressive relaxation of rating and download thresholds
Pagination Support: Multiple result pages when initial matches fail verification
Controlled Fallback: Limited OpenAI tag regeneration with automatic timeout
This structured approach prevents infinite loops while maximizing the chances of finding appropriate sounds. The system now intelligently gives up after reasonable attempts, preventing computational waste while maintaining output quality.
Toward Contextually Intelligent Audio Generation
This week’s enhancements represent a significant leap from simple sound retrieval to contextually intelligent audio selection. The combination of semantic verification, adaptive filtering and scene-aware composition creates a system that doesn’t just find sounds, it finds the right sounds and arranges them intelligently.
Intelligent Sound Fallback Systems – Enhancing Audio Generation with AI-Powered Semantic Recovery
After refining Image Extender’s sound layering and spectral processing engine, this week’s development shifted focus to one of the system’s most practical yet creatively crucial challenges: ensuring that the generation process never fails silently. In previous iterations, when a detected visual object had no directly corresponding sound file in the Freesound database, the result was often an incomplete or muted soundscape. The goal of this phase was to build an intelligent fallback architecture—one capable of preserving meaning and continuity even in the absence of perfect data.
Closing the Gap Between Visual Recognition and Audio Availability
During testing, it became clear that visual recognition is often more detailed and specific than what current sound libraries can support. Object detection models might identify entities like “Golden Retriever,” “Ceramic Cup,” or “Lighthouse,” but audio datasets tend to contain more general or differently labeled entries. This mismatch created a semantic gap between what the system understands and what it can express acoustically.
The newly introduced fallback framework bridges this gap, allowing Image Extender to adapt gracefully. Instead of stopping when a sound is missing, the system now follows a set of intelligent recovery paths that preserve the intent and tone of the visual analysis while maintaining creative consistency. The result is a more resilient, contextually aware sonic generation process—one that doesn’t just survive missing data, but thrives within it.
Dual Strategy: Structured Hierarchies and AI-Powered Adaptation
Two complementary fallback strategies were introduced this week: one grounded in structured logic, and another driven by semantic intelligence.
The CSV-based fallback system builds on the ontology work from the previous phase. Using the tag_hierarchy.csv file, each sound tag is part of a parent–child chain, creating predictable fallback paths. For example, if “tiger” fails, the system ascends to “jungle,” and then “nature.” This rule-based approach guarantees reliability and zero additional computational cost, making it ideal for large-scale batch operations or offline workflows.
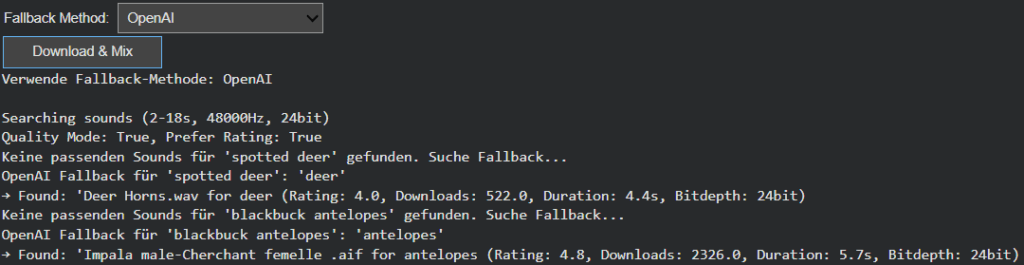
In contrast, the AI-powered semantic fallback uses GPT-based reasoning to dynamically generate alternative tags. When the CSV offers no viable route, the model proposes conceptually similar or thematically related categories. A specific bird species might lead to the broader concept of “bird sounds,” or an abstract object like “smartphone” could redirect to “digital notification” or “button click.” This layer of intelligence brings flexibility to unfamiliar or novel recognition results, extending the system’s creative reach beyond its predefined hierarchies.
User-Controlled Adaptation
Recognizing that different projects require different balances between cost, control, and creativity, the fallback mode is now user-configurable. Through a simple dropdown menu, users can switch between CSV Mode and AI Mode.
CSV Mode favors consistency, predictability, and cost-efficiency—perfect for common, well-defined categories.
AI Mode prioritizes adaptability and creative expansion, ideal for complex visual inputs or unique scenes.
This configurability not only empowers users but also represents a deeper design philosophy: that AI systems should be tools for choice, not fixed solutions.
Toward Adaptive and Resilient Multimodal Systems
This week’s progress marks a pivotal evolution from static, database-bound sound generation to a hybrid model that merges structured logic with adaptive intelligence. The dual fallback system doesn’t just fill gaps, it embodies the philosophy of resilient multimodal AI, where structure and adaptability coexist in balance.
The CSV hierarchy ensures reliability, grounding the system in defined categories, while the AI layer provides flexibility and creativity, ensuring the output remains expressive even when the data isn’t. Together, they form a powerful, future-proof foundation for Image Extender’s ongoing mission: transforming visual perception into sound not as a mechanical translation, but as a living, interpretive process.
Following the foundational phase of last week, where the OpenAI API Image Analyzer established a structured evaluation framework for multimodal image analysis, the project has now reached a significant new milestone. The second release integrates both OpenAI’s GPT-4.1-based vision models and Google’s Gemini (MediaPipe) inference pipeline into a unified, adaptive system inside the Image Extender environment.
Unified Recognition Interface
In The current version, the recognition logic has been completely refactored to support runtime model switching. A dropdown-based control in Google Colab enables instant selection between:
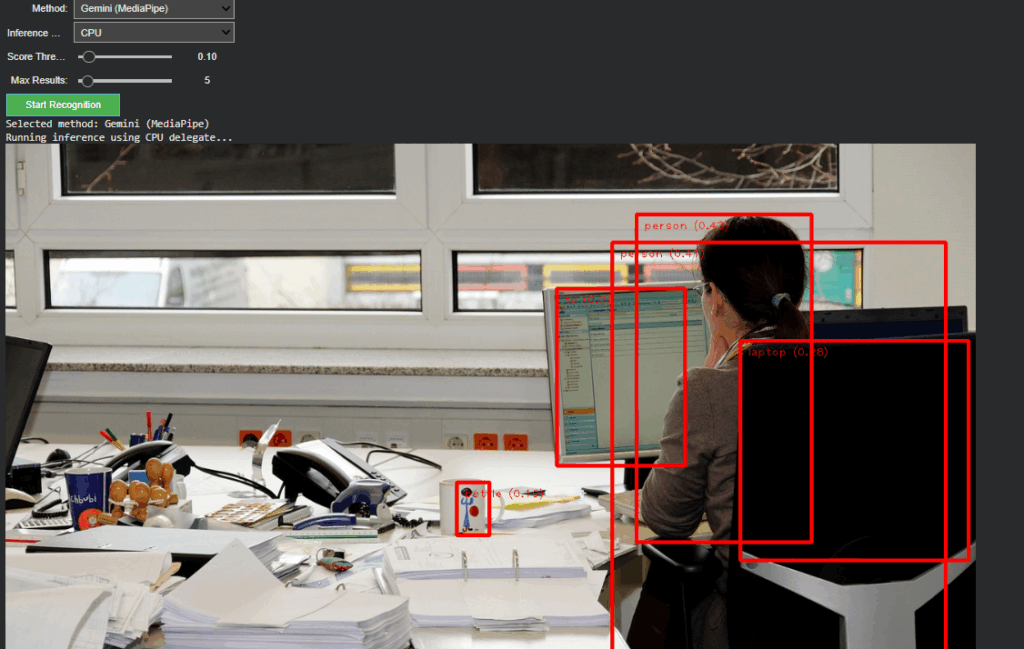
Gemini (MediaPipe) – for efficient, on-device object detection and panning estimation
OpenAI (GPT-4.1 / GPT-4.1-mini) – for high-level semantic and compositional interpretation
Non-relevant parameters such as score threshold or delegate type dynamically hide when OpenAI mode is active, keeping the interface clean and focused. Switching back to Gemini restores all MediaPipe-related controls. This creates a smooth dual-inference workflow where both engines can operate independently yet share the same image context and visualization logic.
Architecture Overview
The system is divided into two self-contained modules:
Image Upload Block – handles external image input and maintains a global IMAGE_FILE reference for both inference paths.
Recognition Block – manages model selection, executes inference, parses structured outputs, and handles visualization.
This modular split keeps the code reusable, reduces side effects between branches, and simplifies later expansion toward GUI-based or cloud-integrated applications.
OpenAI Integration
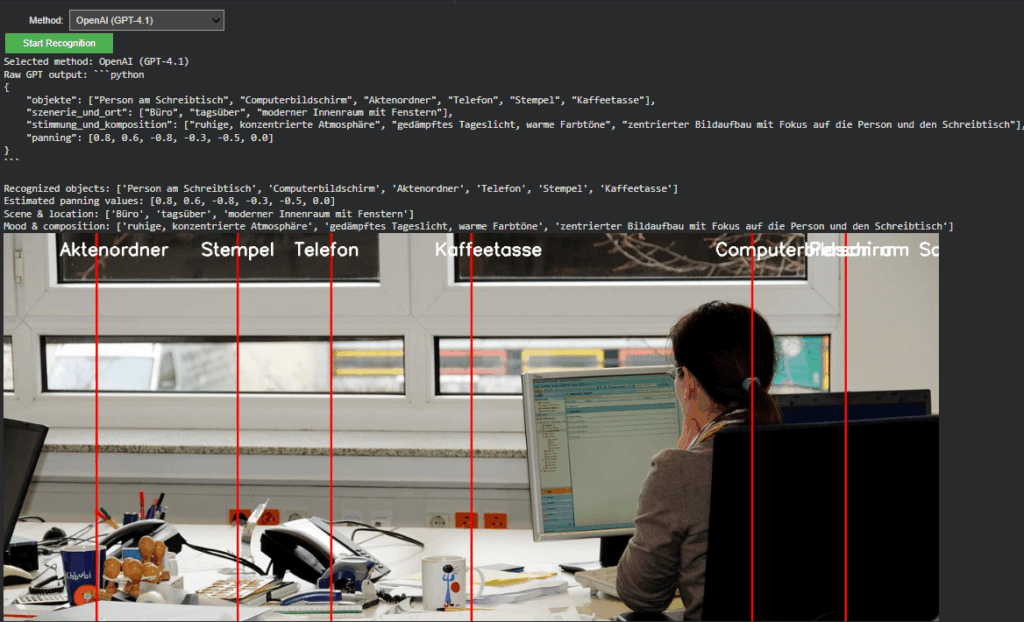
The OpenAI branch extends directly from Last week but now operates within the full environment. It converts uploaded images into Base64 and sends a multimodal request to gpt-4.1 or gpt-4.1-mini. The model returns a structured Python dictionary, typically using the following schema:
{
“objects”: […],
“scene_and_location”: […],
“mood_and_composition”: […],
“panning”: […]
}
A multi-stage parser (AST → JSON → fallback) ensures robustness even when GPT responses contain formatting artifacts.
Prompt Refinement
During development, testing revealed that the English prompt version initially returned empty dictionaries. Investigation showed that overly strict phrasing (“exclusively as a Python dictionary”) caused the model to suppress uncertain outputs. By softening this instruction to allow “reasonable guesses” and explicitly forbidding empty fields, the API responses became consistent and semantically rich.
Debugging the Visualization
A subtle logic bug was discovered in the visualization layer: The post-processing code still referenced German dictionary keys (“objekte”, “szenerie_und_ort”, “stimmung_und_komposition”) from Last week. Since the new English prompt returned English keys (“objects”, “scene_and_location”, etc.), these lookups produced empty lists, which in turn broke the overlay rendering loop. After harmonizing key references to support both language variants, the visualization resumed normal operation.
Cross-Model Visualization and Validation
A unified visualization layer now overlays results from either model directly onto the source image. In OpenAI mode, the “panning” values from GPT’s response are projected as vertical lines with object labels. This provides immediate visual confirmation that the model’s spatial reasoning aligns with the actual object layout, an important diagnostic step for evaluating AI-based perception accuracy.
Outcome and Next Steps
The project now represents a dual-model visual intelligence system, capable of using symbolic AI interpretation (OpenAI) and local pixel-based detection (Gemini).
Next steps
The upcoming development cycle will focus on connecting the openAI API layer directly with the Image Extender’s audio search and fallback system.
Autorin: Andrea Corcuera Marruffo Titel:Automatic Sonification of Video Sequences through Object Detection and Physical Modelling Hochschule: Aalborg University Copenhagen Studiengang: MSc Sound and Music Computing Jahr: 2017
Die Arbeit von Andrea Corcuera Marruffo untersucht die automatische Erzeugung von Foley-Sounds aus Videosequenzen. Ziel ist es, audiovisuelle Inhalte algorithmisch zu sonifizieren, indem visuelle Informationen, z.B. Materialeigenschaften oder Objektkollisionen, mithilfe von Convolutional Neural Networks (nutzung des YOLO models) analysiert und anschließend physikalisch modellierte Klänge synthetisiert werden. Damit positioniert sich die Arbeit an der Schnittstelle von Klangsynthese, teilweise software und coding und Wahrnehmung, ein Feld, das in der Medienproduktion wie auch in der künstlerischen Forschung zunehmende Relevanz besitzt und entsprechend auch überschneidungen zum Grundkonzept meiner vorstehenden Masterarbeit.
Das „Werkstück“ besteht aus einem funktionalen Prototypen, der Videos analysiert, Objekte klassifiziert und deren Interaktionen in synthetisierte Klänge übersetzt. Ergänzt wird dieses Tool durch eine Evaluation, in der audiovisuelle Stimuli hinsichtlich ihrer Plausibilität und wahrgenommenen Qualität getestet werden.
Bewertung
systematisch anhand der Beurteilungskriterien des Studiengangs CMS
(1) Gestaltungshöhe
Die Arbeit zeigt eine sehr gute technische Tiefe und eine klare methodische Struktur. Der Aufbau ist logisch, die Visualisierungen (z. B. Flussdiagramme, Spektrogramme) sind nachvollziehbar und unterstützen das Verständnis des Prozesses.
(2) Innovationsgrad
Der Ansatz, Foley-Sound automatisch (unter dem Einsatz von „physical modelling“) zu generieren, wurde zum Zeitpunkt der Veröffentlichung (2017) nur vereinzelt erforscht. Die Verbindung von Object Detection und Physical Modelling stellt daher einen innovativen Beitrag im Bereich „Computational Sound Design“ dar.
(3) Selbstständigkeit
Die Arbeit zeigt eine deutliche Eigenleistung. Die Autorin erstellt ein eigenes Dataset, modifiziert Trainingsdaten und implementiert das YOLO Model in einer angepassten Form. Auch die Syntheseparameter werden experimentell abgeleitet. Die Eigenständigkeit ist daher sowohl konzeptionell als auch technisch vorhanden.
(4) Gliederung und Struktur
Die Struktur folgt einem klassischen wissenschaftlichen Aufbau. Theorie, Implementierung, Evaluation, Schlussfolgerung. Kapitel sind klar fokussiert, jedoch teils stark technisch geprägt, was die Lesbarkeit für fachfremde Leser einschränken kann. Eine visuellere Darstellung der Evaluationsmethodik hätte das eventuell verbessert.
(5) Kommunikationsgrad
Die Arbeit ist insgesamt verständlich und präzise formuliert. Fachtermini werden sorgfältig eingeführt, Abbildungen sind beschriftet und logisch eingebunden. Der sprachliche Stil ist sachlich, allerdings manchmal zu stark an technischer Dokumentation orientiert. Narrative Reflexionen zu Designentscheidungen oder ästhetischen Überlegungen fehlen weitgehend, was anhand des Studiengangs, welcher sich nicht hauptsächlich an design orientiert verständlich und nachvollziehbar ist.
(6) Umfang der Arbeit
Mit über 30 Seiten Haupttext und zusätzlichem Anhang ist der Umfang angemessen. Die Balance zwischen Theorie, Umsetzung und Evaluation ist gelungen. Die empirische Studie mit 15 Proband bleibt jedoch relativ klein, wodurch die statistische Aussagekraft begrenzt ist.
(7) Orthographie, Sorgfalt und Genauigkeit
Die Arbeit ist durchgängig formal korrekt und methodisch sorgfältig dokumentiert. Kleinere sprachliche Unschärfen („he first talkie film“) mindern den Gesamteindruck kaum. Zitate und Quellenverweise sind konsistent.
(8) Literatur Das Literaturverzeichnis zeigt eine solide theoretische Fundierung. Es werden gängige Quellen zu Sound Synthesis, Modal Modelling und Neural Networks verwendet (Smith, Farnell, Van den Doel). Allerdings wären aktueller Medien- oder Wahrnehmungsforschung (durch z. B. Sonic Interaction Design, Embodied Sound Studies) noch eine spannende Ergänzung hinsichtlich Forschungsliteratur gewesen.
Abschließende Einschätzung
Insgesamt überzeugt die Arbeit durch ihren innovativen Ansatz, die methodische Präzision und die gelungene Umsetzung eines komplexen Systems. Die Evaluation zeigt kritisch die Grenzen des Modells auf (Objektgenauigkeit und Synchronisationsprobleme), was die Autorin reflektiert und nachvollziehbar einordnet.
Stärken: klare Struktur, hohes technisches Niveau, origineller Forschungsansatz, eigenständige Implementierung. Schwächen: begrenzte ästhetische Reflexion, kleine Stichprobe in der Evaluation, eingeschränkte Materialvielfalt.
The master thesis “Sound Response to Physicality: Artistic Expressions of Movement Sonification” was written by Aleksandra Joanna Słyż in 2022 at the Royal College of Music in Stockholm (Kungliga Musikhögskolan; Stockholm, Sweden).
Introduction
I chose Aleksandra Słyż’s master thesis because her topic immediately resonated with my own research interests. In my master project I am working with the x-IMU3 motion sensor to track surf movements and transform them into sound for a surf documentary. During my research process, the question of how to sonify movement data became central, and Słyż’s work gave me valuable insights into which parameters can be used and how the translation from sensor to sound can be conceptually designed.
Her thesis, Sound response to physicality, focuses on the artistic and perceptual dimensions of movement sonification. Through her work Hypercycle, she explores how body motion can control and generate sound in real time, using IMU sensors and multichannel sound design. I found many of her references—such as John McCarthy and Peter Wright’s Technology as Experience—highly relevant for my own thesis.
Gestaltungshöhe – Artistic Quality and Level of Presentation
Słyż’s thesis presents a high level of artistic and conceptual quality. The final piece, Hypercycle, is a technically complex and interdisciplinary installation that connects sound, body, and space. The artistic idea of turning the body into a musical instrument is powerful, and she reflects deeply on the relation between motion, perception, and emotion.
Visually, the documentation of her work is clear and professional, though I personally wished for a more detailed sonic description. The sound material she used is mainly synthesized tones—technically functional, but artistically minimal. As a sound designer, I would have enjoyed a stronger exploration of timbre and spatial movement as expressive parameters.
Innovationsgrad – Innovation and Contribution to the Field
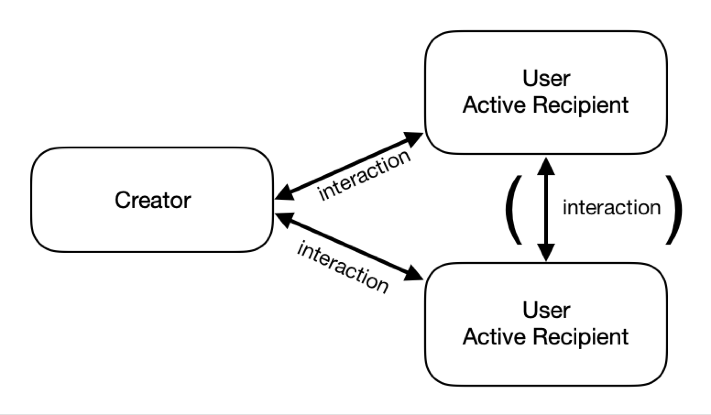
Using motion sensors for artistic sonification is not entirely new, yet her combination of IMU data, embodied interaction, and multichannel audio gives the project a strong contemporary relevance. What I found innovative was how she conceptualized direct and indirect interaction—how spectators experience interactivity even when they don’t control the sound themselves.
However, from a technical point of view, the work could have been more transparent. I was missing a detailed explanation of how exactly she mapped sensor data to sound parameters. This part felt underdeveloped, and I see potential for future work to document such artistic systems more precisely.
Selbstständigkeit – Independence and Original Contribution
Her thesis clearly shows independence and artistic maturity. She worked across disciplines—combining psychology, music technology, and perception studies—and reflected on her process critically. I especially appreciated that she didn’t limit herself to the technical side but also integrated a psychological and experiential perspective.
As someone also working with sensor-based sound, I can see how much self-direction and experimentation this project required. The depth of reflection makes the work feel authentic and personal.
Gliederung und Struktur – Structure and Coherence
The structure of the thesis is logical and easy to follow. Each chapter begins with a quote that opens the topic in a poetic way, which I found very effective. She starts by explaining the theoretical background, then moves toward the technical discussion of IMU sensors, and finally connects everything to her artistic practice.
Her explanations are written in clear English, and she carefully defines all important terms such as sonification, proprioception, and biofeedback. Even readers with only basic sound design knowledge can follow her reasoning.
Kommunikationsgrad – Communication and Expression
The communication of her ideas is well-balanced between academic precision and personal reflection. I like that she uses a human-centered language, often describing how the performer or spectator might feel within the interactive system.
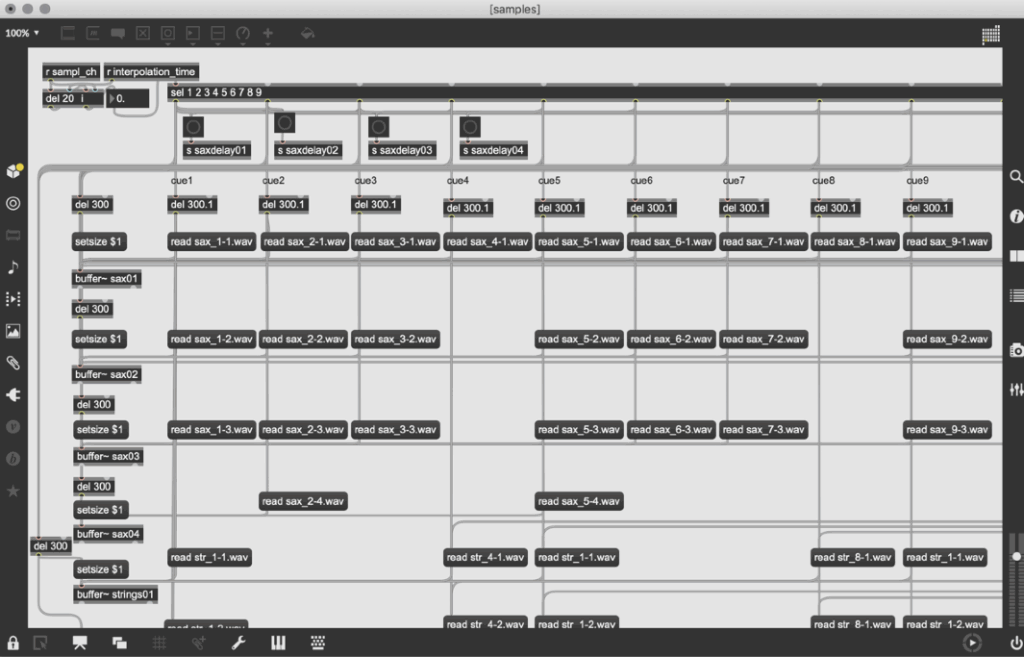
Still, the technical documentation of the sonification process could be more concrete. She briefly shows a Max/MSP patch, but I would have loved to understand more precisely how the data flow—from IMU to sound—was built. For future readers and practitioners, such details would be extremely valuable.
Umfang – Scope and Depth
The length of the thesis (around 50 pages) feels appropriate for the topic. She covers a wide range of areas: from sensor technology and perception theory to exhibition practice and performance philosophy. At the same time, I had the impression that she decided to keep the technical parts lighter, focusing more on conceptual reflection. For me, this makes the thesis stronger as an artistic reflection, but weaker as a sound design manual.
Orthography, Accuracy, and Formal Care
The thesis is very carefully written and proofread. References are consistent, and the terminology is accurate. She integrates both scientific and artistic citations, which gives the text a professional academic tone. The layout is clear, and the visual elements (diagrams, performance photos) are well placed.
Literature – Quality and Relevance
The literature selection is one of the strongest aspects of this work. She cites both technical and philosophical sources—from G. Kramer’s Sonification Report to McCarthy & Wright’s Technology as Experience and Tanaka & Donnarumma’s The Body as Musical Instrument. For me personally, her bibliography became a guide for my own research. I found new readings that I will also include in my master thesis.
Final Assessment – Strengths, Weaknesses, and Personal Reflection
Overall, Sound response to physicality is a well-balanced, thoughtful, and inspiring thesis that connects technology, perception, and art. Her biggest strength lies in how she translates complex sensor-based interactions into human experience and emotional resonance. The way she conceptualizes embodied interaction and indirect interactivity is meaningful and poetic.
The main weakness, in my opinion, is the lack of detailed technical documentation—especially regarding how the IMU data was mapped to sound and multichannel output. As someone building my own sonification system with the x-IMU3 and contact microphones, I would have loved to see the exact data chain from sensor to audio.
Despite that, her work inspired me profoundly. It reminded me that the psychological and experiential dimensions of sound are just as important as the data itself. In my own project, where I sonify the movement of a surfboard and the feeling of the ocean, I will carry this understanding forward: that sonification is not only about data translation but about shaping human experience through sound.
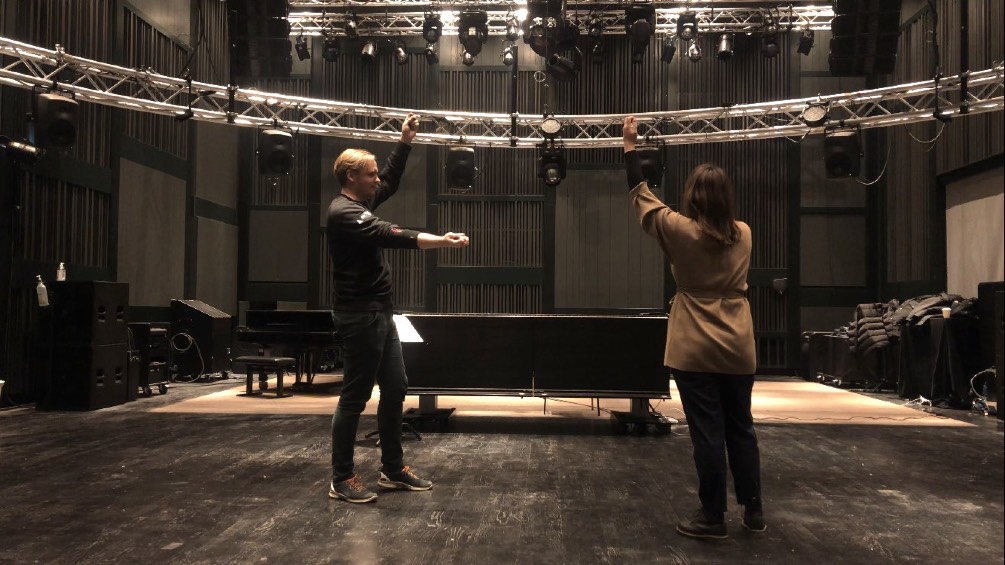
At our visit at the IRCAM-institute during our Paris-excursion I visited a panel talk, that described the workflow in creating a multi-media opera, that lies at the intersection of traditional opera and contemporary music technology and that struck me: Die letzten Tage der Menschheit (The Last Days of Mankind) by French composer Philippe Manoury. Based on the extensive anti-war drama by Austrian writer Karl Kraus, the work premiered at the Cologne Opera in June 2025 and reflects on themes of conflict, media, and societal collapse.
The Material
Karl Kraus wrote Die letzten Tage der Menschheit during and after World War I. The text consists of over 220 short scenes, depicting fragments of daily life, political rhetoric, and journalistic distortion that led to the chaos of the war. Due to its scale and structure, Kraus himself considered the piece impossible to stage in its entirety.
Manoury’s adaptation condenses the material into a three-hour opera. Rather than present a straightforward narrative, the production offers a layered and often disjointed sequence of impressions and reflections. Manoury and director Nicolas Stemann refer to the result as a “Thinkspiel”, a hybrid of the German Spiel (play) and the English “think”, suggesting a theatre of ideas rather than linear storytelling.
Blending Acoustic and (digital)Electronic Practice
Manoury, known for his work with live electronics, collaborated closely with IRCAM (Institut de Recherche et Coordination Acoustique/Musique) in developing this opera. He used tools such as Antescofo, a real-time score-following system that syncs live instrumental input with preprogrammed electronic components, and PureData, a visual programming environment designed for audio synthesis and spatial control.
The system enables audio to follow performers in real time, allowing electronics to respond to spoken text, instrumental timing, and stage movement. Manoury worked with Miller Puckette, the creator of PureData, to develop new modules tailored to the opera’s needs, including a granular speech-processing system that tracks vocal input spatially on stage.
This setup allowed for integration of a full orchestra, live electronics, spoken word, and multimedia, with a focus on flexibility and performer interaction during rehearsals and live performance.
Structure and Staging
The opera is divided into two distinct parts. The first presents loosely chronological scenes from the First World War, focusing on figures such as politicians, journalists, and ordinary citizens. The second part is meant to be a reflection and takes a more abstract and philosophical tone, exploring themes such as violence, historical memory, and self-destruction.
A newly introduced character, Angelus Novus acts as an observer throughout the piece. Performed by mezzo-soprano Anne Sofie von Otter, the character provides continuity and commentary across the fragmented scenes.
The staging involves video projections, live camera feeds, war imagery, and a modular stage design. The visual components are used not for spectacle but to support the opera’s shifting focus and tonal contrasts.
A Contemporary Approach to Historical Events
Die letzten Tage der Menschheit does not aim for easy accessibility. Its structure, sound design, and subject matter are complex and at times demanding. However, the production reflects current interests in combining artistic disciplines and using digital tools to reinterpret historical works.
Rather than retell World War I history, the opera focuses on atmosphere and fragmentation, using both musical and technological language to examine how war, media, and misinformation interact, which in my opinion is as relevant as ever in the face of current events.
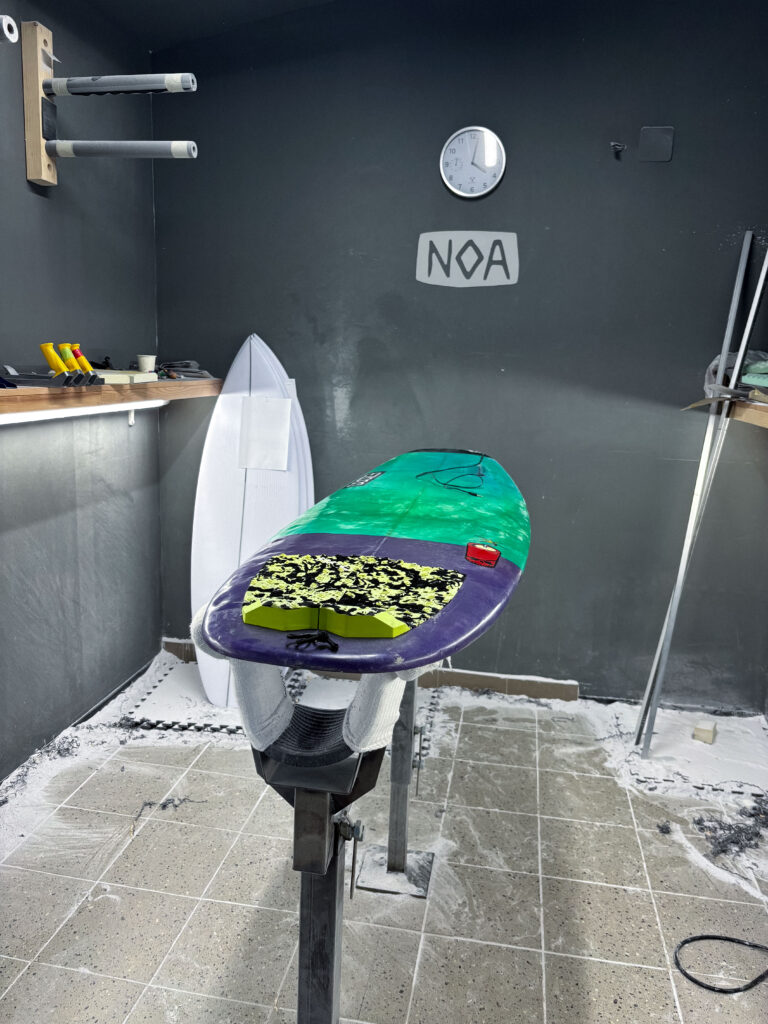
The base model and final prototype selected for this project is built on top of my own personal shortboard. It is measuring 5 feet 9 inches in length and is made for faster maneuvers like the cutback because of its short length and small volume. Considering these factors the board was selected due to its size and shape, which offer a wider range of motion and faster changes of speed and rotation in comparison to a longboard. Also, the dynamical movement and the internal board vibrations will be different than the one of a longboard or a board with a higher volume. Before the construction, a planning session was conducted with the Noa team to identify the ideal locations for sensor placement, cable routing, mounting of the housing, and material usage considering the exposure to saltwater.
Noa surfboards is a small factory for shaping mostly shortboards and riverboards. With their own shaping studio, they represent one of the few professional shapers in the region of Austria and Germany. This studio was chosen for the professional knowledge and experience of shaping to develop a well-functioning and safe protype.
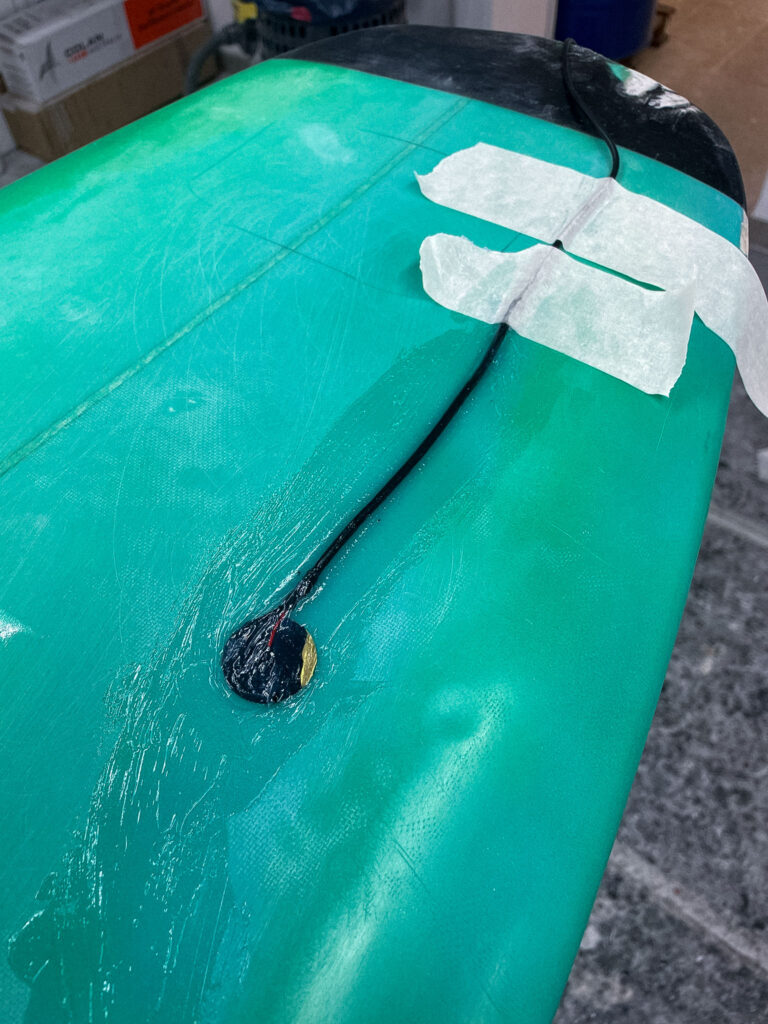
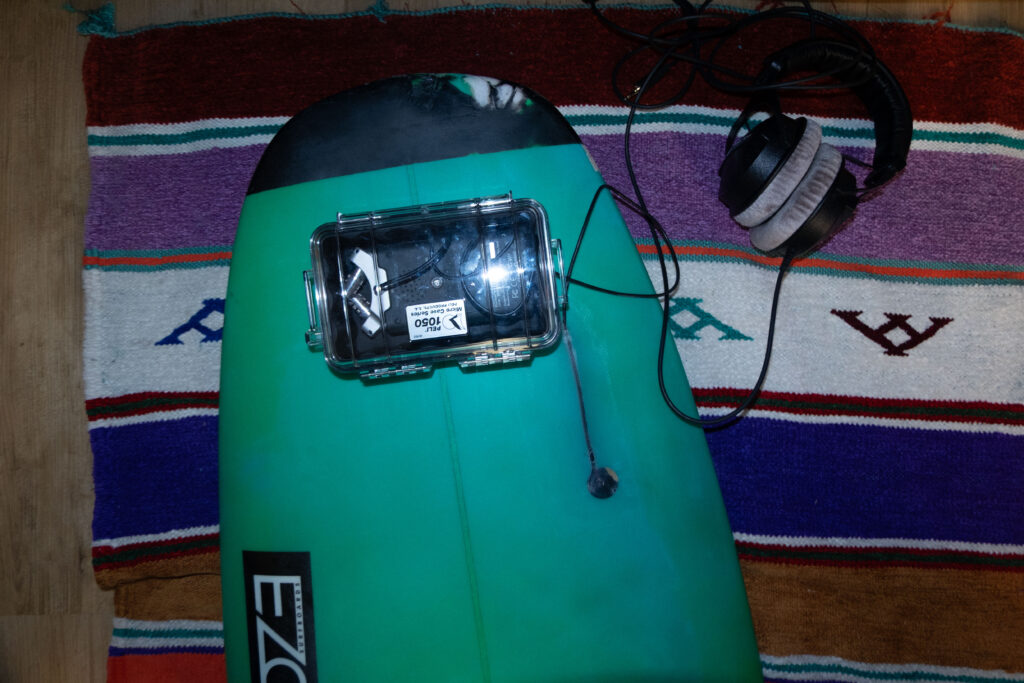
Looking at the building phase of the protype, Noa Surfboards proposed embedding the piezo disc underneath the front-foot zone of the deck. This area is perfect to capture the movement of the surfer, while not being under strong impact of the bodyweight of the surfer. In order to integrate the microphone in the body of the board a rectangular section of the fiberglass top layer was carefully removed. In the next step the piezo disc was mounted directly to the raw material. To protect the microphone from external impacts and the saltwater multiple layers of fiberglass cloth were laid over the sensor and encapsulate the mic completely.
Another critical technical step was to route the cable from the embedded mic to the waterproof electronics box. Therefore, a narrow channel was drilled on the side of the box for the cable to enter.
Inside the case, the Zoom H4n recorder and x-IMU3 sensor were suspended in a foam block designed to isolate the electronics from board vibrations and strong impacts.
Before deploying the system in ocean conditions, a controlled test was performed using a surf skate on land in order to structure the synchronization part of the different media in advance. Therefore, the simulation served multiple purposes:
First, to test the stability and functionality of the hardware setup under strong movements
To collect and analyze motion data from surfing-like movements like the cutback using the ximu3 sensor
To test and evaluate the contact microphone’s responsiveness to board interaction and different movement patterns
To practice audiovisual synchronization between footage an external camera setup, the Zoom H4n recorder, the contact microphone and the x-IMU3 motion data.
Therefore, the surf skate was chosen because of its closely representation of the body movement and board rotation then surfing. Especially the cutback movement can be imitated by using a skate ramp.
This testing setup consists of the following tools:
A Carver-style surf skateboard
The x-IMU3 sensor mounted on the bottom of the board to capture movement dynamics
The Piezo contact microphone taped next to the motion sensor on the bottom of the board. After testing the microphone was placed in the middle of the skateboard deck in order to capture the movement of both axes of the board at the same amount of loudness. Placing the microphone closer to the wheels of the board would result in much more noise in the recording due to the internal rotation of the axes.
The Zoom H4n recorder was help in the hand of the skater and was connected to closed over ear headphones.
Using the external film camera Sony Alpha 7iii the whole test was captured. This additional recording was helpful later in the synchronization part.
The board was ridden in a skate ramp simulating the composition of the wave. ON the top of the ramp the cutback movement can be executed.
At the start of the recording session, all devices were synchronized through a short impulse sound (hitting on the board) recorded on all three devices: Zoom, GoPro, and x-IMU3. The single surf skate tackes lasted approximately 2 minutes of recording and were repeated multiple times. The data recorded consists of:
accelerometer, gyroscope, orientation from the x-IMU3
The surf skate test validated the concept and highlighted important considerations:
Movement-based sonic gestures are highly expressive and usable for composition;
Vibration sensitivity of the contact mic is sufficient for detailed sound capture;
The sync strategy will work equally well in ocean sessions with minor adjustments;
Battery and storage life are adequate for short-to-medium-length surf sessions;
Cable insulation and structural mounting are durable under stress.
This test confirmed the system’s readiness for its full application in Morocco, where ocean sessions will build upon the structure and learnings of this simulation.