Camera Match by Ethan Ou

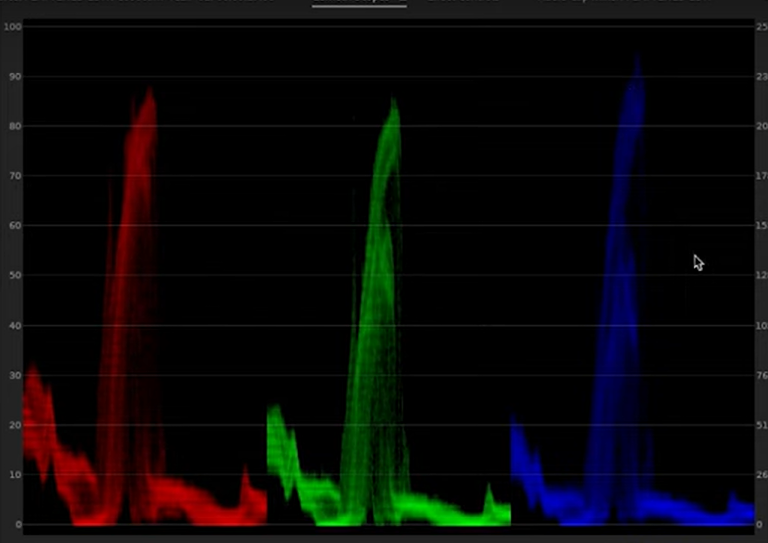
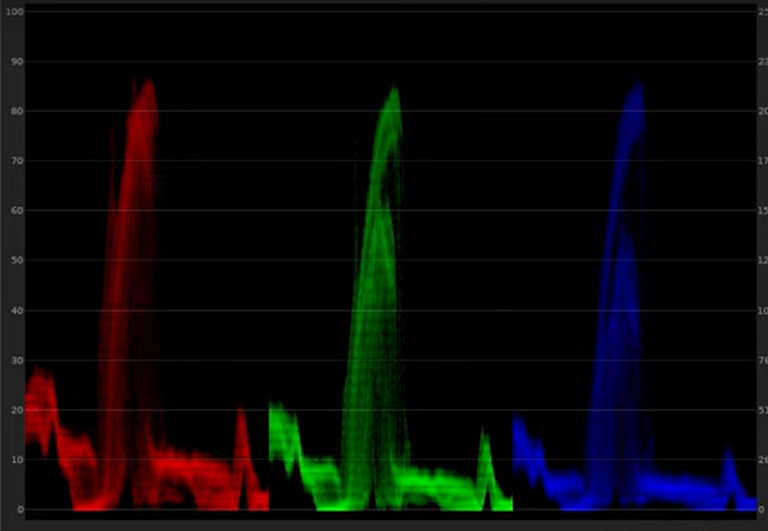
Following the preparation of both the source and target ColorChecker datasets, the subsequent step involves generating a color transform through mathematical alignment. For this purpose, the tool Camera Match developed by Ethan Ou provides an effective and streamlined solution. This Python-based application enables the creation of LUTs by computationally matching the color responses of the source dataset (e.g., digital camera footage such as ARRI Alexa imagery) to a target dataset (e.g., film scans or alternative camera profiles).

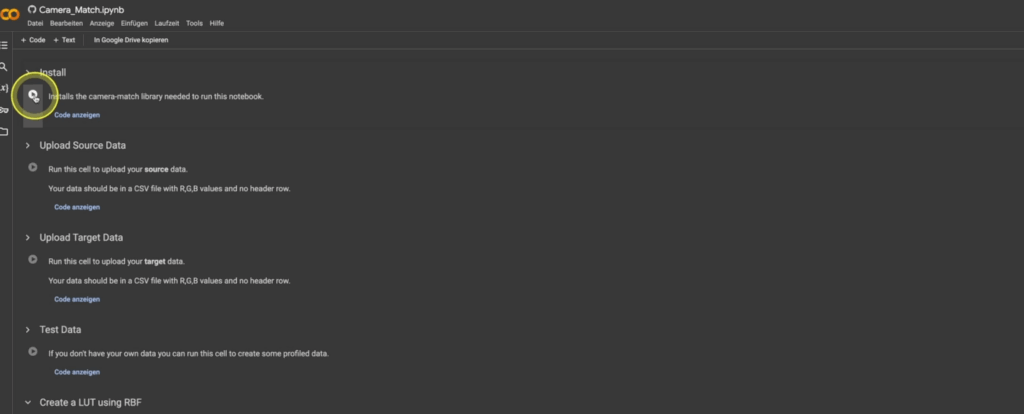
Camera Match is accessible both as a downloadable script and via a browser-based interface (Camera Match GitHub Repository). The basic workflow for LUT generation using the browser interface is as follows:

  1. Initialization:
    Execute the script by pressing the “Play” button, which installs all necessary Python libraries automatically.
  2. Source Data Upload:
    Load the source dataset (e.g., Alexa ColorChecker measurements) into the interface.
  3. Target Data Upload:
    Upload the corresponding target dataset representing the desired film look or alternative camera profile.
  4. LUT Generation:
    Initiate the LUT creation process by selecting the Radial Basis Function (RBF) algorithm as the matching function. The RBF method provides smooth and continuous color transitions, making it suitable for high-fidelity color transformations.
  5. LUT Export:
    Save the generated LUT to a local directory for further use.

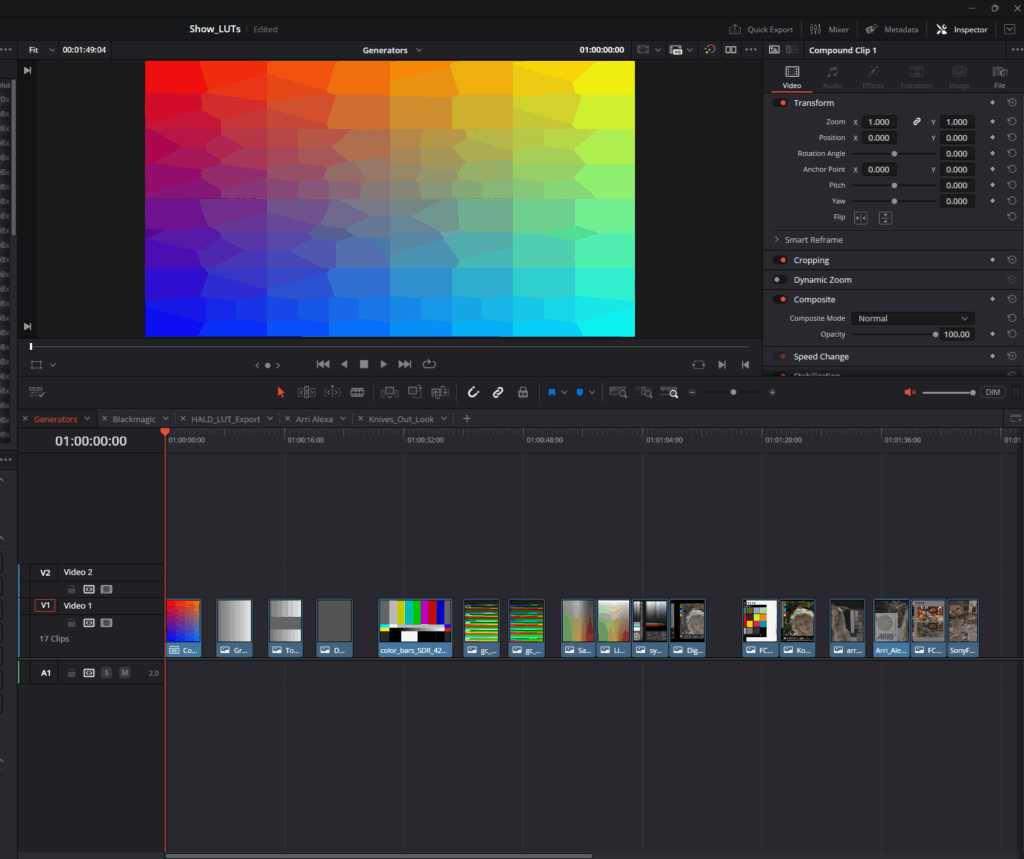
Once created, the LUT can be implemented in post-production applications such as DaVinci Resolve, Lattice, or any system capable of ingesting standard LUT formats. The process is highly efficient, offering a rapid turnaround from dataset preparation to deployable LUT creation.

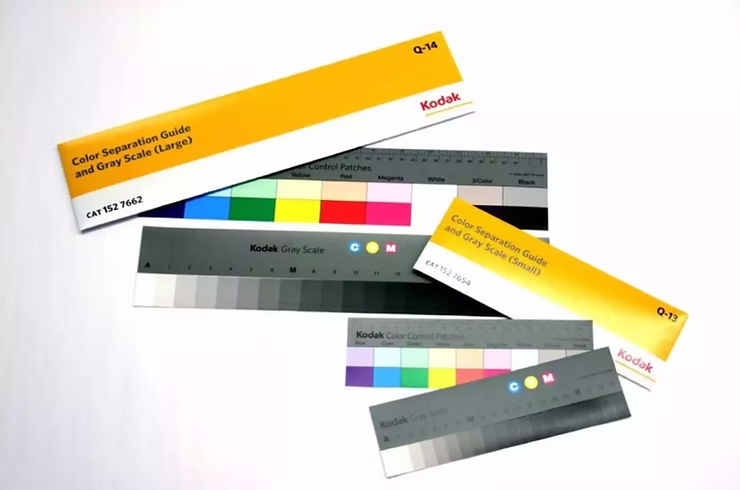
While this approach enables the user to quickly produce functional LUTs, it is important to acknowledge that the quality of the input datasets—particularly the preparation of the ColorChecker charts—significantly influences the final result. In subsequent discussions, we will explore more advanced methodologies for chart preparation, focusing on best practices for achieving scene-referred workflows compatible with color-managed environments such as DaVinci Wide Gamut Intermediate and ACES.

Although this preparation phase remains time-consuming, it is a critical component for those seeking the highest levels of color accuracy and transform reliability.

Reference:

DeMystify Colorgrading. (n.d.). Film Profile Journey: 20 – More Automation, Less Tedious Manual Work. Retrieved April 28, 2025, from https://www.demystify-color.com/post/film-profile-journey-20-more-automation-less-tedious-manual-work

Creating a LUT from a Film Profile

Developing a LUT tailored specifically to the needs of a project may initially seem complex, but the process is more straightforward than it appears. In essence, one builds a specific look within DaVinci Resolve and subsequently renders this look into a LUT file. The technical steps for generating and exporting the LUT will be discussed in detail later in this series of posts, as they are relatively direct once the foundational elements are established.

In order to approach the creation of a true Show LUT, we must move beyond subjective grading and work systematically by profiling real analog film stocks. Specifically, we will be extracting data from ColorChecker charts photographed on film and generating a modified version aligned with our own creative preferences.

It is important to note that film profiling itself is an expansive discipline, comprising numerous methodologies and technical variations. A full exploration of these methods would require not merely additional blog entries, but likely an entire master’s thesis in its own right. To streamline the process for practical application, this discussion will focus exclusively on the automated film profiling workflow presented by Nico Fink in his Film Profiling Course.

Extraction of ColorChecker Values

The first essential step is the acquisition of RGB data from both the reference charts and the film-exposed charts. To facilitate this process efficiently, we use the command-line tool “Get ColorChecker Values”.

This tool automates what would otherwise be an extremely laborious manual task: sampling and recording the 24 patches of a ColorChecker chart across multiple exposures. Rather than hovering over each patch, sampling color values individually, and manually entering data, the tool extracts and compiles the colorimetric information automatically into a structured CSV file.

The script and relevant resources can be found here:

Dataset Preparation

Prior to running the script, the film scans and the reference (digital) captures must be organized carefully:

  • Create a new directory and place the respective color chart images inside.
  • Ensure that each corresponding film and Alexa (digital reference) image shares the exact same filename and appears in the same sequence within the directory. This is crucial for proper alignment of datasets.

Before exporting the images to the directory, additional preprocessing in Adobe Photoshop is required:

  • Straighten the charts to correct any perspective distortion.
  • Crop the charts tightly around the patches.
  • Apply a slight Gaussian blur to reduce fine-grain noise or scanning artifacts.

The resulting images should resemble standardized color chart references suitable for automated analysis.

Running the Script

After preparing the datasets, the next step involves executing the script through the Terminal application on the computer:

  1. Open Terminal.
  2. Navigate to the directory containing your charts using the ls (list directories) and cd (change directory) commands.
    Example:
  3. Execute the script using the appropriate command-line syntax. You will specify the input images and define an output name for the resulting CSV file. (Detailed command examples will be provided later in this series.)

    Upon successful execution, the script generates a comprehensive sheet of numerical RGB values for each chart. This replaces what would otherwise be a time-consuming manual process.

    It is essential to repeat this process separately for both your film-based charts and your digital reference charts, thereby creating two distinct datasets. These datasets form the empirical basis for the subsequent LUT construction, wherein the desired film look will be derived and mathematically mapped.

    Summary

    By automating the extraction of ColorChecker values, we establish a foundation of objective data that can be used to model the film response curve. This not only accelerates the LUT creation workflow but also enhances accuracy and repeatability, which are critical for professional color pipelines.

    The next phase will involve analyzing and comparing these datasets in order to generate a transform that authentically replicates the desired film look while allowing for tailored creative adjustments.

    Reference

    DeMystify Colorgrading. (n.d.). Film Profile Journey: 20 – More Automation, Less Tedious Manual Work. Retrieved April 28, 2025, from https://www.demystify-color.com/post/film-profile-journey-20-more-automation-less-tedious-manual-work

    Importance of Diverse Source Footage

    Importance of Diverse Source Footage

    In the process of designing a show LUT, one cannot rely solely on a narrow selection of material. The end goal is to build a transform that behaves consistently, no matter the variations in camera sensor, lighting condition, or scene composition. A LUT tested on limited footage is unlikely to generalize well across the complexities of an actual production environment.

    Footage must therefore be drawn from a wide array of scenarios: sunlit exteriors, dim interiors, high-contrast night scenes, and environments illuminated by mixed light sources. Moreover, it is necessary to incorporate material from multiple camera manufacturers—each bringing its own interpretation of color science and sensor response to the equation. Without such diversity, the LUT may perform well under certain conditions but break down unpredictably when the variables change.

    This is not merely a technical requirement; it is a philosophical one. A LUT must serve the story without introducing artifacts that pull the viewer out of the experience. As Poynton (2012) points out, wide testing ensures that color transforms survive the real-world unpredictability that defines filmmaking.

    The Role of Controlled References

    Including color charts within the test material is equally critical. These references, such as the X-Rite ColorChecker or similar calibration tools, provide fixed targets against which LUT behavior can be measured. They offer a set of known quantities—neutral grays, primary colors—that allow the colorist to observe exactly how the LUT manipulates standard values.

    This step moves the process from subjective taste toward empirical validation. Without color charts, evaluations become reliant on intuition alone, which may fail to detect subtle but cumulative errors over the course of a feature-length project.

    The ICC (2022) highlights that such controlled references are essential to maintaining fidelity not just within a shot but across the complex interrelation of shots, scenes, and acts. When the same reference yields different results across multiple lighting conditions or cameras, one can be confident that the problem lies within the transform, not within the footage.

    Necessity of a Neutral Evaluation Pipeline

    A show LUT can only be meaningfully assessed if all other variables are controlled. This principle demands that the footage be stripped of in-camera looks, hidden LUTs, and uncontrolled image processing prior to evaluation. Only through this neutralization can the true effect of the show LUT be isolated.

    Otherwise, as Arney (2021) warns, observed issues may stem not from the LUT but from a polluted pipeline, leading to incorrect conclusions and wasted revision cycles. It becomes impossible to know whether a magenta shift, for instance, is caused by the LUT itself or an unnoticed RAW processing setting.

    Neutralization, therefore, is a prerequisite—not a preference. It guarantees that the feedback loop between observation and correction is valid, allowing genuine issues to be identified and addressed with confidence.

    Designing Test Structures with Purpose

    Simply gathering footage is not enough; it must be organized and sequenced thoughtfully. Test timelines must be constructed to reveal different failure modes: rapid shifts from bright exteriors to dim interiors, extreme saturation to near-monochrome, natural daylight to heavy artificial lighting. Each transition becomes a test of the LUT’s resilience.

    Furthermore, footage should be juxtaposed to maximize stress on the transform. For instance, placing a RED clip next to an ARRI clip, or alternating between footage with and without deep shadows, forces the LUT to reveal its behavior under changing conditions.

    In this way, the colorist is not waiting for issues to arise by accident but actively provoking them. As van Hurkman (2014) suggests, the integrity of a color transform is proven not in ideal conditions but when subjected to extremes.

    Conclusion

    The creation of a show LUT is ultimately a scientific inquiry wrapped in artistic purpose. By committing to footage diversity, employing objective reference points, maintaining pipeline neutrality, and designing tests that actively seek out failure, the colorist ensures that the final transform will not merely look good on a single shot but will endure the realities of production.

    A show LUT, if built properly, becomes invisible—supporting story, mood, and emotion without drawing attention to itself. Achieving this level of reliability requires more than technical skill; it demands a methodological rigor rooted in the understanding that visual storytelling is at once a technical craft and an expressive art.

    References

    • Van Hurkman, A. (2014). Color Correction Handbook: Professional Techniques for Video and Cinema. 2nd ed., Peachpit Press.
    • ICC (International Color Consortium). (2022). Introduction to the ICC Profile Format and Color Management Workflows. ICC White Paper Series.
    • Poynton, C. (2012). Digital Video and HD: Algorithms and Interfaces. 2nd ed., Morgan Kaufmann.

    Arney, D. (2021). Practical Color Management in Film and Video Postproduction. Postproduction Journal, Vol. 19

    Why do we need our own Film Emulations

    Introduction

    A Short Blogpost on why Colorists should use their own Luts and should create them, themselves. In modern film and video production, Look-Up Tables (LUTs) play a crucial role in the workflows of cinematographers, editors, and especially colorists. LUTs enable consistent color transformations and help efficiently communicate creative looks. However, pre-made LUTs are often inadequate as they fail to meet the specific requirements of a project or reflect a colorist’s, DP’s or Director’s creative vision. Therefore, it is essential for every professional colorist to create their own LUTs to merge technical precision with artistic control. Almost every DP (Director of Photography) has their own LUT that they use on their Job. Even Roger Deakins, one of the best DPs, always uses the same LUT for his films on set. He might let the colorist alter contrast or saturation to fit the mood of the film.

    1. The Function and Importance of LUTs

    LUTs serve as predefined color transformations that convert an image into a desired color representation. Their primary functions include:

    • Technical Color Transformation: Converting raw camera material (Log or RAW) into a displayable color spectrum, such as Rec. 709 for standard monitors.
    • Creative Color Styling: Applying specific color moods or looks to achieve an aesthetic vision.
    • Consistency in Workflow: Ensuring uniform representation of footage from production through final color grading.

    Since each camera has its own color science and different projects have unique requirements, standard LUTs are often insufficient or introduce unwanted color shifts.

    2. The Limitations of Standard LUTs

    Many filmmakers and colorists rely on pre-existing LUTs, but these have significant drawbacks:

    • Limited Adaptability: They are not optimized for specific lighting conditions, light sources, or individual camera settings.
    • Lack of Individuality: Standard LUTs often create generic looks that do not reflect a film’s creative vision.
    • Lack of Control Over Transformation: A LUT stores a predefined color transformation and cannot perform selective corrections or mask-based adjustments.

    For these reasons, professional colorists must create their own LUTs to perfectly balance their creative signature and technical requirements.

    3. Types of LUTs: Technical, Creative, and Hybrid

    Before a colorist creates their own LUTs, it is important to understand the different types and their applications:

    • Technical LUTs: These transform the color spectrum and gamma curve of a camera sensor into a standardized color profile (e.g., ARRI LogC to Rec. 709). They are based on pure color science without artistic modifications.
    • Creative LUTs: These focus solely on aesthetic adjustments. They alter color tones, contrast, and saturation without performing a color space transformation.
    • Hybrid LUTs: A combination of technical and creative LUTs that incorporates both a color transformation and a specific artistic look. These LUTs are commonly provided by camera manufacturers like ARRI or RED.

    4. The Advantages of Custom LUTs for Colorists

    Creating custom LUTs offers numerous benefits:

    • Customization for Individual Projects: Every project requires a specific color mood. Custom LUTs allow colorists to tailor the colors precisely.
    • Consistency Across Productions: A colorist can maintain their unique visual identity by using similar color palettes for different productions.
    • Optimization for Specific Camera Systems: Different camera sensors have different color characteristics. A custom LUT ensures that footage is optimally interpreted.
    • Increased Efficiency in Workflow: Well-designed LUTs provide a strong starting point for color grading, saving time in post-production.

    5. Creating Custom LUTs in DaVinci Resolve

    Modern color grading software like DaVinci Resolve or nuke provides powerful tools for creating custom LUTs. The process involves several steps:

    1. Setting Up a Proper Test Environment: Selecting reference footage that matches the final shooting material.
    2. Applying a Technical Color Transformation: Performing a neutral color correction to convert the footage from Log or RAW into a usable color spectrum.
    3. Applying Creative Adjustments: Modifying hue, contrast, and saturation to achieve the desired aesthetic.
    4. Exporting the LUT: Saving the color transformation as a .cube file for use in various projects.
    5. Testing & Refining: The LUT should be tested with different shots and lighting conditions and adjusted as needed.

    6. Conclusion

    A professional colorist should not rely solely on pre-made LUTs but should develop their own to ensure maximum creative control and technical precision. Custom LUTs allow for efficient implementation of desired aesthetics and optimize the workflow. Modern tools like DaVinci Resolve or Nuke offer powerful options for creating and refining LUTs, enabling every colorist to shape and preserve their unique color identity.

    Frame.io. (2020). How and why you should build your own LUTs. https://blog.frame.io/2020/07/27/building-your-own-luts-how-and-why/

    Kroll, N. (2018). How to apply color grading LUTs professionally: My workflow explained. https://noamkroll.com/how-to-apply-color-grading-luts-professionally-my-workflow-explained/

    Deakins, R. (n.d.). LUTs. Roger Deakins Forums. Retrieved March 20, 2025, from https://www.rogerdeakins.com/forums/topic/luts/

    Chat GPT 4.0 was used for a grammar and spell check

    Create your own Scene Referred Negative Emulations

    The process of creating scene-referred negative emulations requires a meticulous approach, combining traditional film stocks, digital cinematography, precise lighting conditions, and advanced post-processing techniques. This post outlines the essential tools, film stocks, and preparation steps necessary for accurate film profiling, which serves as the foundation for creating high-quality emulations. The aim is to develop LUTs (Look-Up Tables) that emulate the characteristics of film negatives, preserving their unique response to color and light.

    1. Film Stocks

    To establish a reliable baseline for negative emulations, it is essential to test and profile various film stocks. Luckily a few people already did all the Preparation Parts. I will use scanned film from Nico Fink, an Austrian colourist. He uses the following film stocks for profiling:

    • Kodak 200T (5213) 35mm Motion Picture Film
    • Kodak 500T (5219) 35mm Motion Picture Film
    • Kodak Porta 400 35mm Photo Film
    • Fuji Superia X-Tra 400
    • Silbersalz35 Kodak 50D, 250D, 500T & 200T Motion Picture Film (respooled for stills)
    • Silbersalz35 Fujifilm Vivid 500T Motion Picture Film (respooled for stills)
    • Rollei VarioChrome (Special Edition)
    • Agfa (expired 1979)

    Some additional Stocks are tested as well, including Kodak 250D (5203), Kodak 50D (5207), Cinestill 800T, Fuji Provia 100, Fuji Velvia 100, Kodak Ektachrome E100, and Kodak Gold 200.

    2. Digital Cameras for Profiling

    He achieved comprehensive digital profiling, through a selection of high-end cinema cameras. These cameras are chosen based on their sensor characteristics, color science, and dynamic range:

    • ARRI Alexa Mini
    • RED Helium (initial test camera)
    • SONY FX9
    • Blackmagic Design Pocket 4K or 6K

    Additional cameras, such as the RED Komodo, SONY VENICE, and Blackmagic Design URSAmini 4.6K G2, are also included depending on the project requirements.

    3. Test Charts

    Accurate scene-referred profiling requires precise test charts. These where used to calibrate color response and exposure latitude.

    • X-Rite Digital SG
    • Kodak Grey & White Card R-27
    • Kodak Color Separation Guide & Gray Scale

    Test Charts ©https://www.kodak.com/en/motion/page/color-separation-guides-and-gray-scales

    4. Lighting & Grip Equipment

    Lighting consistency is crucial to ensure reproducibility across tests. An LED light source with accurate color rendition was used:

    • Litepanels Gemini 2×1 RGBWW (chosen for its precision and ability to produce a wide color gamut)
    • Sekonic L758-Cine Light Meter (to ensure precise exposure control)
    • Photo table covered with 18% grey paper (for controlled reflections)
    • Film slate with exposure and white balance information (for accurate documentation)

    5. Scanning & Film Lab Processing

    Scanning is a critical step in film profiling, ensuring high-fidelity digital captures of negatives.

    • Foto Leutner, Vienna (stills scanning)
    • Focus Film Lab, Stockholm (motion picture film processing)
    • Silbersalz35 (providing film processing and scanning using a Cintel Scanner)
    • Scanity 4K Scanner (for high-quality motion picture film scans)

    Scanity 4K Scanner (Pic Credit: ©https://www.focusfilm.se/about)

    6. Software Tools

    To achieve accurate film emulation, a combination of software tools was used for color matching and LUT generation:

    • Blackmagic Design DaVinci Resolve (primary color grading and LUT application)
    • The Foundry Nuke (for precise curve creation and LUT extraction)
    • Adobe Camera RAW (for stills conversion)

    7. Workflow Overview

    The workflow for scene-referred negative emulation consists of multiple controlled steps:

    Conclusion

    1. Capture test charts under controlled lighting conditions at 5600K and 3200K with a digital camera, exposing from -5 to +5 EV in 1-stop increments.
    2. Expose the same test charts under identical conditions using film stocks.
    3. Develop and scan negatives, ensuring high consistency in digital files.
    4. Align digital and scanned film images in Nuke, adjusting for white balance and exposure.
    5. Create a 1D LUT using grayscale steps for R, G, and B channels.
    6. Use Resolve for color matching, refining the LUT with its built-in tools.
      • Alternative: Implement Tetrahedral 3D Interpolation via Blink Script for improved color accuracy.
    7. Apply additional filmic effects, such as halation, grain, and gate weave, to enhance realism.

    These Are the steps one one would have to make, to get an accurate result. It is very expensive and time consuming and there are so many complicated steps that can alter the result in a good and bad way. Luckily Nico Fink provides his scans for little price on his website. This saves a lot of time and the preparations are done by a professional. Now the digital Part starts. Embark with me on a technical journey on how to profile filmstock. We will try and Profile the EastmanEXR100T and 200T Filmstock.

    DeMystify Colorgrading. (n.d.). Film Profile Journey: 02 – Tools, Films & (first) Preparations. DeMystify Colorgrading. Abgerufen am 20. März 2025, von https://www.demystify-color.com/post/film-profile-journey-02-tools-films-first-preparations

    The Cinematic Footprint

    In a world increasingly attuned to environmental concerns, media consumption often escapes critical scrutiny regarding its ecological footprint. Nadia Bozak’s book, The Cinematic Footprint: Lights, Camera, Natural Resources, bridges this gap by investigating the film industry’s dependence on natural resources and its environmental ramifications. This blog post explores the core themes of Bozak’s work, shedding light on the hidden environmental costs of cinematic production and consumption.

    The Hydrocarbon Imagination: Cinema’s Fossil Fuel Dependency

    Bozak introduces the concept of the hydrocarbon imagination, a framework that underscores cinema’s reliance on fossil fuels. From celluloid film production, which traditionally used petroleum-based materials, to the energy-intensive processes of digital streaming, Bozak reveals how deeply embedded fossil fuels are in the creation and delivery of moving images. She argues that cinema, much like industrial society, has evolved in tandem with the exploitation of hydrocarbons, making the medium an unintentional yet significant contributor to environmental degradation.

    Materiality of the Moving Image: A Hidden Environmental Cost

    The romanticized notion of film as an ephemeral art form often obscures its material underpinnings. Bozak meticulously dissects the physical components involved in filmmaking—from raw materials used in celluloid and digital hardware to the energy expended during production, distribution, and exhibition. Through historical analysis, she illustrates how even the shift to digital technology has not absolved the industry of ecological impact; instead, it has merely transferred resource consumption to data centers and electronic waste streams.

    Cinematic Case Studies: Filmmakers Engaging with Environmental Themes

    Bozak anchors her arguments through case studies of filmmakers who consciously address environmental concerns. Directors like Dziga Vertov, Chris Marker, and James Benning emerge as pioneers who not only explore ecological themes but also experiment with sustainable practices in their craft. For instance, Benning’s minimalist aesthetic in landscape films showcases nature’s fragility, encouraging audiences to reflect on their environmental responsibilities.

    Digital Media: An Illusion of Greener Alternatives?

    The transition from analog to digital has often been touted as an eco-friendly evolution. Bozak challenges this assumption by highlighting the substantial energy consumption associated with streaming services and data storage. She cites the extensive carbon footprint of server farms, which are essential for cloud-based platforms like Netflix and YouTube. This digital infrastructure, she argues, perpetuates a cycle of energy consumption that remains largely invisible to end users.

    Reimagining Cinema: Toward Sustainable Media Practices

    Bozak concludes with a call for more sustainable practices within the film industry. She advocates for increased transparency regarding the environmental costs of media consumption and encourages filmmakers to adopt eco-conscious production methods. From reducing location shoot emissions to embracing renewable energy sources for data storage, Bozak outlines practical steps that can mitigate cinema’s environmental impact.

    Final Reflections: A Call for Awareness and Action

    The Cinematic Footprint serves as a wake-up call for both industry professionals and media consumers. Bozak’s interdisciplinary approach, blending film theory with environmental science, reveals the intricate connections between cultural production and ecological exploitation. As audiences continue to engage with media across diverse platforms, the book underscores the importance of recognizing the environmental price tag attached to our screen-centric lifestyles.

    In essence, Bozak’s work challenges us to rethink our relationship with cinema—not just as an art form, but as a resource-intensive industry with tangible environmental consequences. By fostering greater awareness and encouraging innovative, sustainable practices, the film industry can evolve toward a greener, more responsible future.

    Source:

    Bozak, N. (2012). The Cinematic Footprint: Lights, Camera, Natural Resources. Rutgers University Press.

    Welche Leute braucht ein Typisches Filmset als eigentlich?

    Filmsets sind faszinierende Mikrokosmen von Zusammenarbeit und Effizienz. Jeder Film, egal ob Blockbuster oder Indie-Projekt, ist das Ergebnis eines hochspezialisierten und straff organisierten Teams. Aber was braucht es wirklich an Positionen und Abläufen, um ein Filmset am Laufen zu halten? Diese Frage lässt sich anhand der Ergebnisse aus dem Dokument „That’s A Wrap!“ sowie der gängigen Praxis in der Filmindustrie beantworten.


    Minimalbesetzung: Die grundlegenden Positionen

    Ein erfolgreiches Filmset benötigt eine klar definierte Hierarchie und Arbeitsverteilung. Folgende Schlüsselpositionen gelten als unverzichtbar:

    1. Regisseur – Die kreative Führungskraft, die die Vision des Films steuert.
    2. Kameraabteilung:
      • Kameramann/-frau (Director of Photography, DoP) – Verantwortlich für die visuelle Umsetzung.
      • Kameraassistent/-in – Zuständig für die technische Unterstützung und Fokussierung.
    3. Tonabteilung:
      • Tonmeister/-in – Verantwortlich für die Tonaufnahme am Set.
    4. Licht- und Grip-Team:
      • Beleuchter/-in (Gaffer) – Kontrolliert die Lichtgestaltung.
      • Grip – Zuständig für das Handling von Kamerabewegungen und Aufbau.
    5. Regieassistenz (AD) – Koordiniert das Set und sorgt für die Einhaltung des Drehplans.
    6. Skriptbetreuung – Überwacht die Kontinuität und Protokollführung.
    7. Produktionsteam:
      • Produktionsleiter/-in – Überwacht das Budget und die Logistik.
      • Set-Runner – Unterstützt bei allen organisatorischen Aufgaben.

    Effiziente Abläufe: Was macht ein Filmset effektiv?

    Laut der Untersuchung von Lisa C. Cook gibt es mehrere grundlegende Prinzipien, die den Erfolg eines Filmsets ausmachen:

    1. Ergebnisorientierung – Filmcrews sind bekannt für ihren Fokus auf Resultate. Der Drehplan ist das Herzstück, und jede Abweichung bedeutet Zeit- und Kostenverlust.
    2. Klare Hierarchie – Wie in einer militärischen Struktur weiß jede Person genau, was ihre Aufgabe ist und wer die Entscheidungsträger sind. Die Hierarchie wir immer im Call-Sheet angegeben.
    3. Flexibilität und Problemlösung – Filmsets erfordern ständige Anpassung an unerwartete Herausforderungen, z. B. Wetter oder technische Probleme.
    4. Pragmatischer Ansatz – Protokolle und Regeln sind wichtig, aber das Ziel, „den Tag zu schaffen“, hat höchste Priorität.

    Die Balance zwischen Minimierung und Qualität

    Minimalistische Filmsets können erstaunliche Ergebnisse liefern, wenn die richtigen Leute und eine effiziente Organisation vorhanden sind. Allerdings erfordert dies von allen Beteiligten ein hohes Maß an Fachwissen, Disziplin und die Fähigkeit zur Zusammenarbeit. Ein „Minimalteam“ kann unter den richtigen Bedingungen genauso effektiv sein wie größere Crews.

    Für kleinere Produktionen oder Low-Budget-Filme können diese Grundlagen als Leitfaden dienen, um mit minimalem Aufwand maximale Wirkung zu erzielen.

    Quellen:

    Cook, L. C. (2012). That’s a wrap! The organizational culture and characteristics of successful film crews (Master’s Thesis). University of Central Florida. Abgerufen von https://stars.library.ucf.edu/etd/2113

    SetHero. (n.d.). Ultimate film crew positions breakdown + infographic. SetHero. Abgerufen am 25. Januar 2025, von https://sethero.com/blog/film-crew-positions-breakdown-guide-with-infographic/

    Die Rolle digitaler Technik und kleiner Kameras in der heutigen Filmproduktion

    Da sich nicht nur die Lichttechnik, sondern auch die Kameratechnik ändert, erklärt dieser Blogpost den Unterschied zischen Analog und digitalfilm. Die Landschaft der Filmproduktion hat sich mit der Einführung digitaler Technik und kompakter Kameras grundlegend verändert. Während analoger Film weiterhin durch seine einzigartige Ästhetik besticht, dominieren die Effizienz, Flexibilität und Kostenvorteile digitaler Lösungen zunehmend die moderne Filmlandschaft. Ein herausragendes Beispiel ist der Film The Creator, bei dem innovative Technologien und die Nutzung der Sony FX3 die Möglichkeiten des Kinos neu definieren.


    Digitale Technik: Zeitersparnis am Set

    Ein zentraler Vorteil der digitalen Filmproduktion liegt in der erheblichen Zeitersparnis während der Dreharbeiten. Mit sofortiger Wiedergabe können Regisseure Szenen direkt überprüfen und so Fehler und unnötige Nachdrehs minimieren. Kompakte digitale Kameras wie die Sony FX3, die in The Creator zum Einsatz kam, ermöglichen zudem schnelle Setups und eine größere Mobilität. Diese Kameras sind leicht, tragbar und bieten Funktionen, die früher größeren und schwereren Filmkameras vorbehalten waren.

    Darüber hinaus eliminieren digitale Workflows zeitaufwändige Prozesse wie die Filmentwicklung. Wie im Buch Digital Cinematography: Fundamentals, Tools, Techniques, and Workflows von David Stump hervorgehoben wird, optimieren digitale Formate die Postproduktion durch nahtlose Integration in Schnitt- und Farbkorrektursoftware. Dies erlaubt es Filmemachern, sich auf ihre kreative Vision zu konzentrieren und gleichzeitig enge Produktionszeitpläne einzuhalten.


    Kompakte Kameras in Aktion: Das Beispiel The Creator

    The Creator zeigt eindrucksvoll, wie kompakte digitale Kameras die moderne Filmproduktion bereichern. Gedreht mit der Sony FX3, verdeutlicht der Film, wie kleine und vielseitige Kameras beeindruckende visuelle Ergebnisse liefern können. Die FX3 überzeugt durch fortschrittlichen Autofokus, einen hohen Dynamikbereich und eine hervorragende Videoauflösung, was es dem Produktionsteam ermöglichte, dynamische Szenen auch unter schwierigen Bedingungen zu drehen. Durch die geringe Größe der Kamera konnten zudem einzigartige Perspektiven eingefangen werden, die mit herkömmlichen, sperrigen Setups nicht möglich gewesen wären. Auch das Reisen zu den Drehorten wurde dadurch um ein vielfaches erleichtert.

    Auch die finanziellen Vorteile kompakter Kameras sind nicht zu unterschätzen. Produktionen können mit einem kleineren Team arbeiten, was die Gesamtkosten reduziert, ohne an Qualität einzubüßen. Die FX3 ist zudem weitaus erschwinglicher als traditionelle Filmkameras, was sowohl Indie-Filmemachern als auch großen Studios zugutekommt.


    Der zeitlose Reiz des analogen Films

    Trotz des Aufstiegs digitaler Technik hat analoger Film nach wie vor seine Daseinsberechtigung. Seine unverwechselbare Ästhetik – geprägt von satten Farben, tiefem Kontrast und nostalgischem Korn – bleibt einzigartig und schwer von digitalen Formaten nachzuahmen. Die Textur analoger Filme verleiht vor allem Projekten, die eine zeitlose oder künstlerische Note erfordern, einen besonderen Charme.

    Das größte “Problem” beim Analogenfilm ist Zeitaufwand und der Preis. Ein 65mm Film (sehr Hochqualitativer Film) hat bei einer Länge von 304m und 25fps, eine Laufzeit von 8:32 Minuten. Dies Kostet dann 1430, 64€ nach jetzigem Preis. (https://www.kodak.com/content/products-brochures/Film/Kodak-Motion-Picture-Products-Price-Catalog-EAMER.pdf) Also auf Länge eines Spielfilms, OHNE den 15 Takes die während dem Dreh passieren, also nur die länge des durchschnittlichen Spielfilms, wären das allein 14.304,4€. Wenn man dies nun in Takes beim Dreh rechnet sind dass locker über 1 Million Euro, allein für Materialkosten. Dabei wurden die Entwicklung und Scan kosten noch nicht einmal eingerechnet. Im Vergleich: eine Digitale Speicherkarte (Cfast 2.0) kostet mit 1tb Speicherplatz ca. 650€. (https://www.calumetphoto.de/product/angelbird-av-pro-cf-1tb-cfast-2-0/angavp1tbcf?utm_source=google&utm_medium=cpc&utm_campaign=pmax_shopping_outofstock_new_at-ch_cal&utm_id=18898488380&gad_source=1&gclid=CjwKCAiAkc28BhB0EiwAM001TTQVGy0e1M3k_KWTRRnL1p9gc8ni-zGlrs0empUBcA9L_YGNZstWMhoCtFwQAvD_BwE) Dies bedeutet umgerechnet 1 Stunde Videomaterial in ARRI RAW Open Gate 3,4k. (https://vmedia-digital.translate.goog/memory-card-database/arri-alexa-mini-compatible-memory-cards-recording-times/?_x_tr_sl=en&_x_tr_tl=de&_x_tr_hl=de&_x_tr_pto=sc)


    Die Balance zwischen analog und digital

    Filmemacher müssen heute ihre Optionen sorgfältig abwägen, basierend auf der Geschichte, die sie erzählen möchten, ihrem Budget und den logistischen Anforderungen ihres Projekts. Hybride Workflows gewinnen immer mehr an Bedeutung, da sie die Direktheit digitaler Technik mit der unübertroffenen Qualität von Analogfilm verbinden.

    Filme wie The Creator zeigen, wie kompakte digitale Kameras die kreativen Möglichkeiten erweitern, während der analoge Film in bestimmten Projekten weiterhin seine Relevanz beweist. Mit dem ständigen technologischen Fortschritt liegt die Zukunft der Filmproduktion in der Verbindung der besten Eigenschaften beider Welten, um fesselnde visuelle Erzählungen zu schaffen.


    Durch die Kombination moderner digitaler Technik mit der bewährten Qualität des analogen Films haben Filmemacher Zugriff auf ein beeindruckendes Toolkit, das sicherstellt, dass das Kino weiterhin innovativ und inspirierend bleibt. So bleibt am Ende immer die Entscheidung, welches Material ich für mein Projekt brauche und was Sinn macht zu benutzen.

    Quellen:

    Stump, D. (2022). Digital Cinematography: Fundamentals, Tools, Techniques, and Workflows (2. Auflage). Routledge. ISBN: 978-0-429-46885-8.

    Daisie. (n.d.). Analog vs digital film: Understanding the pros and cons. Abgerufen am 24. Januar 2025, von https://blog.daisie.com/analog-vs-digital-film-understanding-the-pros-and-cons/

    Eastman Kodak Company. (n.d.). Kodak Motion Picture Products Price Catalog EAMER. Abgerufen am 24. Januar 2025, von https://www.kodak.com/content/products-brochures/Film/Kodak-Motion-Picture-Products-Price-Catalog-EAMER.pdf

    VMedia Digital. (n.d.). ARRI Alexa Mini kompatible Speicherkarten und Aufnahmezeiten. Abgerufen am 24. Januar 2025, von https://vmedia-digital.translate.goog/memory-card-database/arri-alexa-mini-compatible-memory-cards-recording-times/

    Tieferer technischer Einblick in LED vs HMI vs Halogen Lichter

    Dieser Blogpost soll einen noch genaueren und technischeren Einblick hinter Beleuchtungstechnik geben. Hier werden die 3 Hauptbeleuchtungsarten nochmal analysiert


    1. Einführung in LED-, Halogen- und HMI-Beleuchtung

    Halogenlampen

    Halogenlampen arbeiten, indem sie einen Wolframfaden erhitzen, der in einem Inertgas eingeschlossen ist, wodurch ein helles Licht mit kontinuierlichem Spektrum erzeugt wird. Diese Technologie wird für ihre hervorragende Farbwiedergabe geschätzt, mit einem Farbwiedergabeindex (CRI) von 100. Halogenlampen sind jedoch energieineffizient und wandeln bis zu 80 % ihrer Energie in Wärme um, wodurch Sets unangenehm warm werden und zusätzliche Kühlung erforderlich ist.

    LED-Beleuchtung

    Leuchtdioden (LEDs) basieren auf Halbleitertechnologie und werden als “Festkörperbeleuchtung” eingestuft. LEDs sind deutlich energieeffizienter als Halogenlampen und bieten bis zu 132 Lumen pro Watt im Vergleich zu 25 Lumen pro Watt bei Halogenlampen. Darüber hinaus sind LEDs langlebiger. Allerdings haben sie Herausforderungen bei der konsistenten Farbqualität, insbesondere bei Hauttönen, aufgrund ihres diskontinuierlichen Spektraloutputs.

    HMI-Lampen

    HMI (Hydrargyrum Medium-Arc Iodide)-Lampen sind gasgefüllte Entladungslampen, die durch einen Lichtbogen zwischen zwei Elektroden ein intensives, tageslichtähnliches Licht erzeugen. Sie zeichnen sich durch eine hohe Lichtausbeute und Farbtreue aus, was sie ideal für Außenaufnahmen und große Sets macht. Beispielsweise kann ein einzelnes ARRI M18 HMI-Licht eine Lichtleistung liefern, die der von zehn LED-Panels entspricht. HMI-Lampen sind jedoch groß, benötigen Ballastgeräte und erzeugen erhebliche Wärme, was sie weniger energieeffizient macht.


    2. Vergleich der Leistungsmetriken

    Energieeffizienz und Wärmemanagement

    • LEDs: Sehr energieeffizient und produzieren minimale Wärme, was den Bedarf an Kühlung am Set reduziert.
    • Halogenlampen: Hoher Energieverbrauch mit erheblicher Wärmeabgabe, was die Betriebskosten erhöht.
    • HMI-Lampen: Höhere Lichtausbeute als Halogenlampen, jedoch mit ähnlich hoher Wärmeentwicklung und Energieverbrauch.

    Farbwiedergabe

    • Halogenlampen: Bieten eine unvergleichliche Farbgenauigkeit mit einem CRI von 100, was sie ideal für die Darstellung natürlicher Hauttöne macht.
    • LEDs: CRI liegt typischerweise bei etwa 80. Während Fortschritte wie die Remote-Phosphor-Technologie die Farbkonstanz verbessern, haben LEDs weiterhin Schwierigkeiten bei der genauen Darstellung von Hauttönen.
    • HMI-Lampen: Haben typischerweise einen CRI von 90 bis 95 und liefern eine hervorragende Farbwiedergabe, insbesondere bei Tageslichtanwendungen.

    Lichtqualität und Konsistenz

    • Halogenlampen: Erzeugen ein kontinuierliches Spektrum, das dem natürlichen Sonnenlicht ähnelt und die Arbeit am Filmset erleichtert.
    • LEDs: Mit ihren schmalen Spektralspitzen erfordern sie fortschrittliche Farbkorrekturwerkzeuge und zusätzliche Zubehörteile wie Sync-Boxen, um Flimmern und Grünstiche zu reduzieren.
    • HMI-Lampen: Bieten eine intensive Lichtausgabe mit einer großen Reichweite, sind jedoch aufgrund ihrer Größe und Wärmeentwicklung weniger flexibel als LEDs.

    Im Folgenden Video wird ein Vergleich von HMI und LED Lichter auf der menschlichen Haut gezeigt. Wie in der Abbildung zu sehen ist wirkt das LED Licht (Godox) grüner und ein bisschen wärmer im Gegensatz zum HMI Licht.

    Das ist die Paradendarstellung des HMI Lichts. Wie zu sehen ist, ist ein bisschen mehr Blau im Bild als Rot und Grün.

    Das LED ist sehr Ausgeglichen, außer in den Mitteltönen ist ein bisschen mehr Grün.
    Dies ist alles mit simplen Farbkorrekturen zu korrigieren und ist kein großes Problem. Es ändert im Grunde nur den Look am Set. Dies kann zum Problem werden wenn Kunde oder Regisseur sich nicht gut mit Post Produktion auskennen und bereits ein perfektes Bild am Set brauchen.


    3. Fortschritte in der LED-Technologie

    Remote-Phosphor-Technologie

    Die Remote-Phosphor-Technologie verbessert die Farbkonstanz von LEDs, indem die Phosphorschicht von der LED-Lichtquelle entfernt wird. Dies erzeugt eine glattere, gleichmäßigere Lichtausgabe, obwohl das Spektrum weiterhin diskontinuierlich bleibt, was Herausforderungen mit Farbkorrekturfiltern mit sich bringt.

    Moderne Kamerasensoren

    Fortschritte in der Kamerasensortechnologie, wie der 14-Blenden-Dynamikbereich der ARRI Alexa, ermöglichen es Kameraleuten, unter schlechten Lichtbedingungen zu arbeiten. Dies hat die begrenzte Lichtausbreitung von LEDs im Vergleich zu größeren Halogen- und HMI-Lampen teilweise gemildert.


    4. Herausforderungen und Zukunftsaussichten

    Herausforderungen bei LEDs

    • Inkonsistente Farbausgabe zwischen Herstellern.
    • Schwierigkeiten, die “Wärme” und den natürlichen Effekt von Halogen- und HMI-Licht zu replizieren.
    • Flimmerprobleme durch Verzögerungen in leistungsstarken LEDs.

    Branchentrends

    • LEDs dominieren den Low-Budget-Filmmarkt aufgrund ihrer Portabilität und Energieeffizienz. Hochkarätige Filme wie Birdman und Fury haben LEDs für bestimmte Anwendungen genutzt.
    • HMI-Lampen bleiben aufgrund ihrer intensiven Lichtausgabe und ihrer Fähigkeit, Tageslicht zu imitieren, in der High-End-Produktion unverzichtbar.
    • In High-End-Produktionen bleiben Halogenlampen aufgrund ihrer besseren Lichtqualität und Konsistenz unersetzlich.

    Der Bedarf an großen Beleuchtungskörpern

    Trotz Verbesserungen bei LEDs sind sich Branchenexperten einig, dass große Leuchten wie 24K Fresnel oder HMI-Lampen weiterhin für High-End-Produktionen erforderlich sind. LEDs bieten derzeit nicht die notwendige “Leuchtkraft” für umfangreiche Beleuchtungsaufbauten.


    5. Fazit

    Halogenlampen, HMI-Lampen und LEDs haben jeweils ihre Stärken und Schwächen. Während Halogenlampen eine überragende Farbgenauigkeit und eine vertraute Lichtqualität bieten, überzeugen HMI-Lampen mit ihrer intensiven Lichtausbeute für große Sets. LEDs bringen Energieeffizienz, Vielseitigkeit und schnelle technologische Fortschritte mit sich. Die Zukunft wird wahrscheinlich eine Kombination aller Technologien umfassen, wobei LEDs zunehmend dominieren werden, da ihre Leistung weiter verbessert wird.


    Diese kontinuierliche Entwicklung der Beleuchtungstechnologie unterstreicht die Bedeutung, ästhetische Anforderungen mit praktischen Überlegungen in Einklang zu bringen. Sobald LEDs ihre verbleibenden Herausforderungen bewältigen, könnten sie die visuelle Sprache des Kinos neu definieren.

    Weiter Video Empfehlungen:

    Quellen:

    Takhar, A. (2015). Will LED lights displace Tungsten Halogen lights as the dominant technology for both high-end and low-end filmmaking? Birmingham City University. BSc (Hons) Film Production & Technology, Media Technology Project UG3.

    Wu, R. (n.d.). LED vs. HMI: ARRI lighting with Rubidium Wu. AbelCine. Retrieved January 23, 2025, from https://www.abelcine.com/articles/blog-and-knowledge/tutorials-and-guides/led-vs-hmi-arri-lighting-with-rubidium-wu

    Budget einer Kurzfilmproduktion und wie gespart werden kann

    Ein Mittel, schneller und effizienter Shots für einen Film zu sammeln, sind sogenannte „Skeleton Crews“. Diese werden schon seit Jahren in Hollywood eingesetzt, aber meistens als 2nd Unit oder Ergänzungsdrehs. In diesem Blogpost beleuchten wir, wie diese Teams Kosten sparen, produktiv arbeiten und dennoch beeindruckende Ergebnisse liefern. Dabei ziehen wir einen Vergleich zwischen einer herkömmlichen Kurzfilmproduktion und einer Produktion mit Skeleton Crew.


    Kostenaufstellung einer traditionellen Kurzfilmproduktion

    Eine typische Kurzfilmproduktion mit einem Budget von 50.000 Euro könnte wie folgt aufgeteilt sein:

    PositionKostenanteil (traditionelle Produktion)Kosten (€)
    Schauspieler (Hauptrollen)15%7.500
    Regie20%8.000
    Kamerateam15%7.500
    Beleuchtung15%7.500
    Ton8%4.000
    Kostüm & Maske7%3.000
    Drehorte & Setdesign15%7.500
    VFX5%2.500
    Sonstiges (Transport, Catering, etc.)5%2.500
    Gesamtkosten100%50.000

    Diese Kosten basieren auf Schätzungen und der Aufteilung typischer Kurzfilm-Budgets.

    Wie eine Skeleton Crew Kosten spart

    Eine Skeleton Crew – bestehend aus maximal 6–10 Personen – reduziert die Kosten durch effizientere Arbeitsmethoden und den Einsatz moderner Technologien. Gespart wird beim Kamerateam, Beleuchtung, Setdesign und Regie (1st, 2nd AD). Auch bei Transport und Catering wird viel gepart.

    Technologien, die kleine Teams effizienter machen

    1. LED-Beleuchtung und kleiner Kamera Rigs
      Skeleton Crews setzen auf leichte LED-Lichtsysteme und handliche Kamera Rigs
    2. Natürliche Drehorte statt Studioaufnahmen
      Kleine Crews nutzen oft reale Schauplätze, um die Kosten für Studio-Sets zu sparen. Natürliche Schauplätze bieten authentische Ästhetik, ohne aufwendige Konstruktionen
    3. AI-unterstützte VFX und Bearbeitung
      AI schreitet schnell voran und verschnellert Workflows die sonst Tage gedauert haben. Rotoscoping geht nun oft in Minuten, was sonst mehrere Stunden gedauert hat.

    Beispiele von Skeleton Crews wären z.B. nicht die neue Star Wars Serie die Super geflopped ist, sonder wie bereits oft in meinen Blogposts erwähnt, „The Creator“. Auch Teile von Herr der Ringe wurden mit kleiner Crew in den Bergen von Neuseeland gedreht,

    Fazit: Effizienz und Kreativität

    Die Reduzierung der Crewgröße bietet nicht nur eine deutliche Kosteneinsparung, sondern auch Vorteile wie höhere Flexibilität, schnellere Entscheidungsprozesse und eine engere Zusammenarbeit zwischen Teammitgliedern. Wie in meinem vorherigen Blogpost erwähnt, muss dafür eine gute Gruppendynamik herrschen. Für Kurzfilmproduktionen eröffnet dies völlig neue Möglichkeiten. Es können flexiblere Entscheidungen getroffen werden und der Umweltfußabdruck bleibt auch Kleiner.

    Quellen:

    Be a Star Productions. (n.d.). Ein umfassender Guide zu den Kosten einer Filmproduktion. Abgerufen am 20. Januar 2025 von https://www.be-a-star-productions.de/blog/ein-umfassender-guide-zu-den-kosten-einer-filmproduktion

    Kroll, N. (n.d.). Tip of the Day: Making a Skeleton Crew Work for You. Abgerufen am 20. Januar 2025 von https://noamkroll.com/tip-of-the-day-making-a-skeleton-crew-work-for-you/

    Gareth, Franklin (2023). The Creator director talks his film’s budget. Abgerufen am 20. Januar 2025 von https://www.darkhorizons.com/the-creator-director-talks-his-films-budget/